A Maintenance Oriented Podcast For Airplane Owners, Pilots, and Mechanics

Author: Dean Showalter (Page 25 of 26)

012 – Servicing Landing Gear Shock Struts

Note:  After reading this, if you’d like to learn exactly how to service a shock strut with fluid and nitrogen, check out this video training course:

Click here to check out the step-by-step video training course.

February 5, 2016

Servicing landing gear shock struts… can you do it as an airplane owner?

Absolutely!  Just take a look at the list of items in Part 43, Appendix A.

However, MAKE SURE you are familiar with the procedure before you launch into on your own.

Why?  Because servicing landing gear shock struts can be both messy and dangerous, if not done properly.

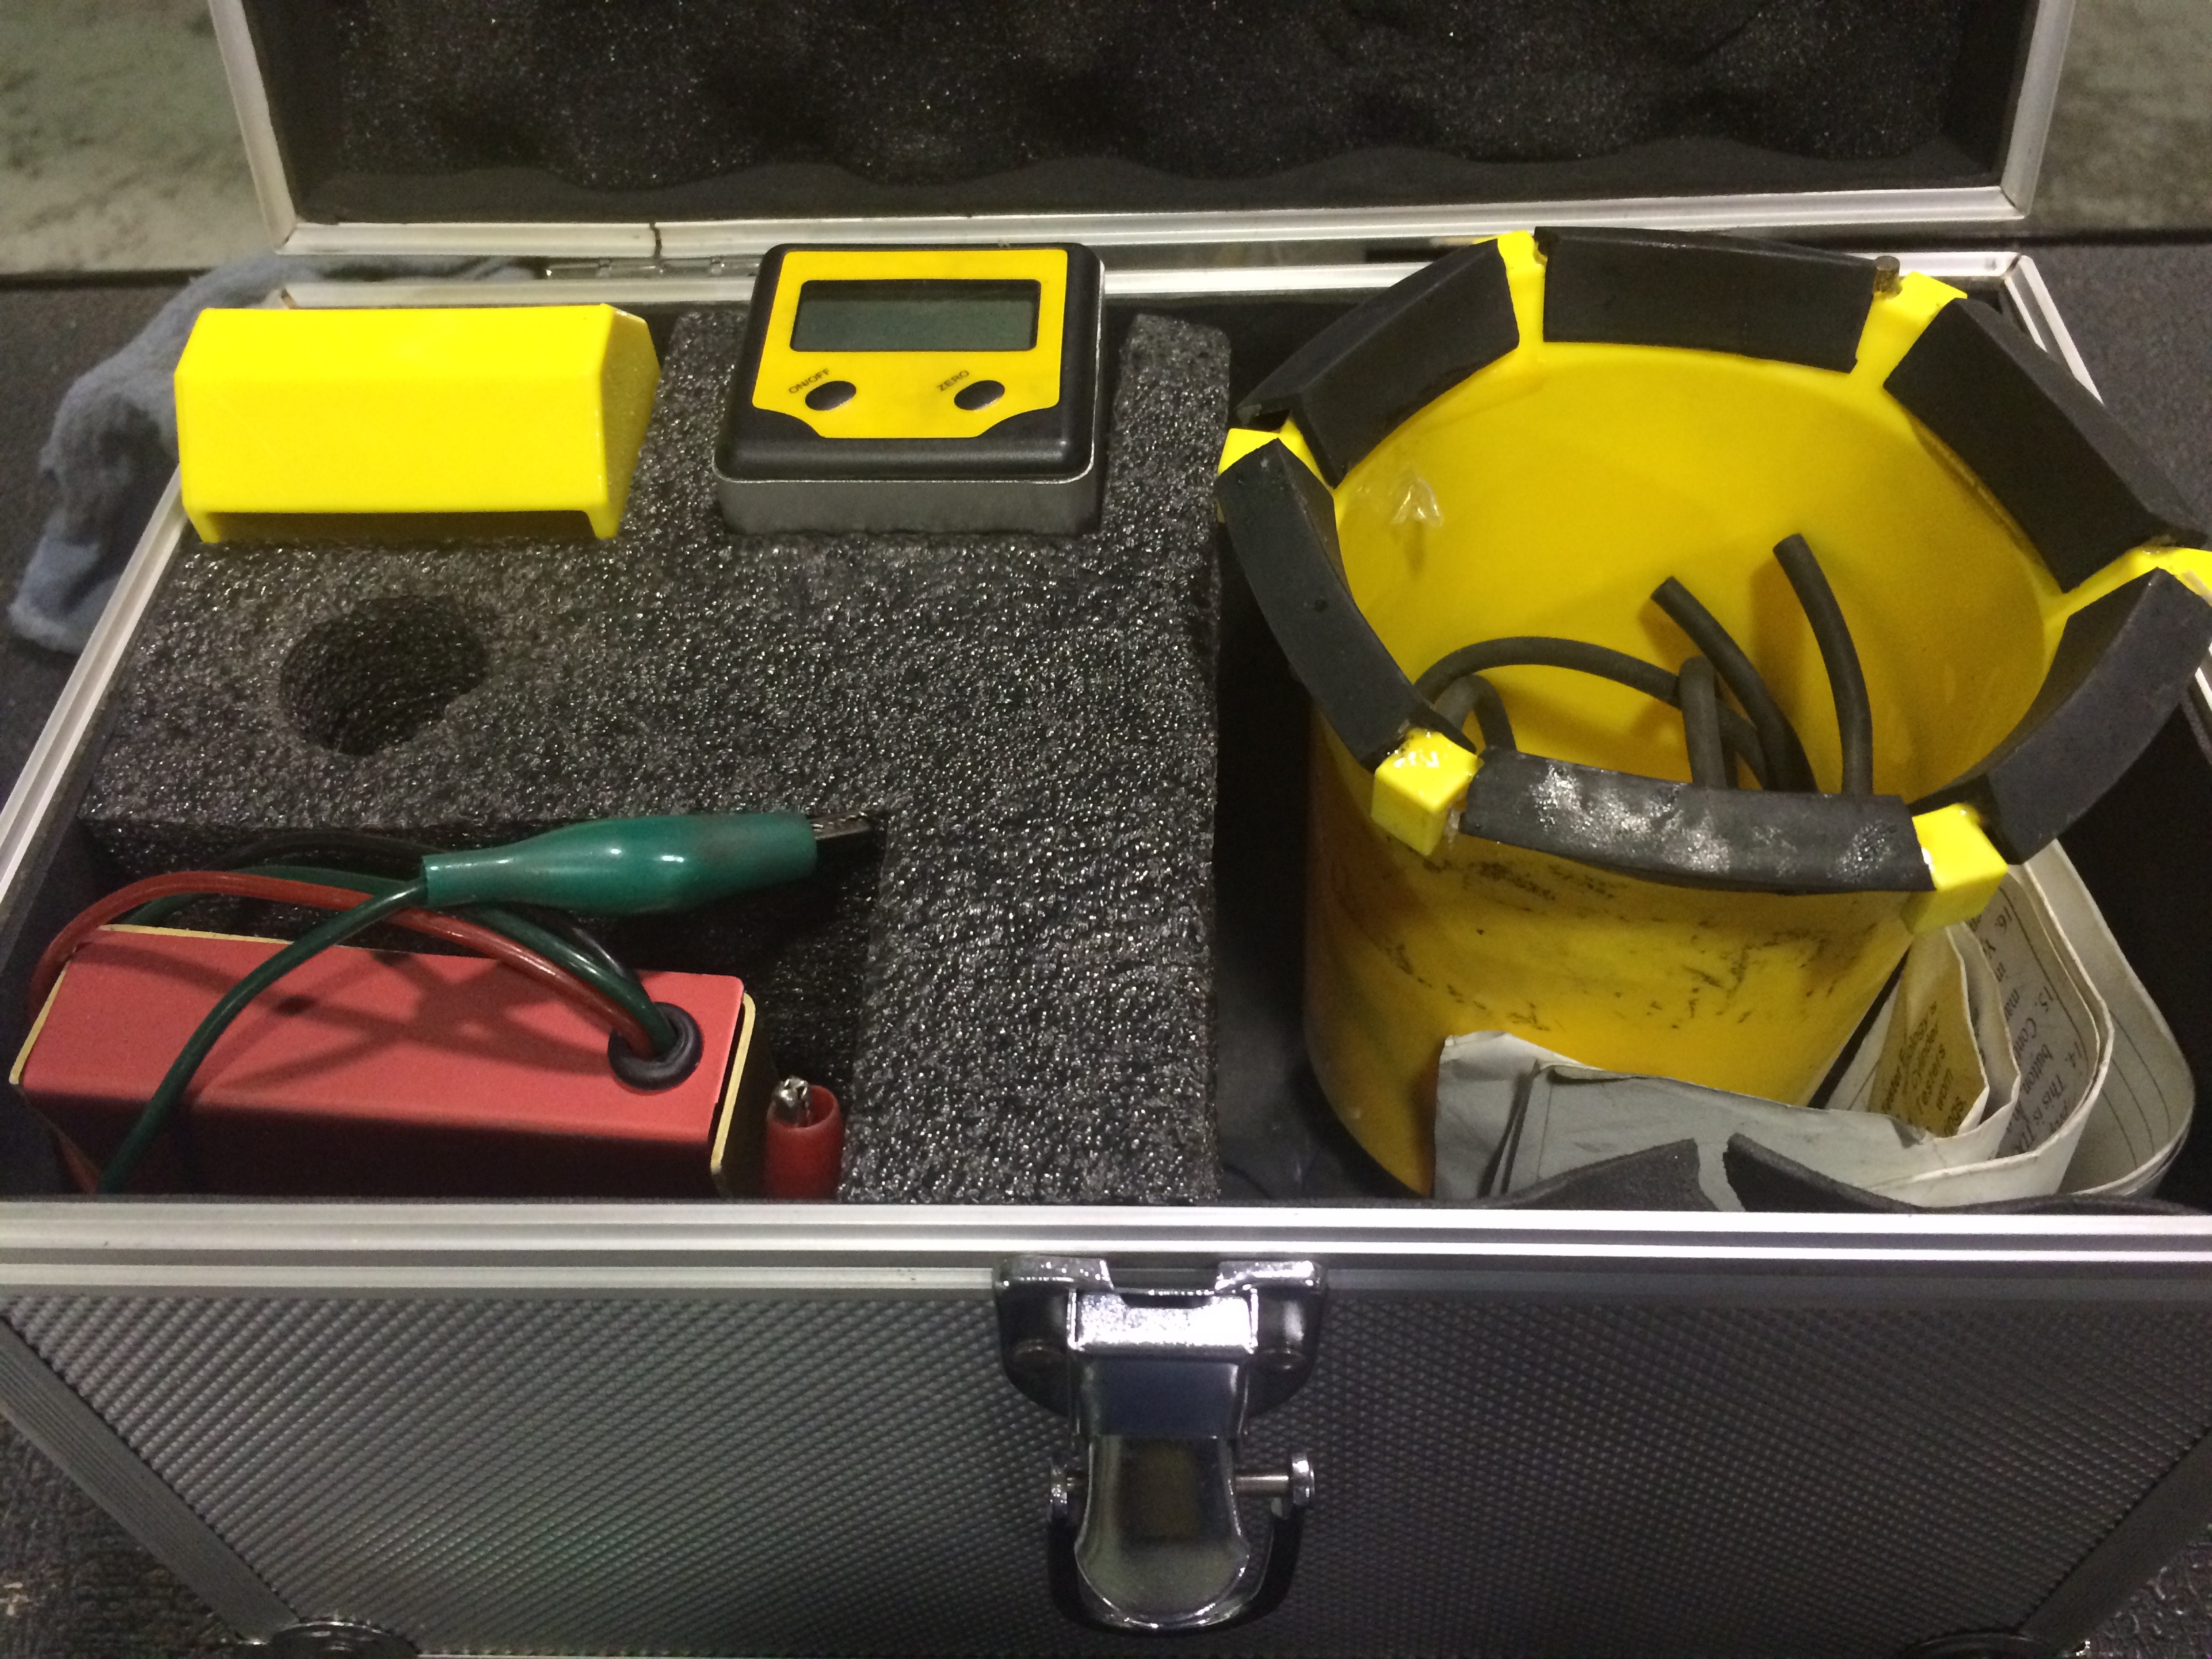
(Both Bogert Aviation and Aircraft Spruce have some cool strut servicing equipment, but it can be a little pricey.)

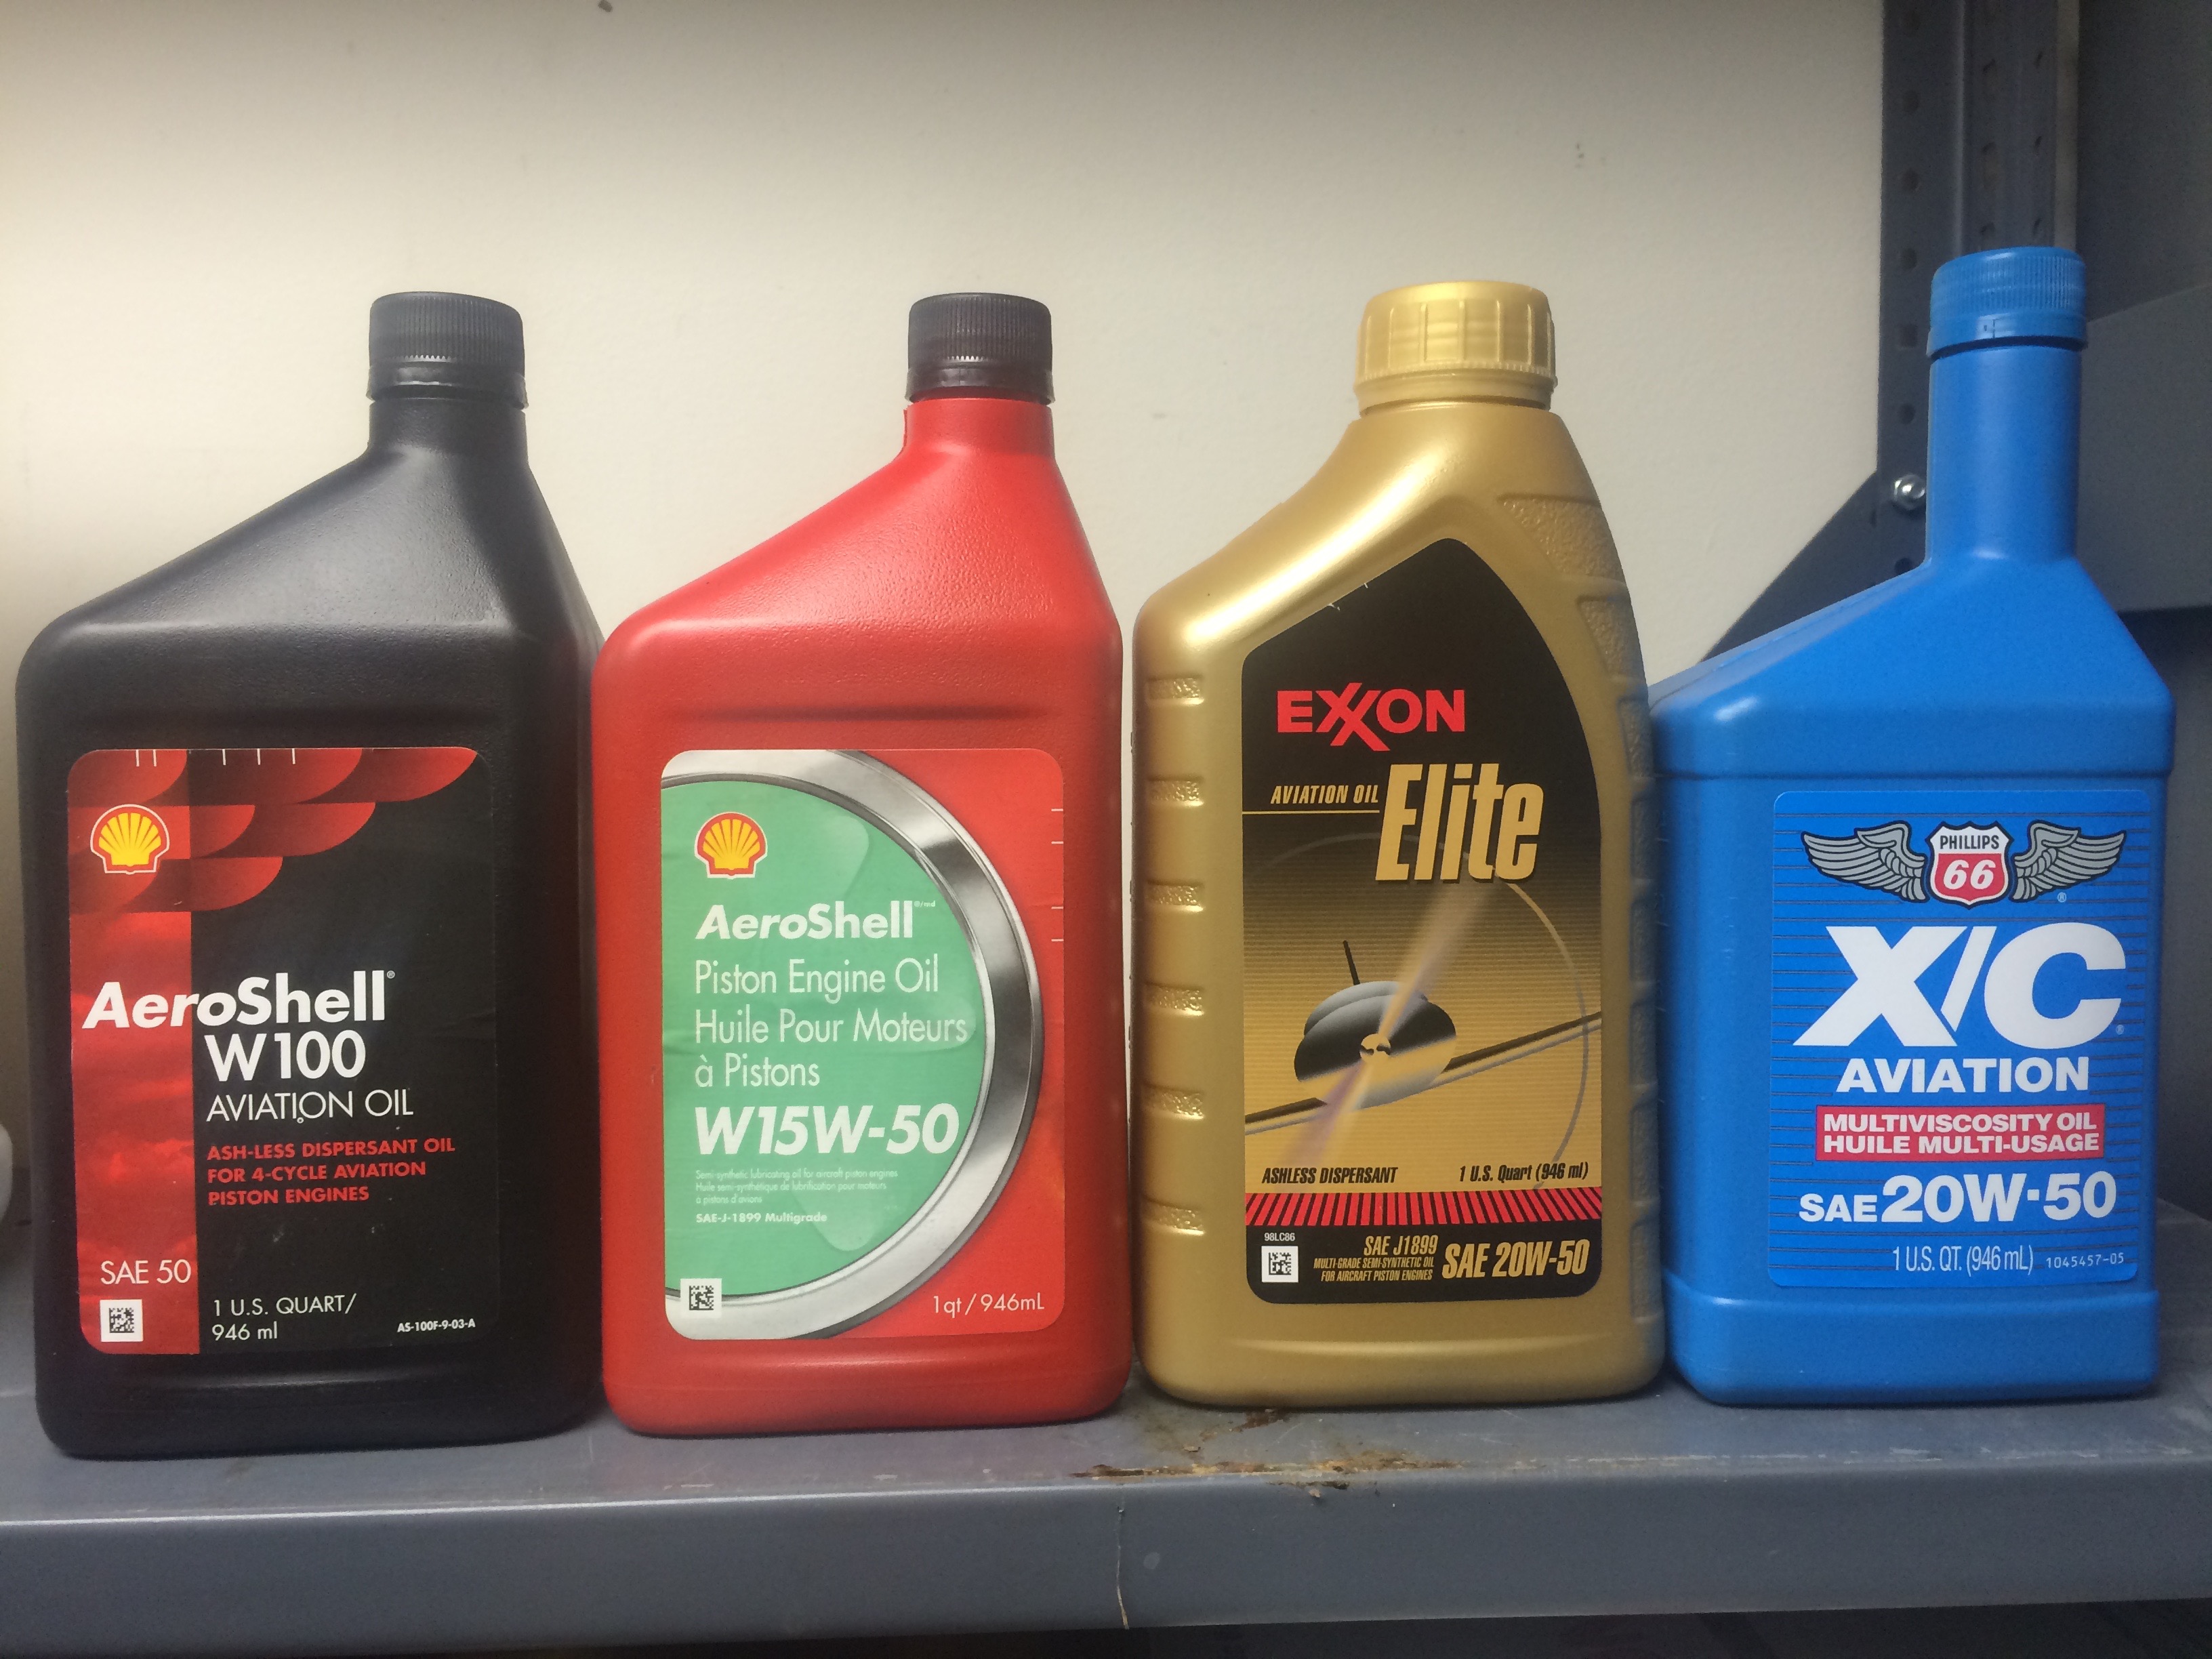
If you want to learn more about an airplane strut, you can go to this link and read an excellent article by Mike Busch, with Savvy Aviator.  I find his articles to be very educational and helpful.

http://www.avweb.com/news/savvyaviator/192153-1.html

IMG_2936

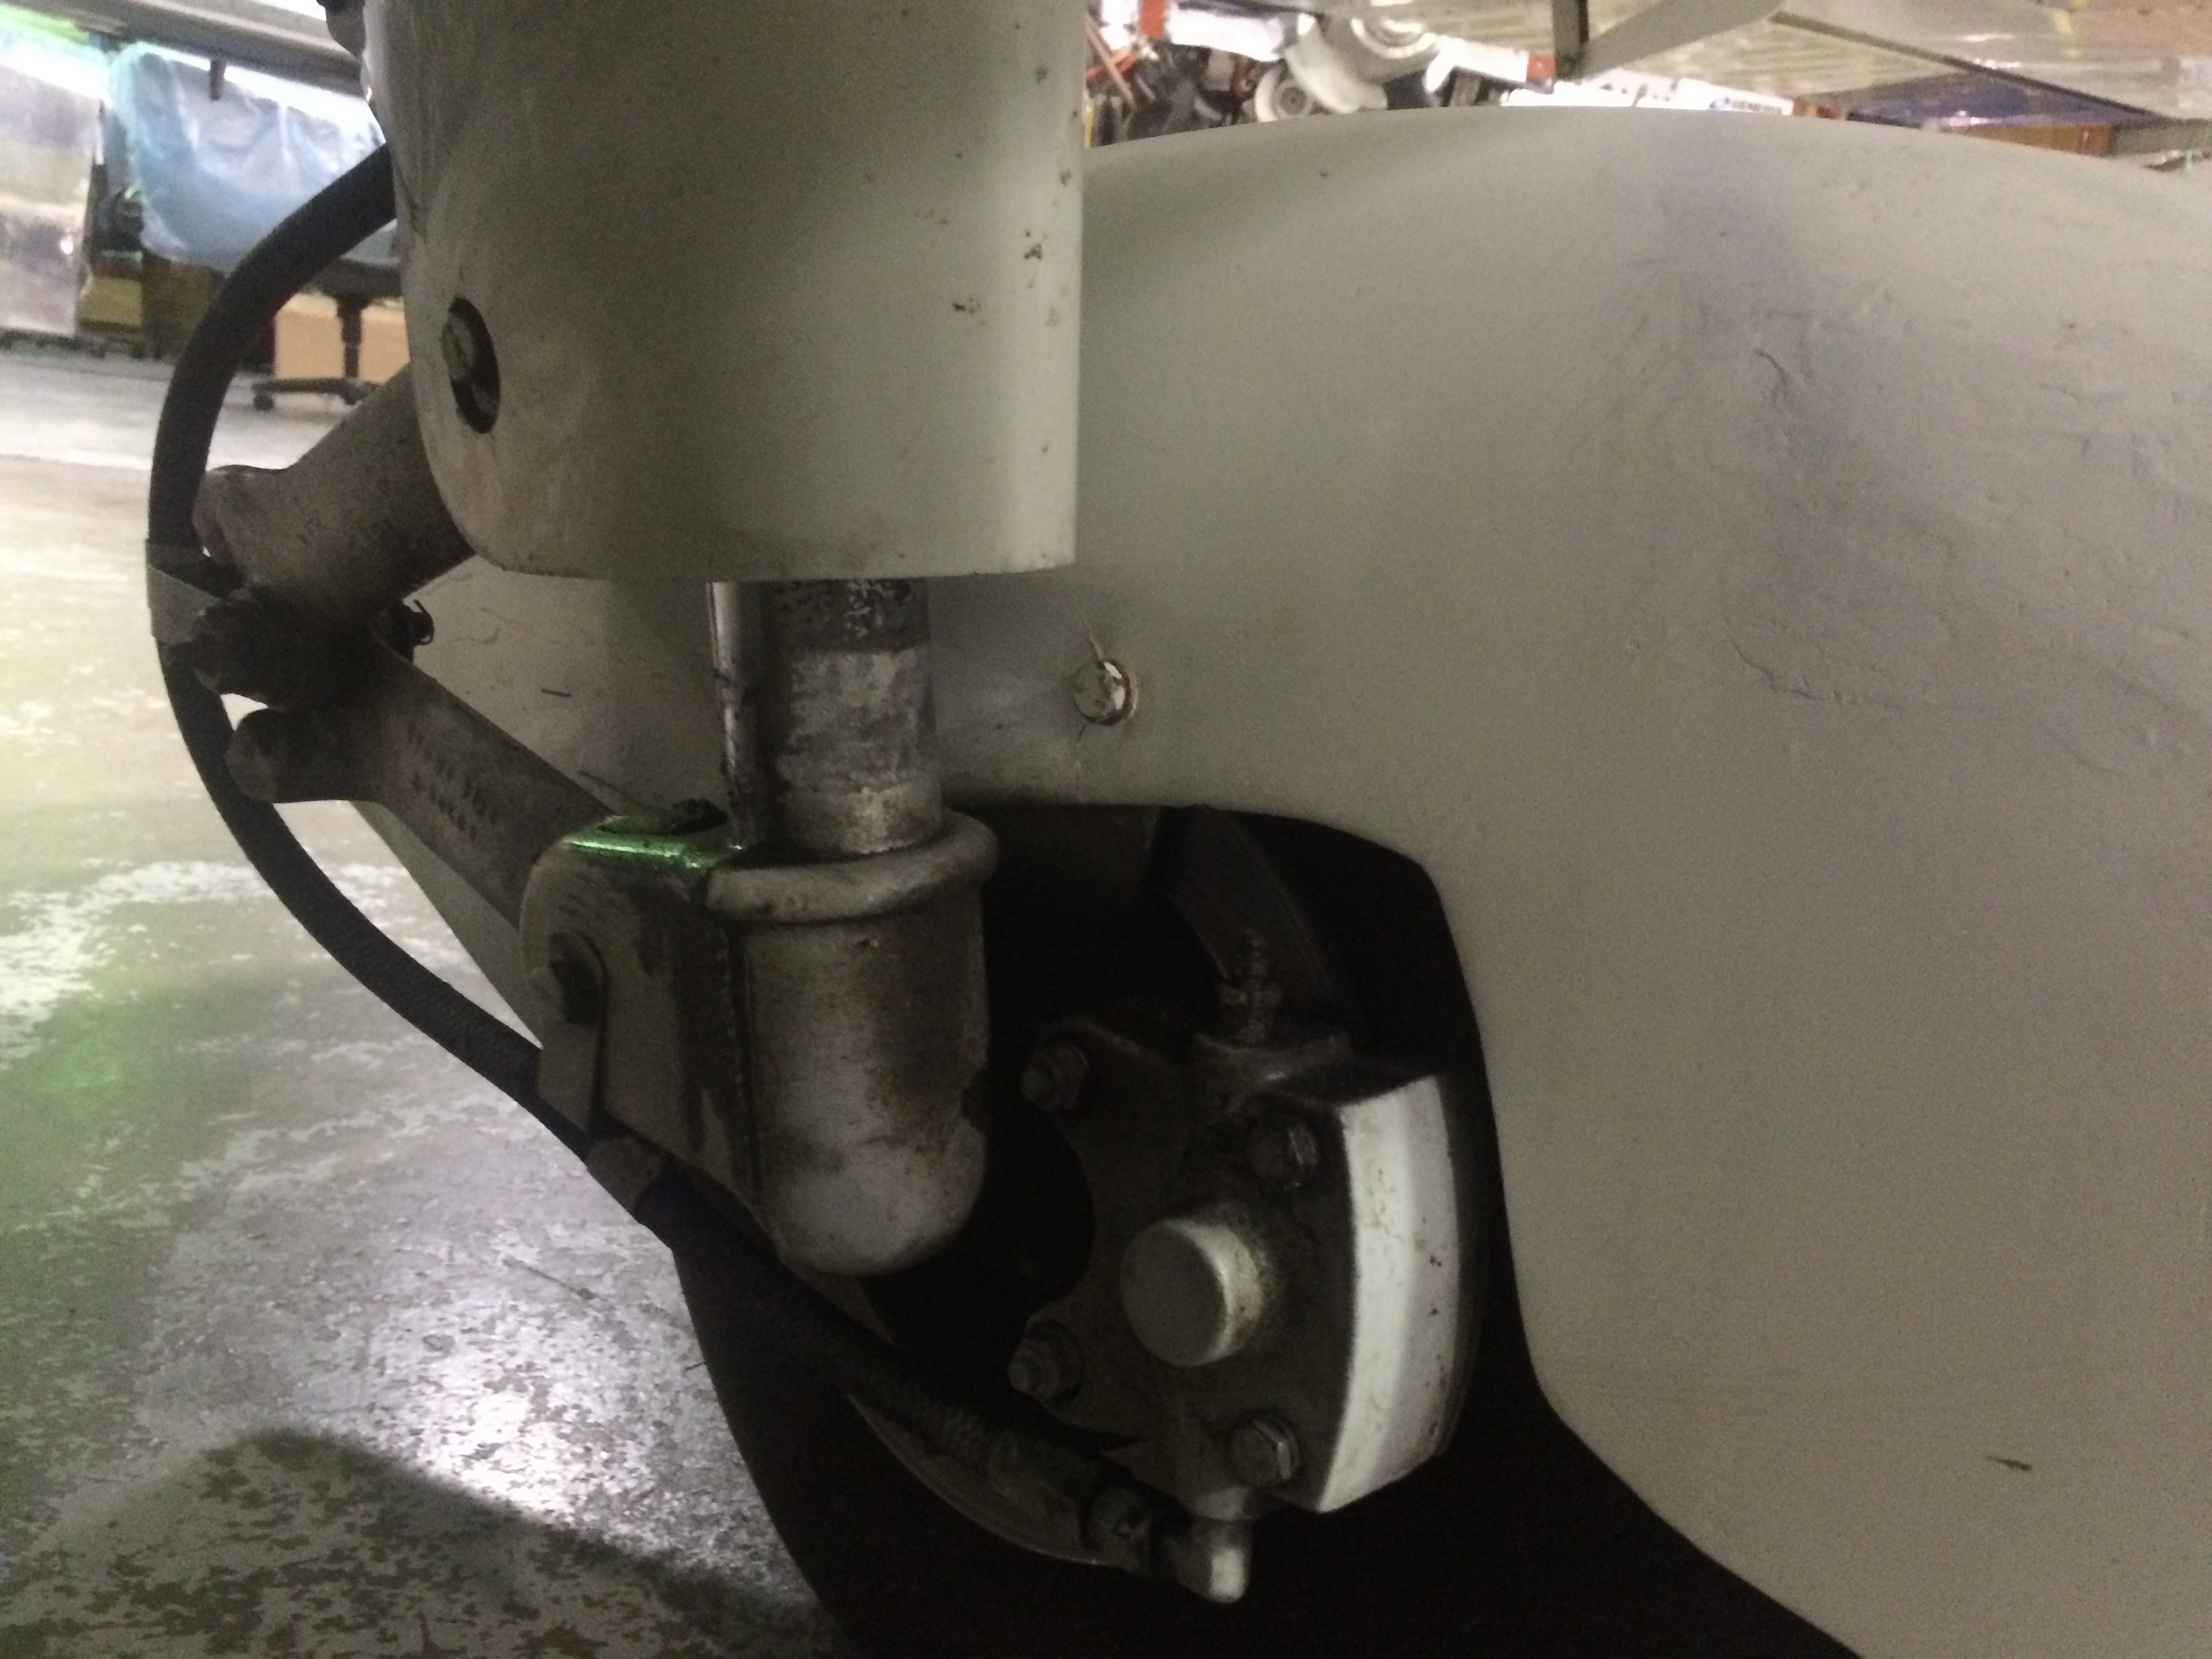
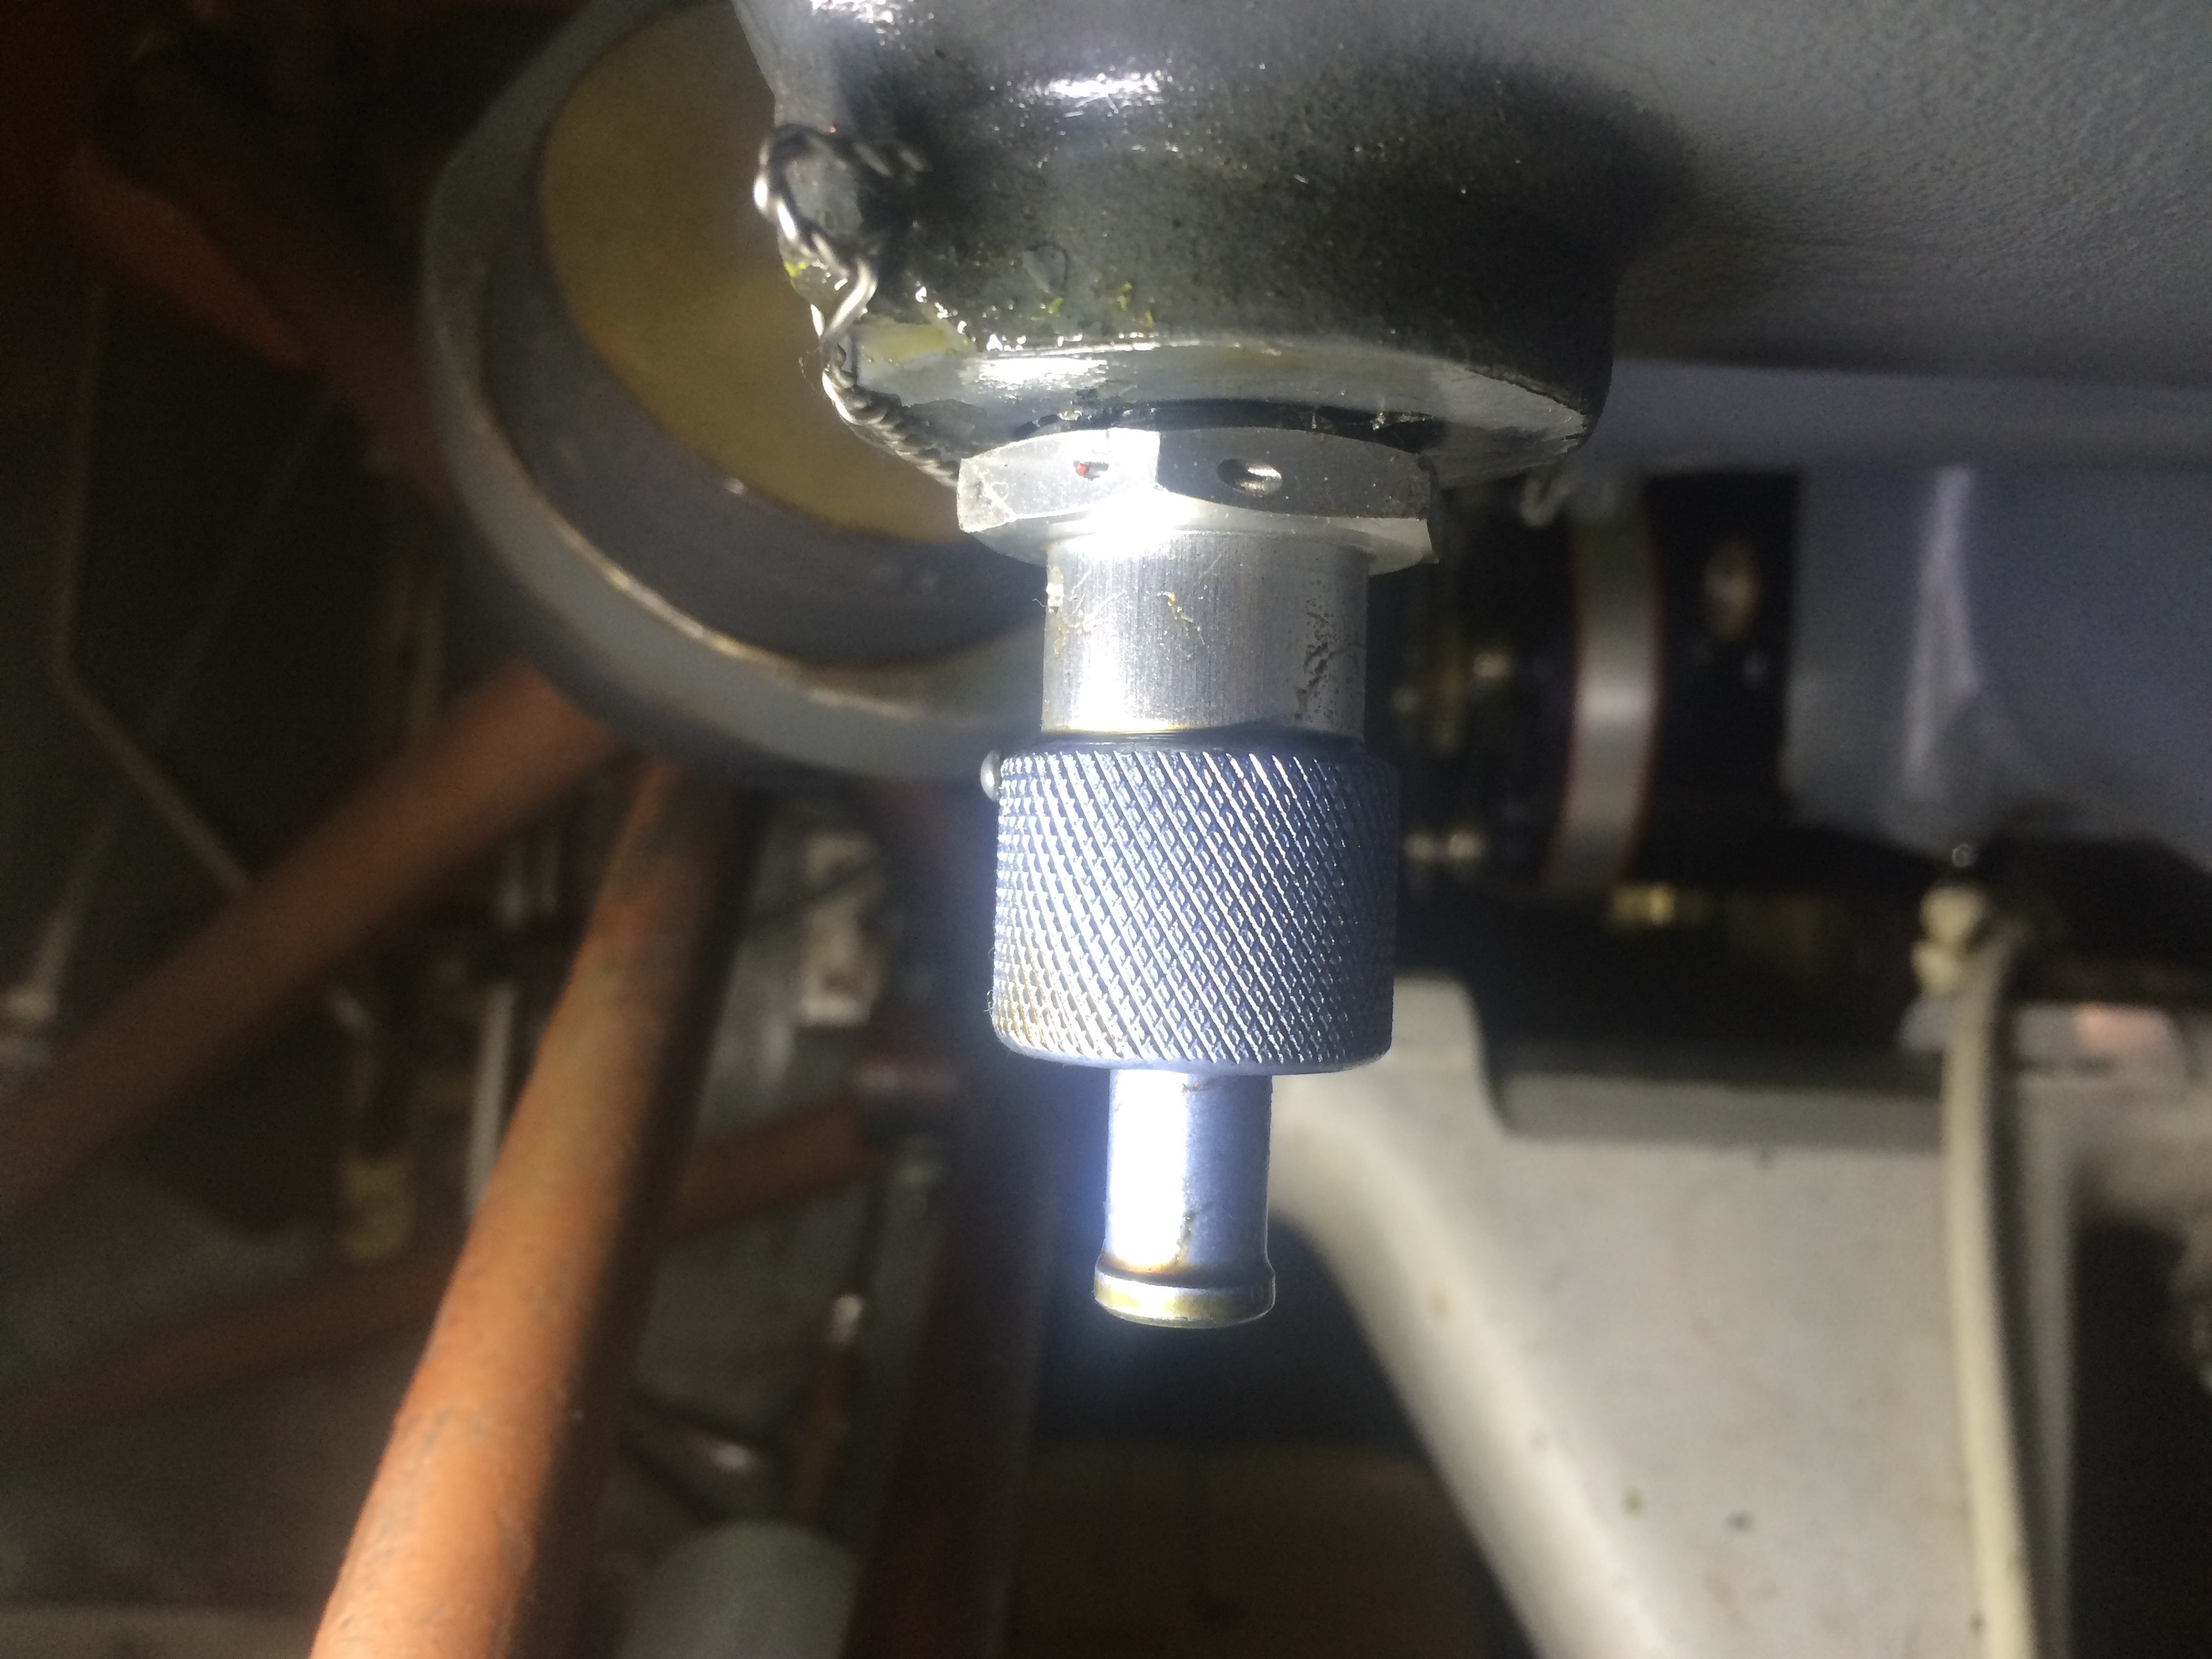
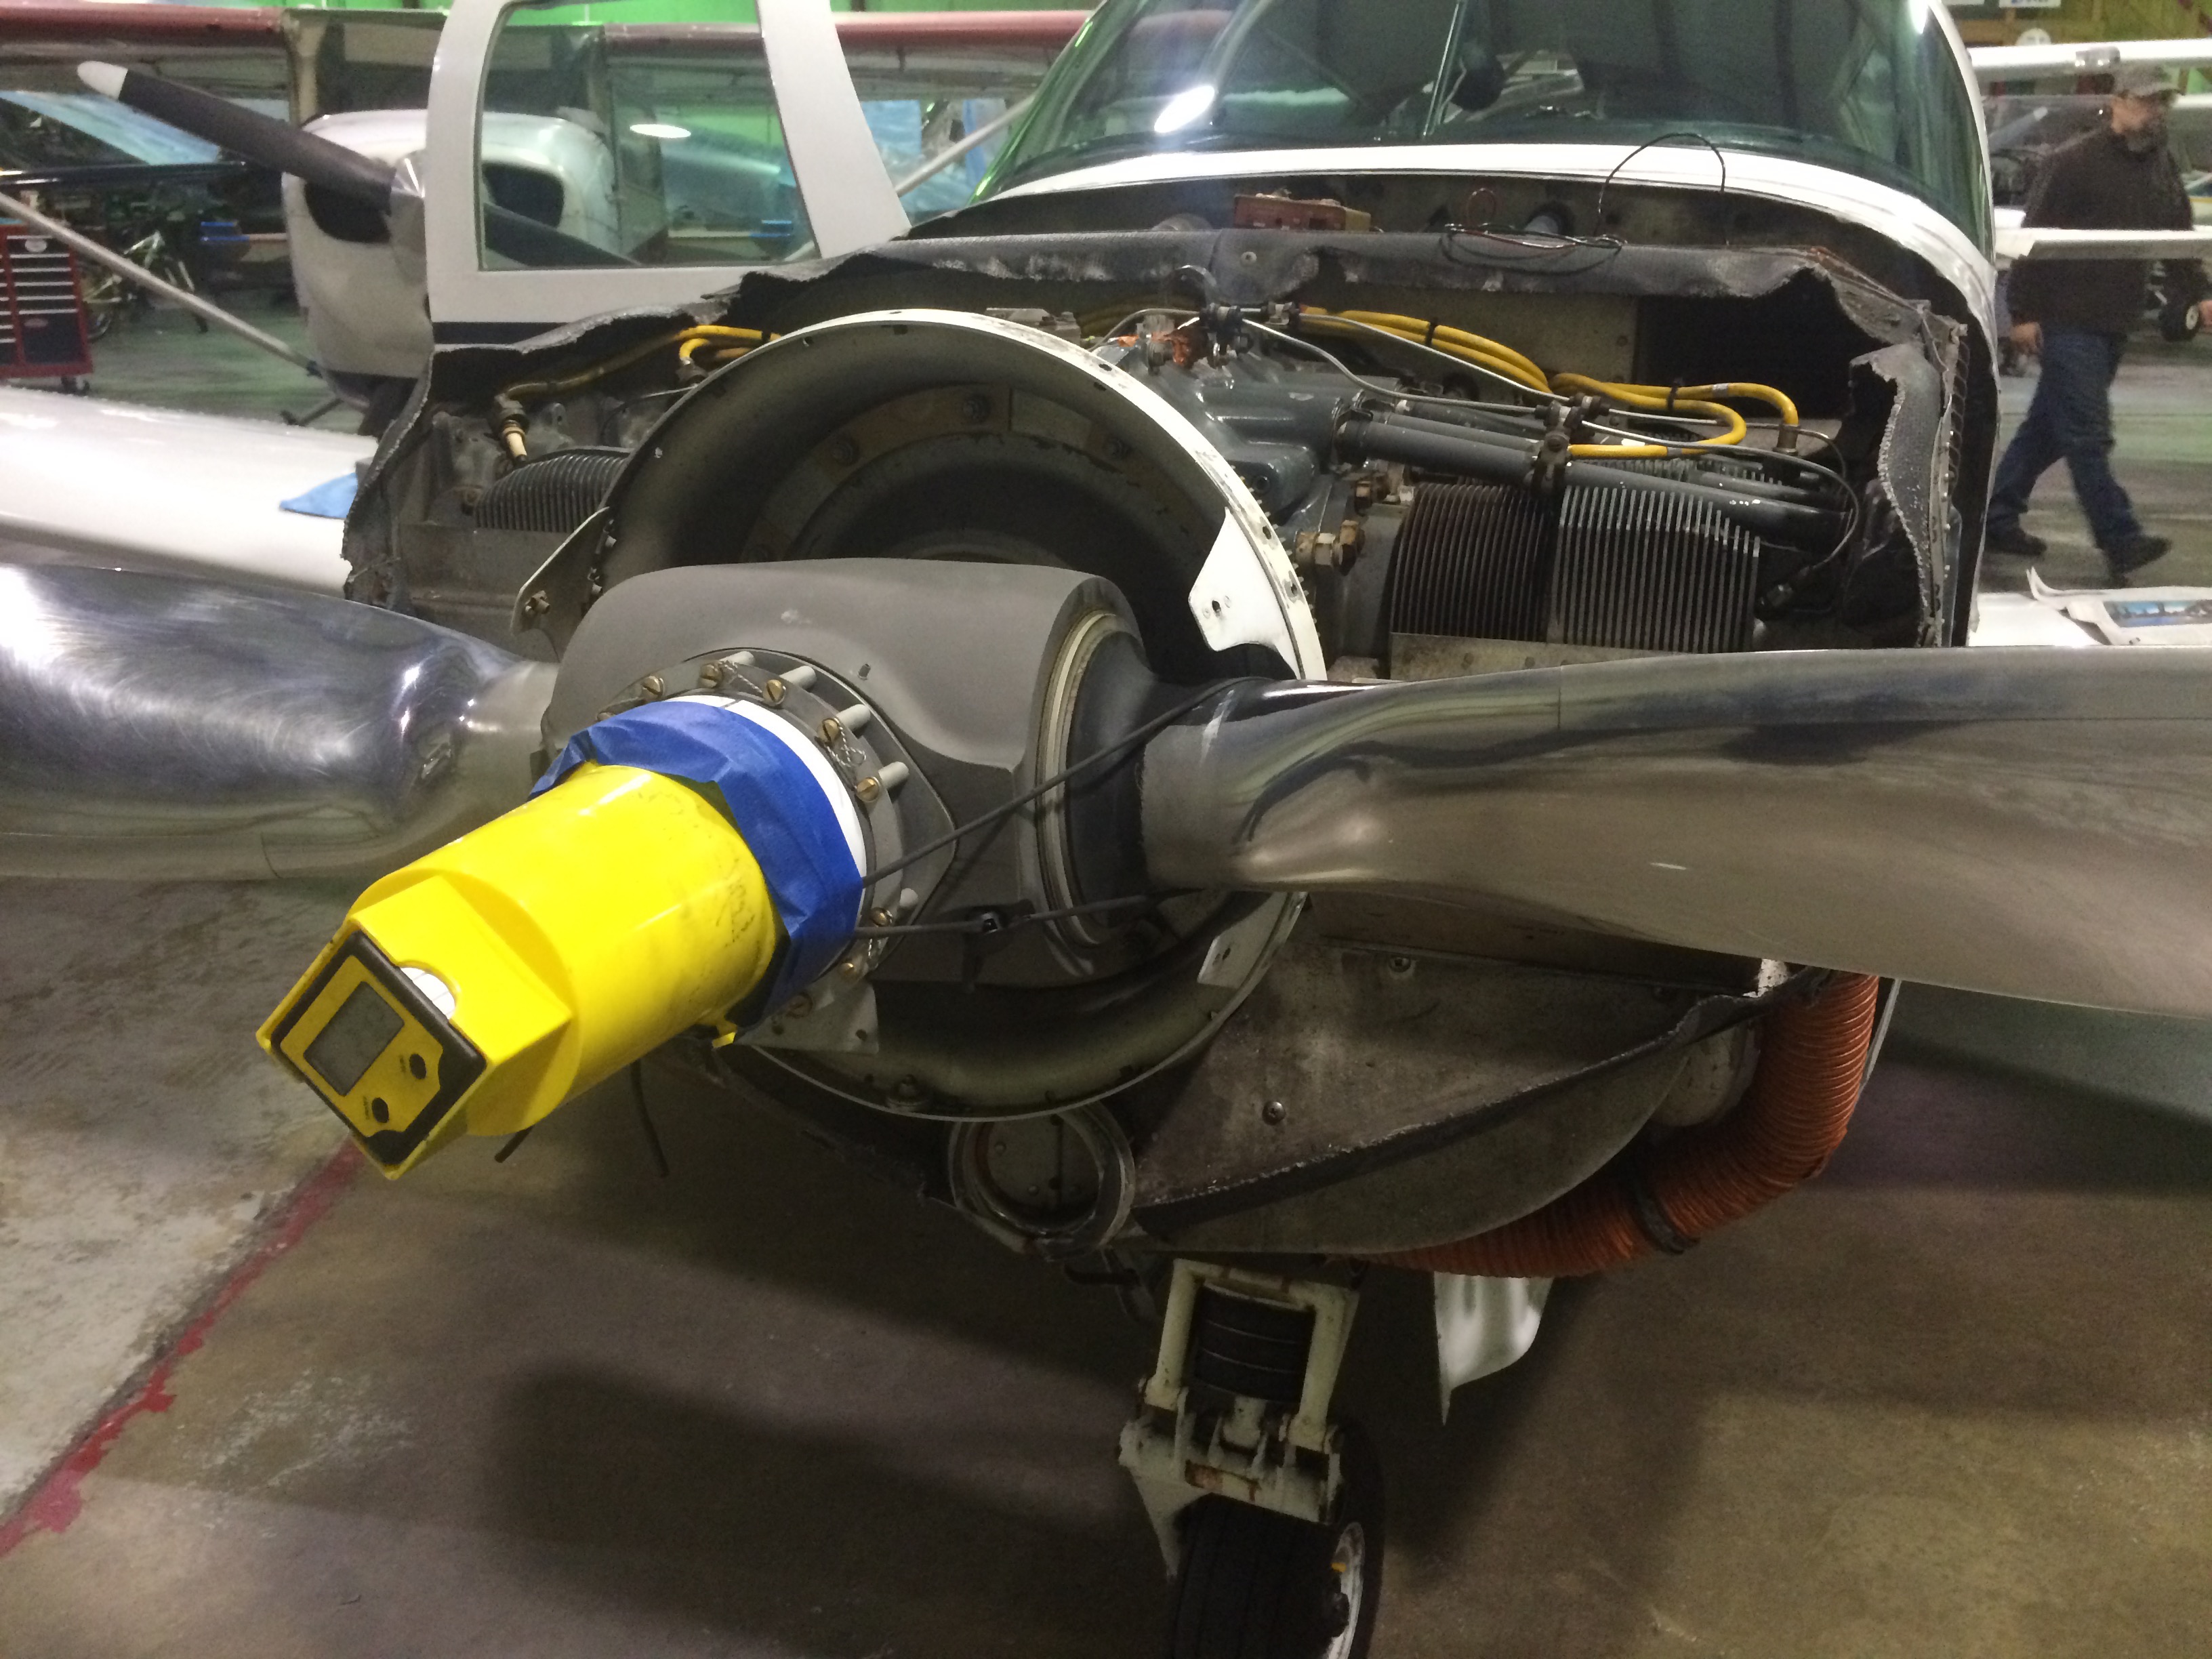
This is a strut that I serviced the other day on a Piper Cherokee.

IMG_2937

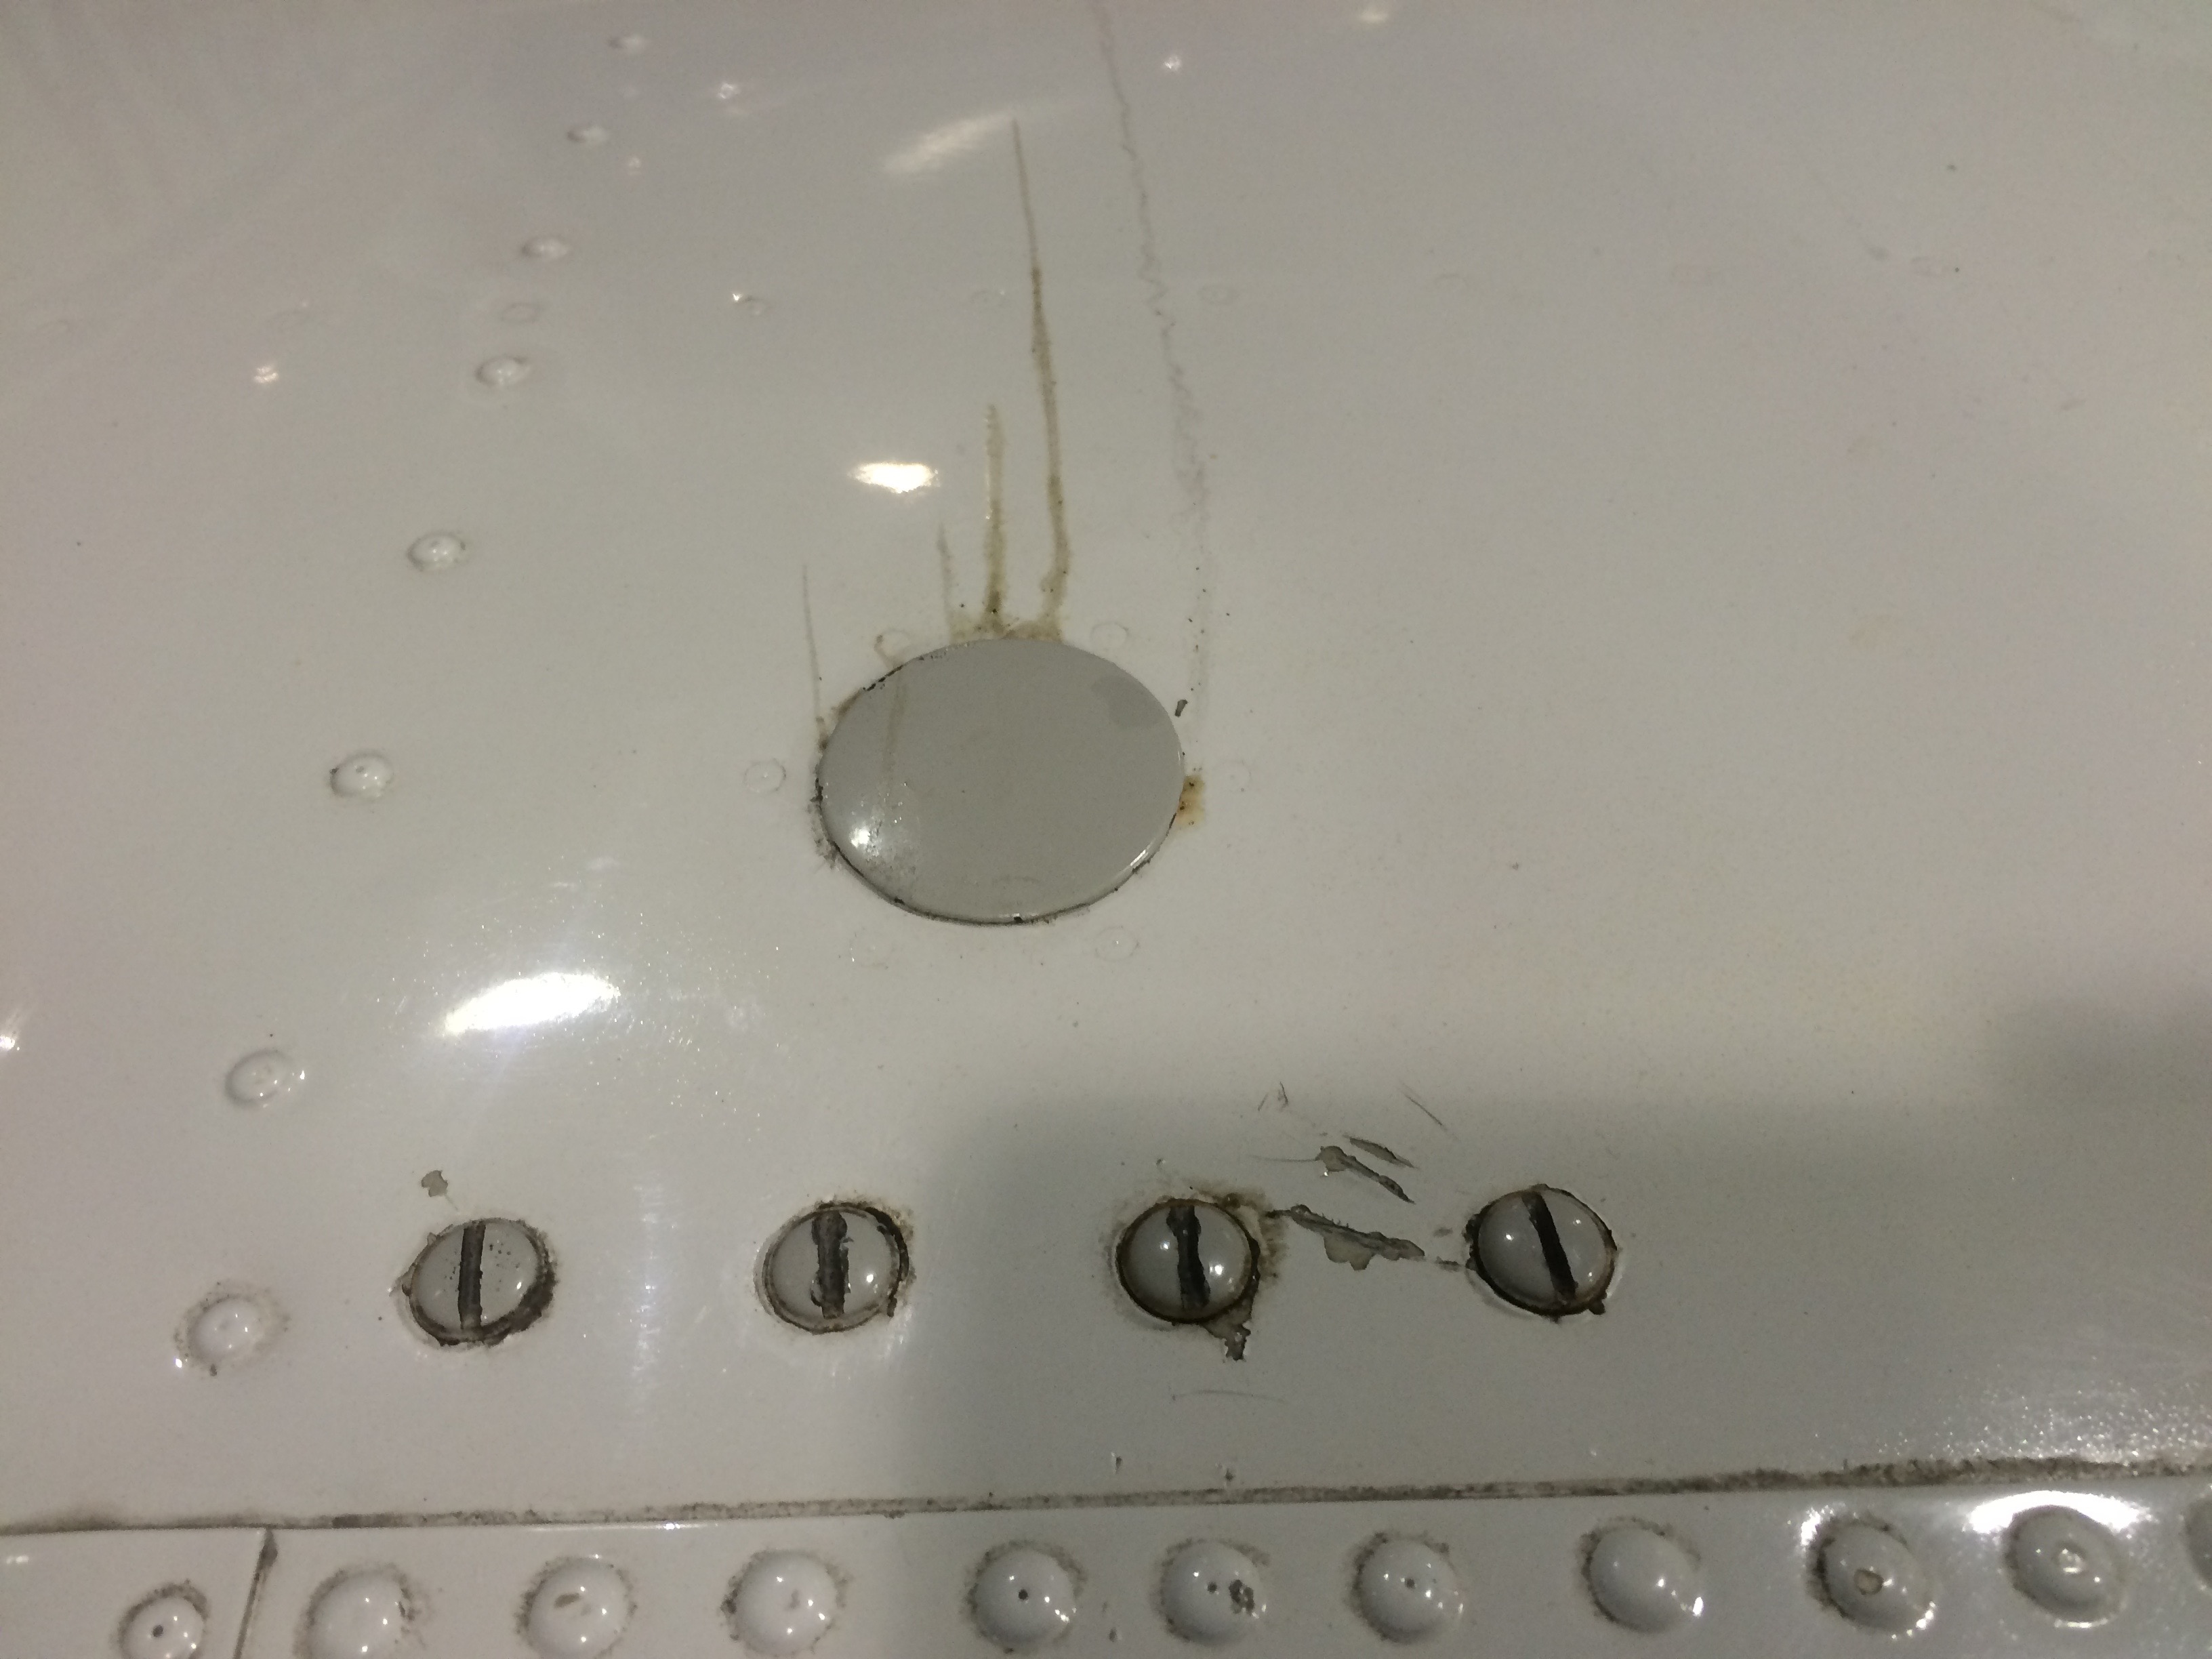
Notice the seepage on top of the wing, coming from the plug that covers the Schrader valve for servicing the shock strut.

IMG_2938

There was a puddle of hydraulic fluid around the Schrader valve.

IMG_2944

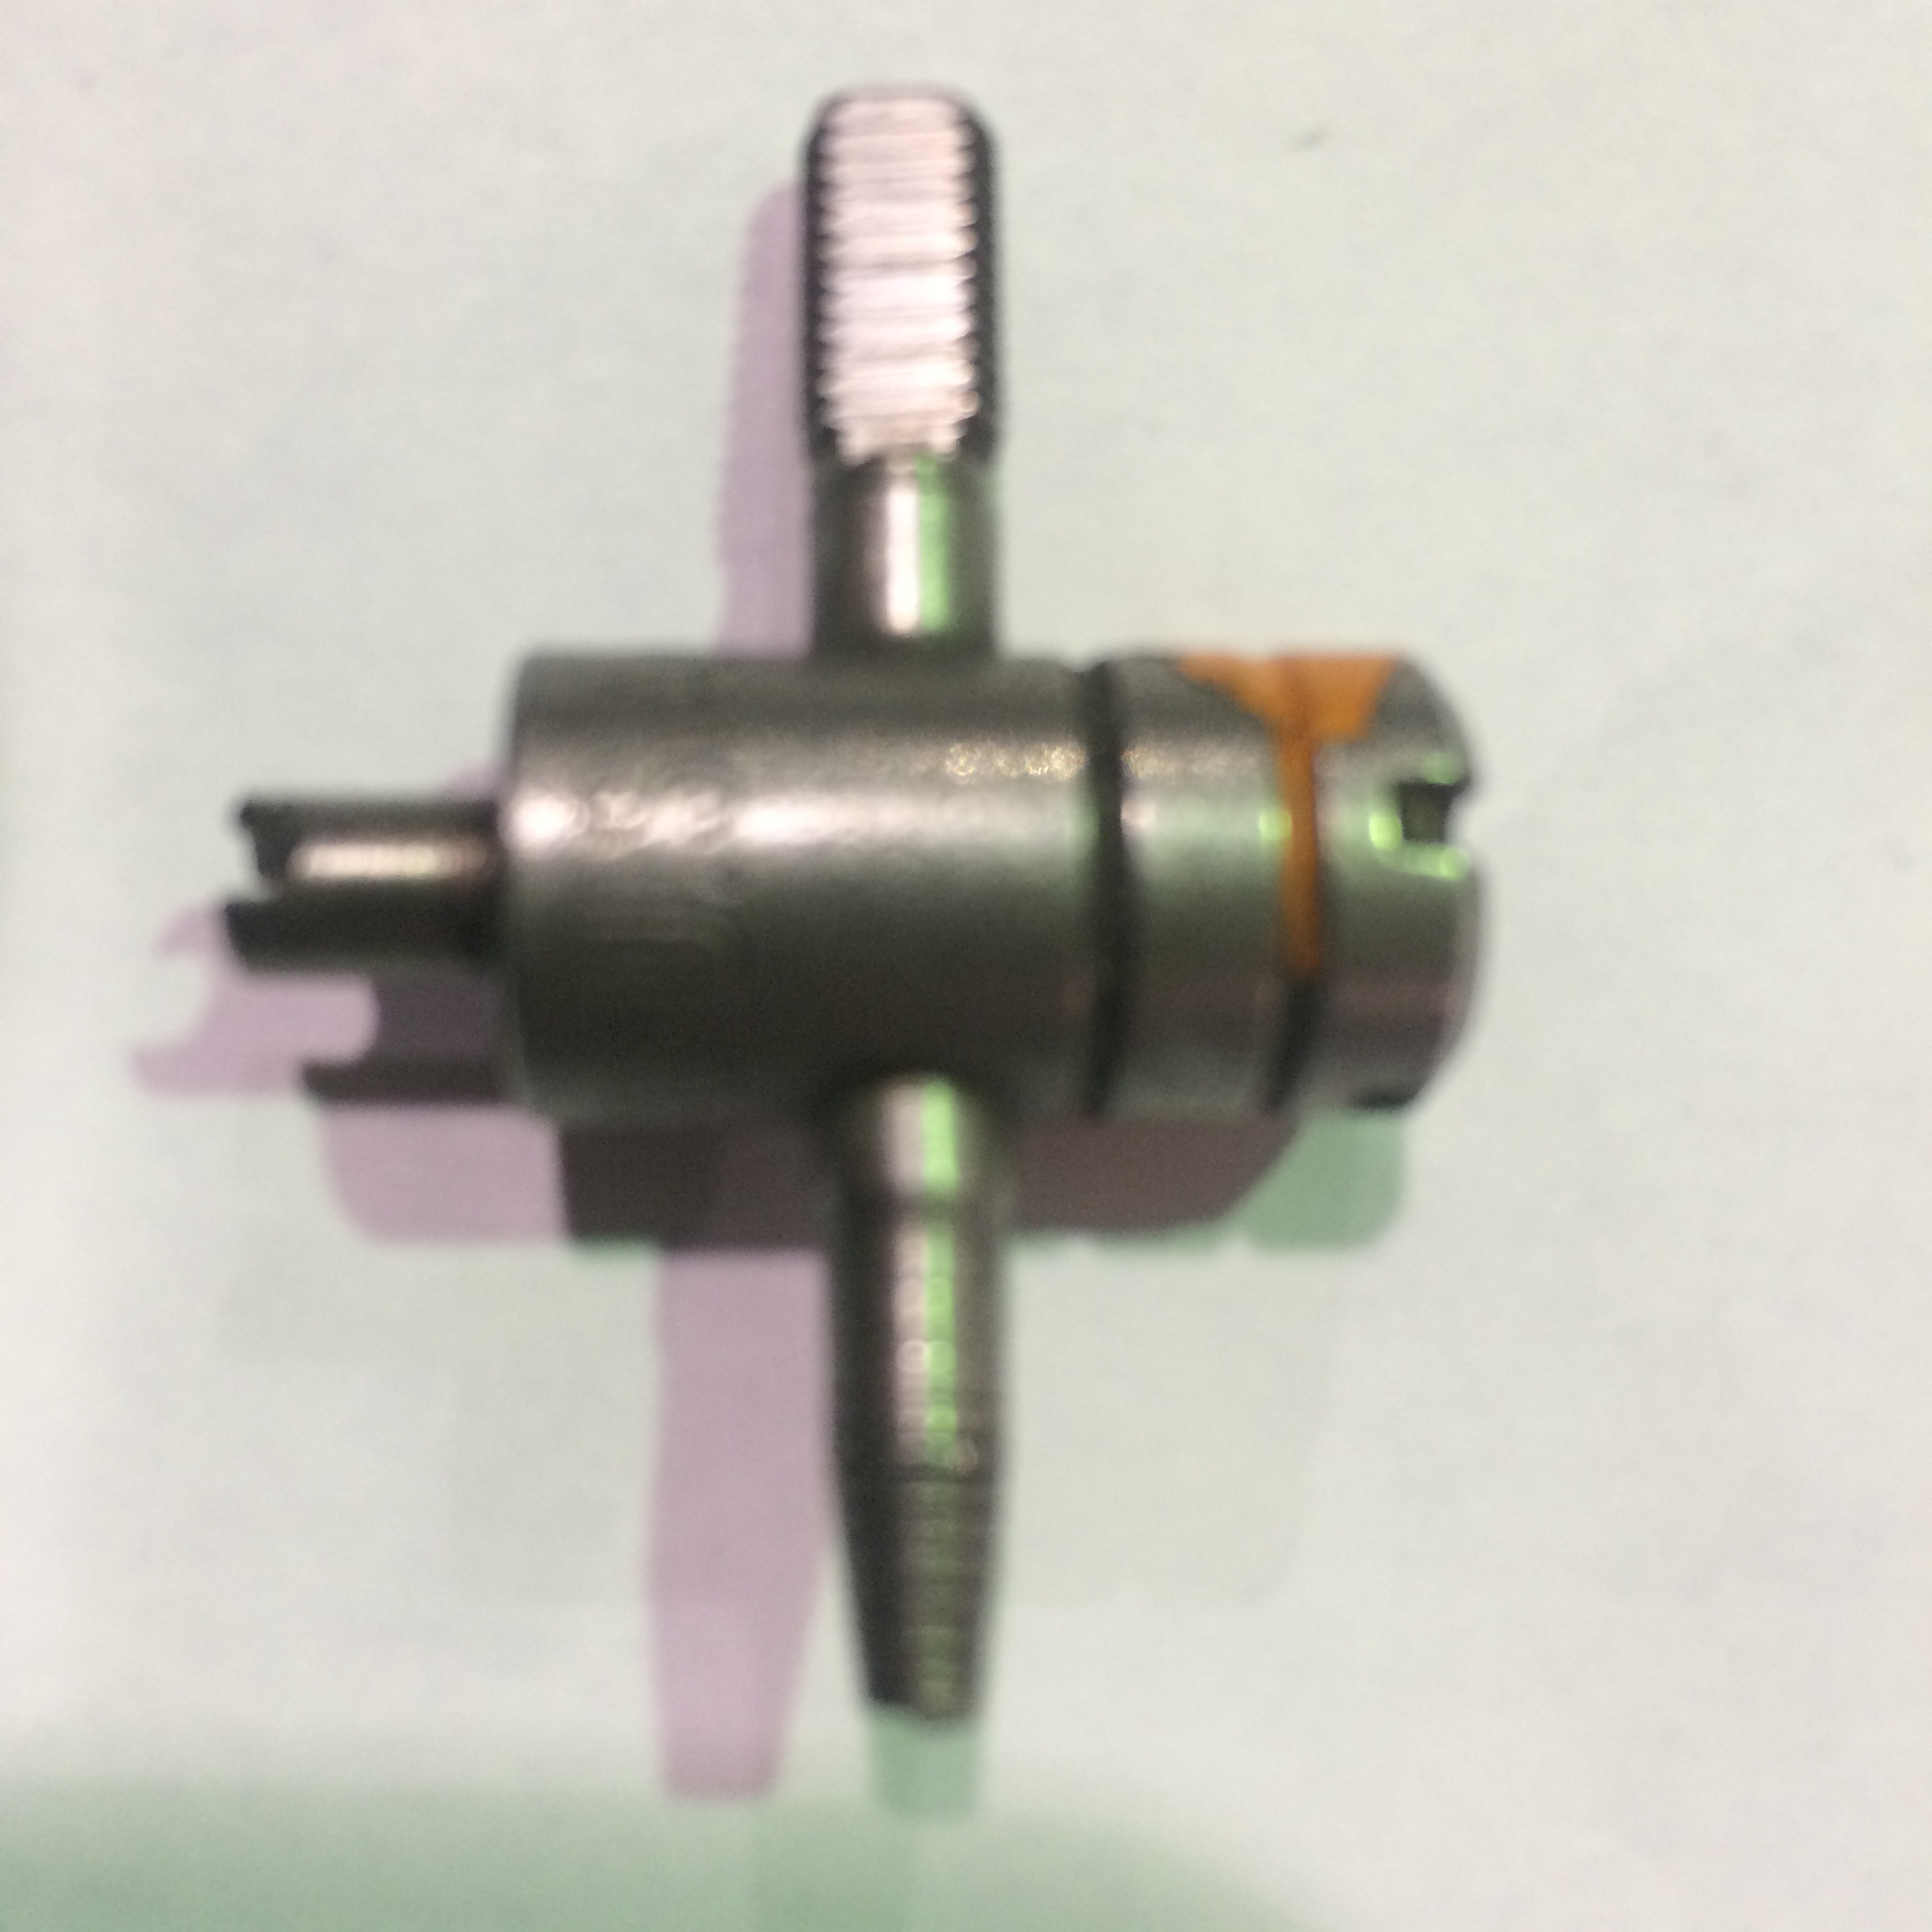
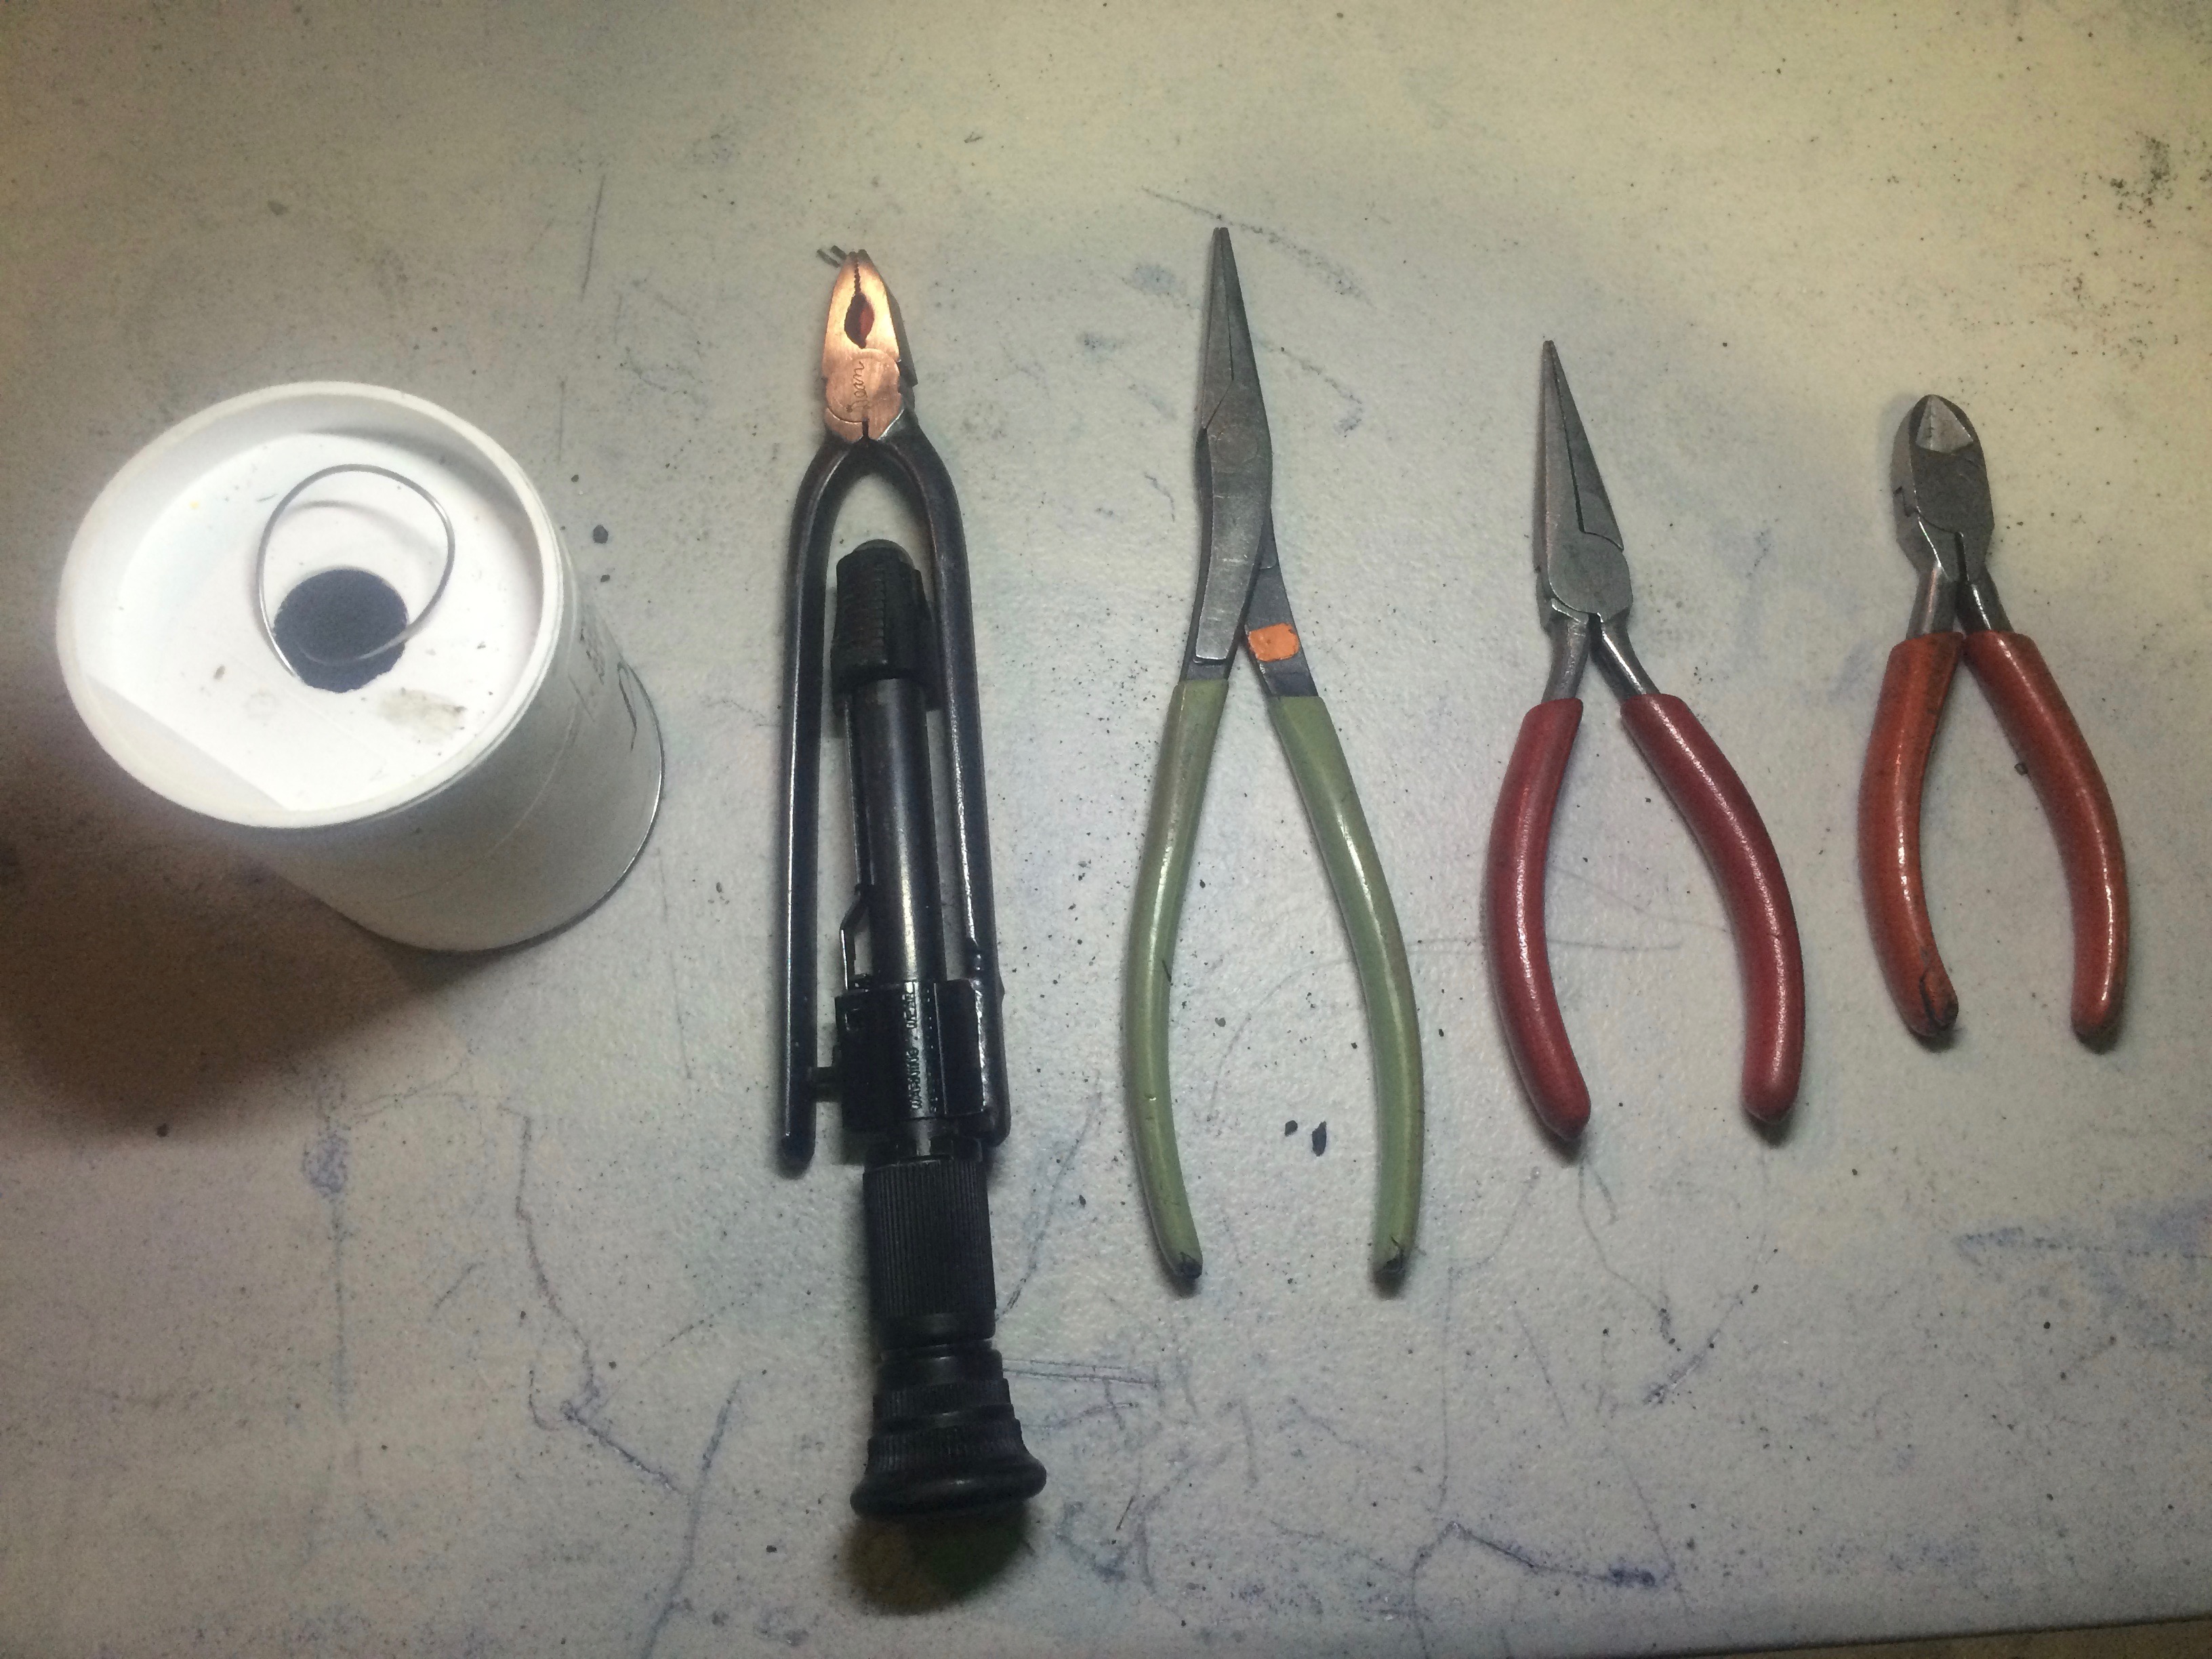
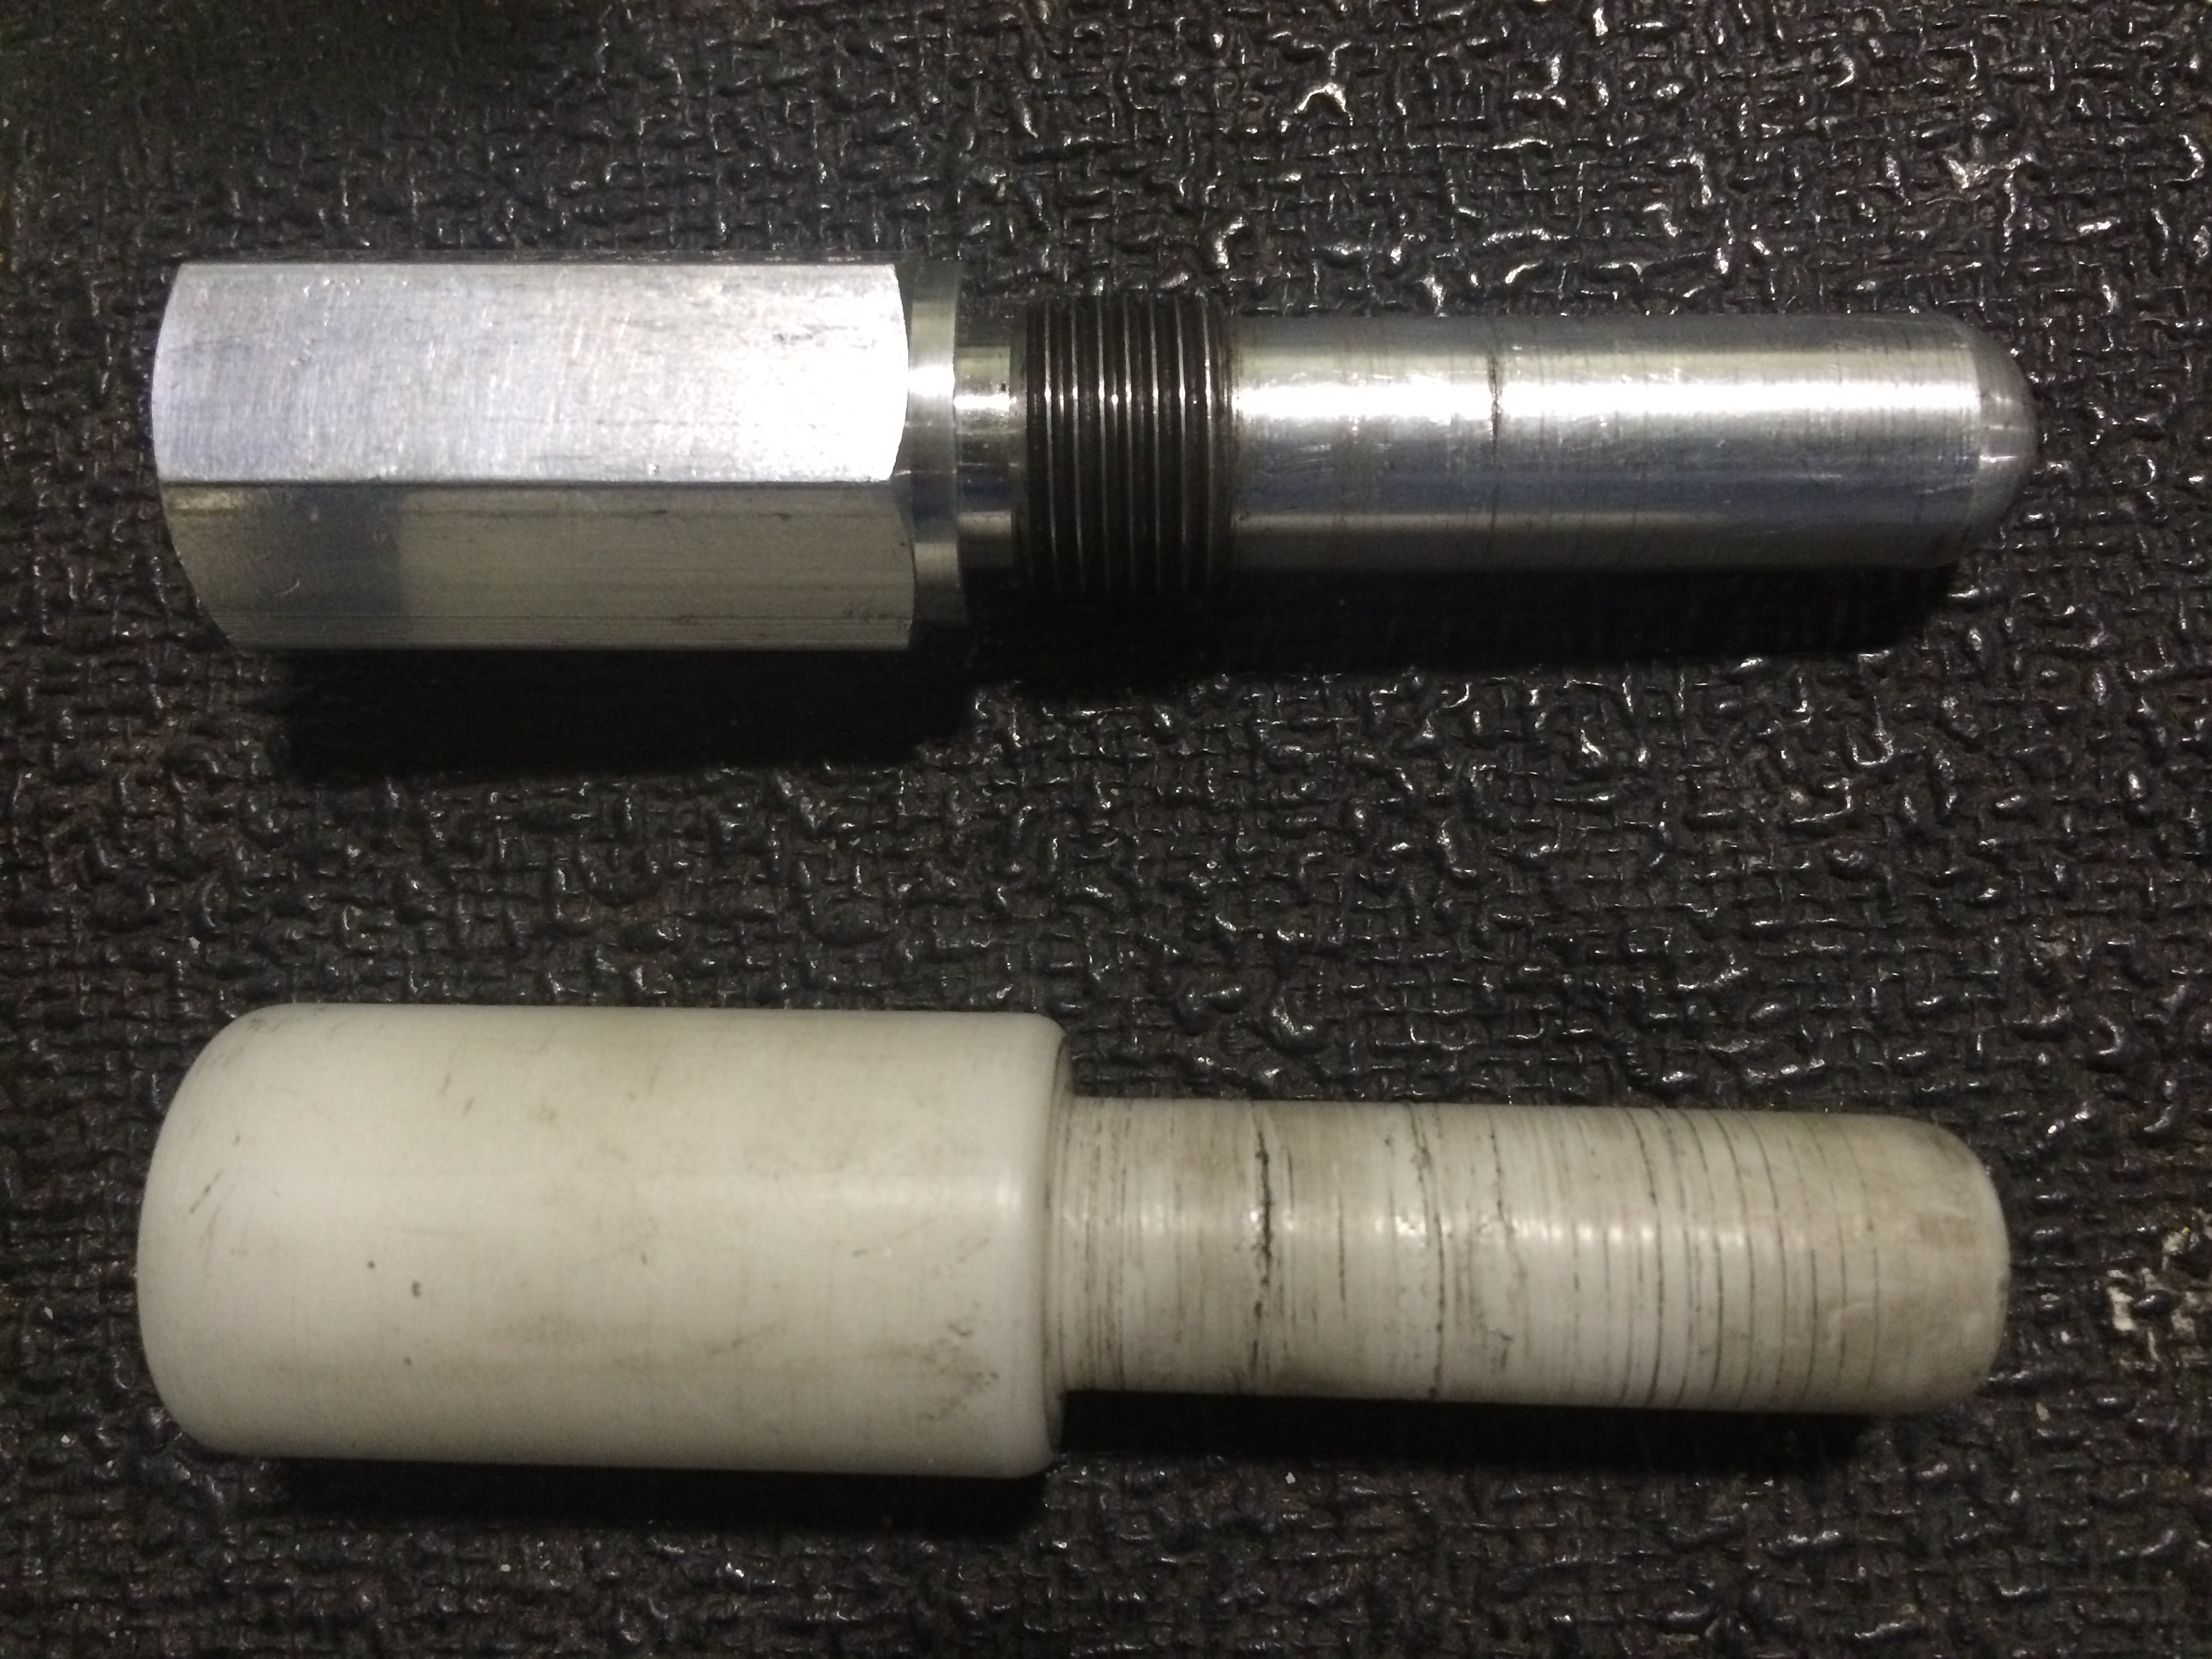
This is a simple tool for removing and tightening the valve core in the Schrader valve. Before adding air or nitrogen to a strut that is low, it’s a good idea to verify the core is tight. (You can buy this tool at an auto parts store, or even Walmart,)

In the case of the above strut, I found the Schrader valve itself needed a little tightening (with a wratchet and 3/4 inch socket.)

Listen to the audio to hear the rest of this story.

IMG_2941

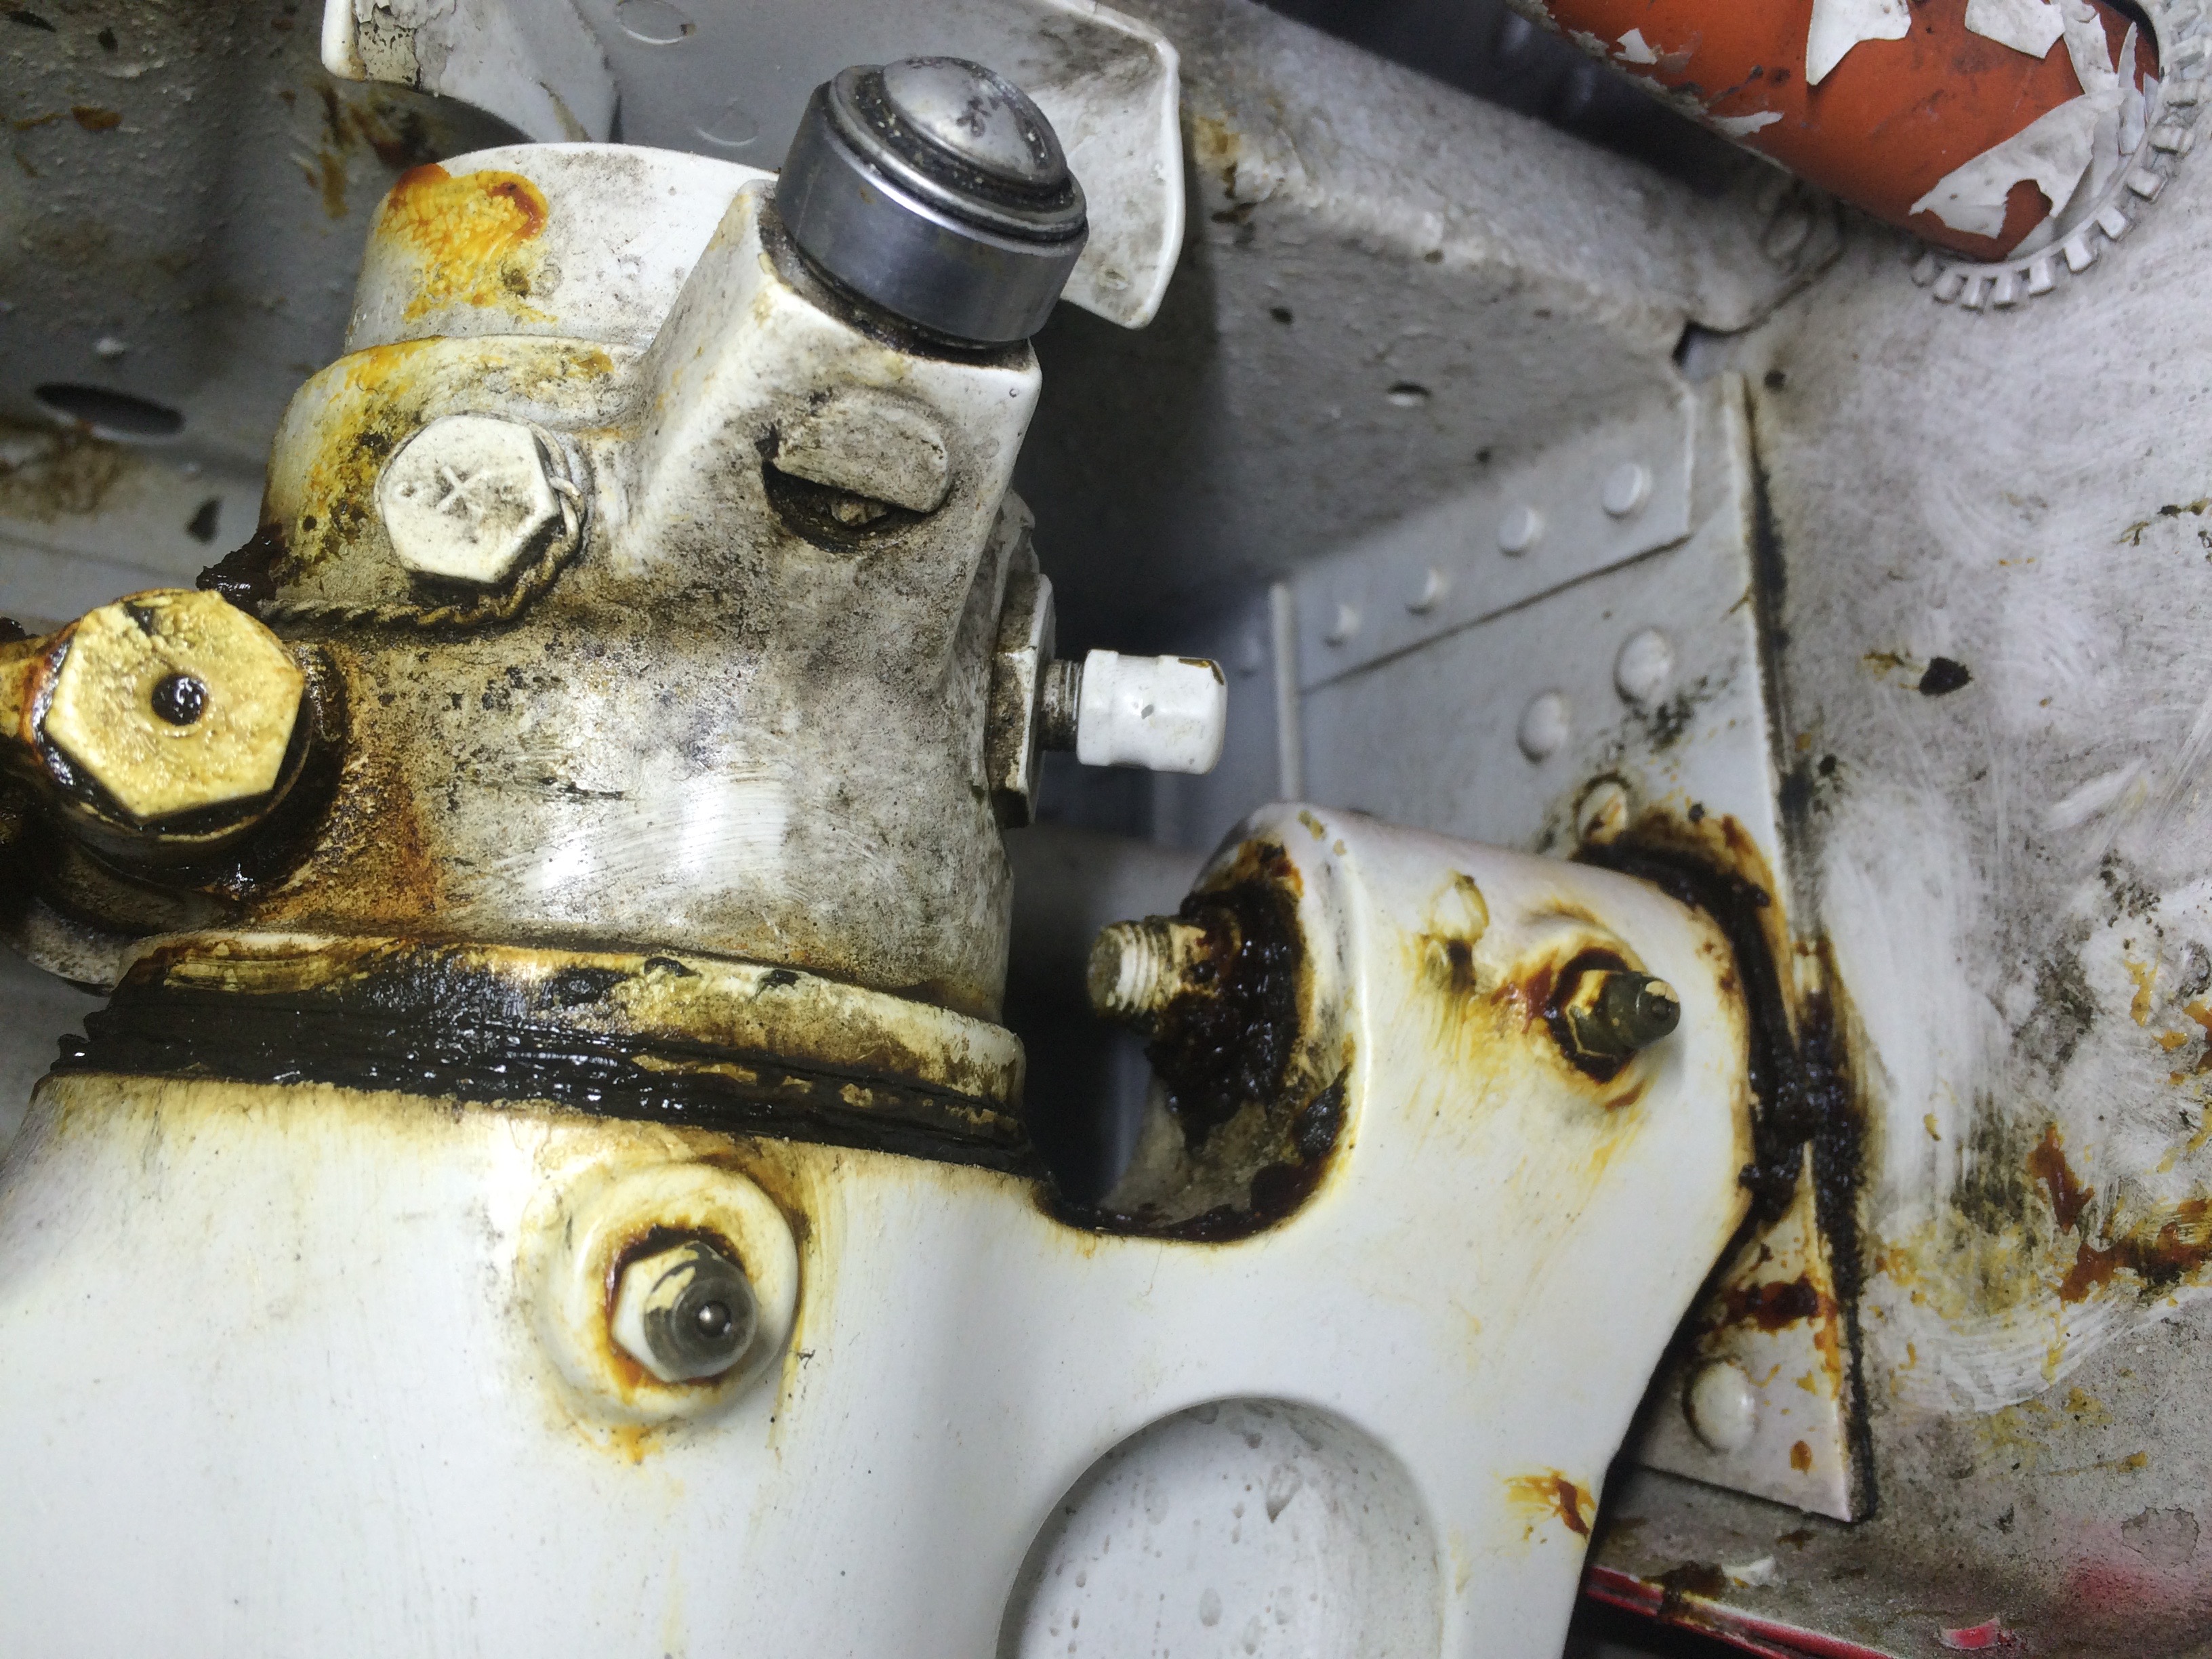
Here is a typical nosestrut on a Beech Bonanza.  Notice the Schrader valve (servicing valve) with the white cap in the center of the picture.  This is where fluid and nitrogen are added to the strut.

In today’s episode we’ll answer these questions:

  1. What type of landing gear do you have on your airplane?
  2. If you have an oleo (air-oil) strut, how do you know if it needs servicing?
  3. Does your strut need air/nitrogen, or oil (aviation hydraulic fluid,) or both?
  4. When does your strut need more maintenance than just “servicing?”
  5. What tools and equipment will be needed?
  6. What is the procedure for “servicing” a shock strut?
  7. What are some cautions to be aware of?
  8. What can happen if you ignore the condition of your shock struts?

So, after listening to today’s episode, I would encourage you to do the following if you have an airplane with one or more shock struts:

  1. Take a look in your POH or Owners Manual, and find the recommended inflation setting for your shock struts (typically in inches of extension, but can also be in psi with no load on the strut.  This information will typically be in the chapter on servicing.
  2. Measure the extension levels on your struts and see if they meet the specs.  While you do this, dampen a cloth with a little avgas, and clean the chrome shaft on the shock strut.  This will help prevent any dirt or other debris from getting in the sealing area as the shaft moves up and down inside the strut housing.
  3. If your strut needs servicing, get some help the first time from someone with experience, and go for it!
  4. Make it a part of your preflight inspection, to verify your struts are at the proper level, have no fluid leakage, and that the strut shaft is clean.

One final tip for enjoying this podcast, or any podcast for that matter!  (You’ll have to listen to find out what this is!)

And please… if you enjoy this podcast and want it to continue, let a few of your aviation friends know about it, and rate the podcast in iTunes.  (You can also find it in Stitcher, if you prefer that.)

Also, PLEASE leave a comment below and let me know any future topics you would like to hear about.  Or, you can send me an email at deanshow@gmail.com

011 – Oil Changing Basics For Airplane Owners

January 30, 2016

IMG_2885Ever thought about changing the oil and filter on your airplane?  If not, this might be a good time to think about it.

As an owner, you can do an oil change on your airplane, and sign off the work in your maintenance records… just take a look at the Federal Aviation Regulations.  In Part 43, Appendix A, item #23 on the list of approved preventive maintenance items says:

(23) Cleaning or replacing fuel and oil strainers or filter elements.

So, you can do this!  And if you listen to today’s podcast, perhaps you can pick up a few tips that will help you.

The main thing is, the first time you do this, get some help from someone who has experience in this task… this is absolutely the best way to get started.

A quick drain makes it easy to drain the oil.

IMG_2880

IMG_2879

My favorite safety wiring tools… listen to the podcast and find out what I do with each of these.


IMG_2877

Example of a properly safety wired oil filter.

IMG_2897

When you are looking for an oil filter cutting tool, the one on the bottom in this picture is much preferred, and far easier to use.

If you enjoyed this podcast, leave me a comment below.  And, if you have an idea of another topic you would like to hear about, let me know that as well.  I’d also be interested in any oil changing tips you might want to share as well.

Thanks!

010 – Aircraft Electrical Charging Systems

January 22, 2016

The condition of your charging system is a very important part of your airplane.

Today, we cover charging system components, possible issues and problems, as well as what you, as an airplane owner, can do to keep things functioning properly.

In this episode, I share some actual stories about airplanes that had charging system problems, and what was done to fix them.

We also talk about ways to efficiently troubleshoot charging system problem.

DEC 07 - FEB 08 067

This was an actual battery ground connection strap from an airplane years ago.  If you have anything like this connected to your battery, it’s time to get it repaired!

Finally, we end with 5 steps to ensure your airplane charging system is in optimal condition:

  1.  Check and clean battery connections and apply an anti-corrosion protectant.
  2. Check and make sure your alternator and its components are secure and not loose.
  3. Check your output voltage during engine operation (14 volts for a 12 volt system, and 28 volts for a 24 volt system.)
  4. If your alternator is belt driven, check the belt tension.
  5. If you have a charging system problem, consider having the alternator brushes checked, if they are accessible.

Thanks, and please, leave me a comment below (AirplaneOwnerMaintenance.com), and if you would like to hear about a specific topic, leave me a request for that, and I will consider producing a future episode to cover that topic.

Have a great week!

009 – Clean Up Your Maintenance Records!

January 15, 2016

Aircraft Maintenance Records…

Today, I talk about 7 tips for organizing your airplane’s paperwork and maintenance records.

  1.  Generate a concise, but complete, AD compliance record.
  2. Compute all applicable times for aircraft, engine(s), and prop(s).
  3. Organize maintenance records (logbooks) and separate the current ones from the old ones.
  4. Locate and organize all 337 forms.
  5. Go through the 337’s and make a list of the associated ICA’s (Instructions for continued airworthiness.)  Keep this information available at annual inspection time.
  6. Organize all 8130’s and parts tags.
  7. Designate a location for miscellaneous items.

PLEASE… leave me a comment at the bottom of this page.  Tell me what you would like to hear in future podcast episodes.  Or, ask a question you would like answered.

Thank you!

008 – Is That Landing Gear Down? … and other crazy things I’ve seen on Beeches

The teeth on the small gear in this landing gear motor were stripped off, requiring a very careful manual gear extension.  Listen to the podcast and see how it all turned out!DSCN1056

The gear motor attaches to the gearbox / drive assembly, which is an amazingly simple, but critical part of the landing gear system on Bonanzas, Barons, Debonairs, and Travelairs.

The red handle is for emergency extension.  The top 4-way arm is for the attachment of the main gear actuating rods and inboard door rods.  The bottom arm operates the nosegear rod.  (This one was not aligned properly on the shaft splines, and may have been a factor in stripping the teeth on the gear motor drive gear.)

DSCN1063

A recent A36 Bonanza I inspected had the wrong part number brake caliper installed, which caused the brake to seize when new linings were installed.  (See how the new caliper has more depth available for piston travel,IMG_1899which gives proper clearance and operation of the brakes.)


Here is the difference between an old, rusty, stretched, main landing gear uplock spring, and a new one.  If yours look like the one on the left, it’s time to change them!  I’ve heard that if this spring breaks, there is the potential for punching a hole in the top of the wing.

IMG_1884


Gear Motors:

If internal landing gearbox clearance cannot be achieved by adjusting the limit switches, the gear motor may need to be overhauled.  (If the motor is worn, the dynamic braking action may also be weak, and may not stop the gear quickly enough.)

Use caution and safety devices when putting airplanes on jacks, and running landing gear!  If an airplane lands on its nose, significant repairs will be required!


3 Recommendations if you own a Bonanza, Debonair, Baron, or Travelair:

  1.  Join ABS (American Bonanza Society.)  It is a fantastic organization.  bonanza.org
  2. Take your airplane to a service clinic, and if possible, take your mechanic with you.
  3. Read the Landing Gear Rigging and Procedures book that was produced by ABS.  It will help you become more familiar with your landing gear system.


007 – A Must-Do Item Before You Buy a Piper Cherokee

Podcast Episode 007

January 1, 2016

Do you own a Piper Cherokee, or some other Piper model?  Are you considering buying one?  If your answer is yes, then you might want to listen to this episode!

One item that tends to be overlooked on Piper airplanes, is Service Bulletin 1006.  It is an inspection to be done each 7 years and requires removing the fuel tanks from the wings to perform it.

PiperSB1006 

IMG_1052
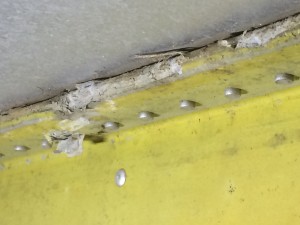
Removing the fuel tanks makes it possible to inspect critical areas on the wing spars for corrosion, something you want to find out about before you buy an airplane, not after.  (The corrosion in this picture is what led to changing the left wing on a Piper PA 28-140.)

Even though compliance with service bulletins may not be absolutely required like AD’s, this one is certainly worth doing.

Listen to today’s episode, and hear how this very service bulletin has had a direct impact on three specific airplanes.

Please… leave me a comment.  What question would you like answered on a future episode of this podcast?  It can be any question related to piston-powered airplane maintenance.

Thank You!

006 – Magneto Timing for Airplane Owners

December 25, 2015

Merry Christmas everyone!

Today we talk about how to CHECK the magneto timing on your airplane engine.

This is NOT about how to adjust the timing, but simply how to CHECK it.

IMG_2774


In order to check magneto to engine timing, you will need: A timing indicator.  (A popular one is called a magneto synchronizer.)


IMG_2777


Recommended kit is called the Rite System magneto timing kit.  It’s available at Aircraft Spruce for about $150 for the one including the synchronizer.


IMG_2776


IMG_2775

If you get the Rite System kit, I recommend also buying a threaded top dead center plug (18mm) since it is much better than the nylon TDC pin that comes in the Rite System kit.  Aircraft Tool Supply sells it for about $16.


IMG_2773You must be an A&P, or be supervised by one, to adjust mag timing, but as an airplane owner, you could CHECK the mag timing so that you know if it needs adjustment BEFORE it goes into the maintenance shop.

Have a great week!

005 – Valuable and Specific Maintenance Training

Airplane Owner Maintenance

Podcast Episode 005

Valuable and Specific Maintenance Training

Specific aviation maintenance training is often extremely focused and highly beneficial.

Some specific training I’ve had the opportunity to participate in:

1997:  Pratt & Whitney PT-6 engine school in Montreal, Québec, Canada

2003:  American Bonanza Society (ABS) service clinic in Poughkeepsie, New York

2004:  King Air C90B familiarization and inspection procedures in Rocky Mount, North Carolina

2005:  Diamond Aircraft factory maintenance training in London, Ontario, Canada

2007:  Flight Safety Westwind jet maintenance training in Wilmington, Delaware

2012:  Twin Cessna Flyer / TAS Aviation twin cessna engine and airframe maintenance training in Defiance, Ohio

2013:  Continental Motors Inc (CMI) factory engine training course in Mobile, Alabama

Benefits of Specific Aviation Maintenance Training

  1.  It keeps things interesting;  and an interested aviator is a safer aviator!
  2. It gives you a distinct troubleshooting advantage.  You will be more equipped to solve in-flight problems.
  3. It sets you up to be able to help and teach others who may also benefit from what you have learned.

Please do two things:

  1.  Choose a specific training course or seminar to attend in 2016 that relates to your airplane.  It will make you a better pilot!
  2. Leave me a comment on this page… what has been YOUR most outstanding specific aviation training you’ve ever received?  Share it so that others can also benefit.  Thank You!

Do you want to learn how to produce a podcast?  Check out PodcastingAtoZ.com  Cliff Ravenscraft’s course is excellent… use the code “dean” and get a $500 discount!  Want more information before you decide?  Check out PodcastAnswerMan.com  There is all kinds of free content there.

Please, if you would like me to talk about a specific topic on the podcast, leave me a comment below.  Thanks!

004 – The Day I Got Hit by a Prop

10 Tips for a Safe and Successful Compression Test

  1.  Run the engine.
  2. Check the mag switch for proper grounding.
  3. Be sure your compression testing equipment is calibrated.
  4. Use a helper!
  5. The person holding the prop is in charge.

Special Announcement:  Learn how to produce a podcast!  Take Cliff Ravenscraft’s course, Podcasting A to Z, and get a $500 discount by using the code “Dean”.

Check it out at PodcastingAtoZ.com

6.  Helper:  Don’t hook the hose to the cylinder fitting until instructed to do so.

7.  Don’t let go of the propeller until the hose has been disconnected from the cylinder.

8.  When finding compression stroke positions, turn the prop in the opposite direction of normal rotation to avoid snapping the impulse coupling. (Tip:  For 4 cylinder engines, if you use the reverse firing order, 4-2-3-1, you only need to turn the prop 1/2 turn when going from one cylinder to the next.)

9.  Finish with cylinder #1.  That way you will be ready to check mag to engine timing.

10.  Examine any questionable cylinders with a borescope.

References:

AD 76-07-12

AC 43.13-1B

Continental Motors SB 03-3 (Compression Testing and Borescope Inspection)

14 CFR 43, Appendix D (Scope and Detail of a 100 Hour or Annual Inspection)

Bonus Tip (Not in the Podcast):

Buy, or make, enough fittings (you can use old spark plugs) so that you can put one in each cylinder before starting the compression test.  Then, you can just go from one to the next without needing to transfer the fitting from one cylinder to the next.

Have a great week, and let me know if YOU have a compression testing tip.


003 – How to Choose an Inspector or Shop

Podcast Episode 003 – How to Choose an Inspector or Shop

(10 Key Questions to Make the Choice Clear)

Read all the way to the bottom for a bonus question that is not in the podcast!

Introduction

I hope you had a great Thanksgiving!

Two more people I’m thankful for:

My wife, Maria.  (She worked as a home-health nurse to put me through aviation school while we lived in Northeast Tennessee.)  Thank you Maria!

Kyle London.  He is the owner of Classic Aviation, LLC in the Shenandoah Valley of Virginia, where I work.  Thanks Kyle, for making it a great place to work!

For these two, and for all the people I mentioned in last week’s podcast, I am grateful to God!

Now for this week’s topic:

Choosing the inspector or shop who will inspect your airplane, is one of the most important maintenance decisions you can make for the safety and efficiency of your aviation experience.

Reminder: 

This podcast is for information and inspirational purposes only, and the things that you may learn here must be confirmed with your local airplane maintenance professional, and/or FAA regulations and procedures.

Always keep in mind, that in the regs:

§91.403   General.

The owner or operator of an aircraft is primarily responsible for maintaining that aircraft in an airworthy condition.

Listen to the podcast for 10 questions you can ask an inspector or shop.

The Continental Service Bulletin mentioned in the audio:

http://www.tcmlink.com/pdf2/sb03-3.pdf

Announcement:  If you have a reason to produce a podcast yourself, take a look at Cliff Ravenscraft’s course, Podcasting A to Z.  It is top notch! atoz

Go to podcastingatoz.com and check it out!  And remember, if you use the code “Dean” (not case sensitive), you can get a very nice discount!

Also check out podcastanswerman.com for all kinds of free content to help you get to know Cliff.

Remember, this podcast is available on iTunes and Stitcher.

Please leave me a comment below… Tell me about a question you have used to select an inspector or shop for your annual inspection.

And now for the bonus question that is not in the podcast:

Can you give me contact information for a couple of your satisfied customers?  Testimonials from other airplane owners can be incredibly valuable in making a decision.

Have a great week!

« Older posts Newer posts »
Send Voicemail