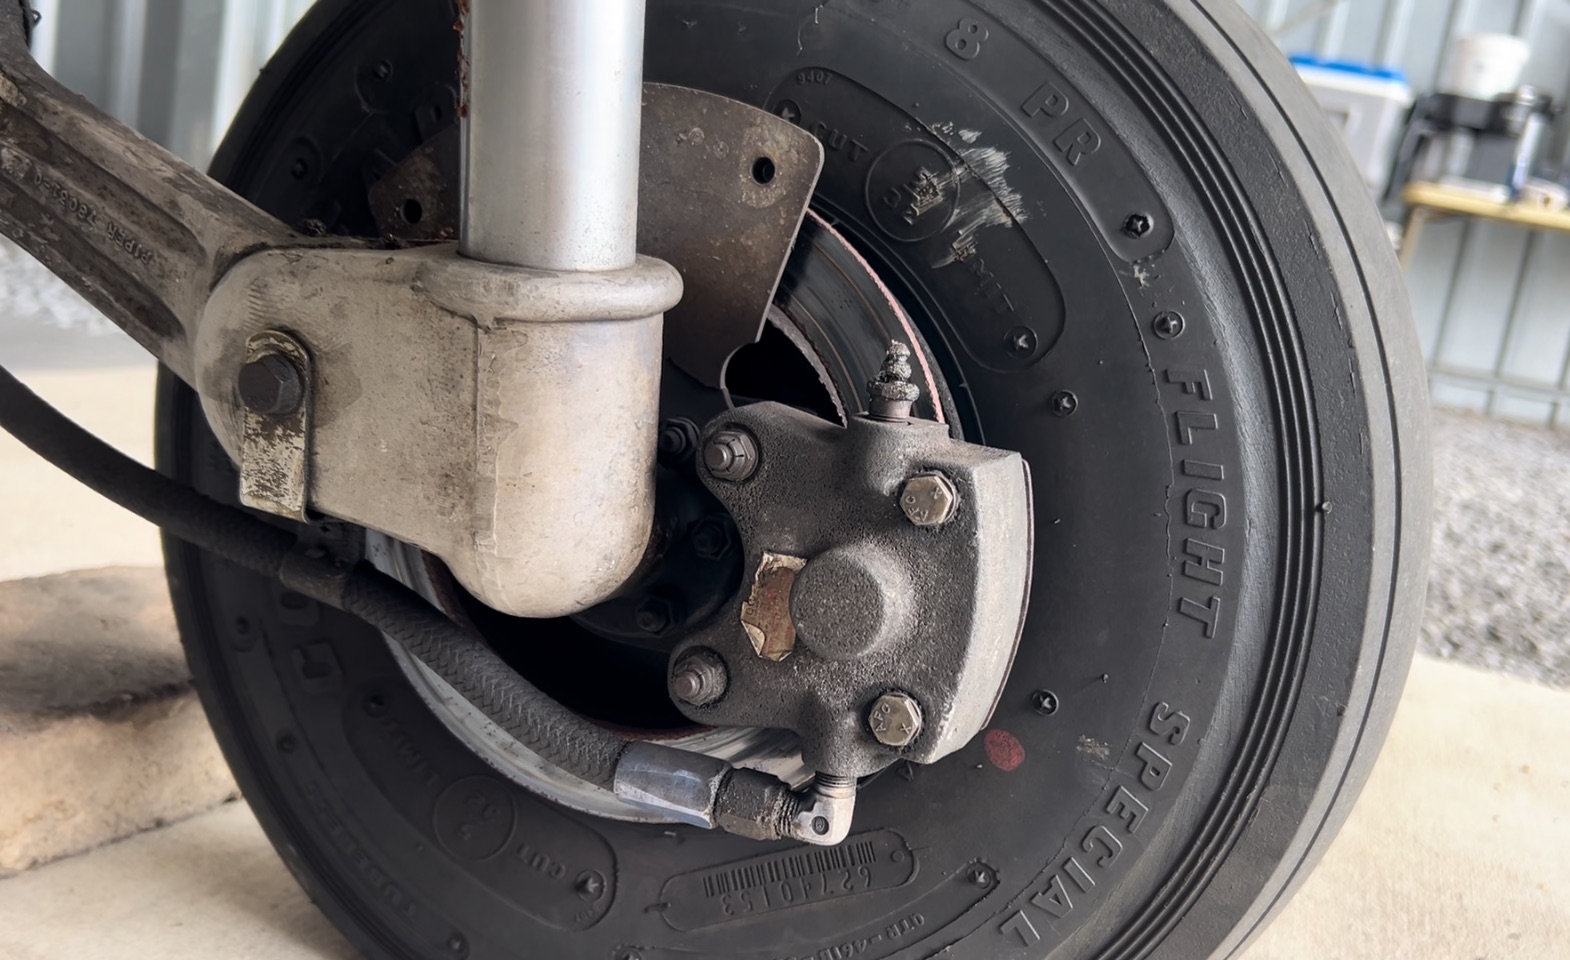
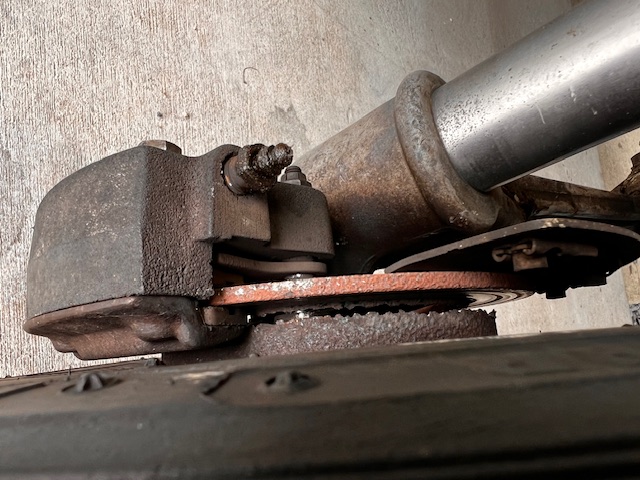
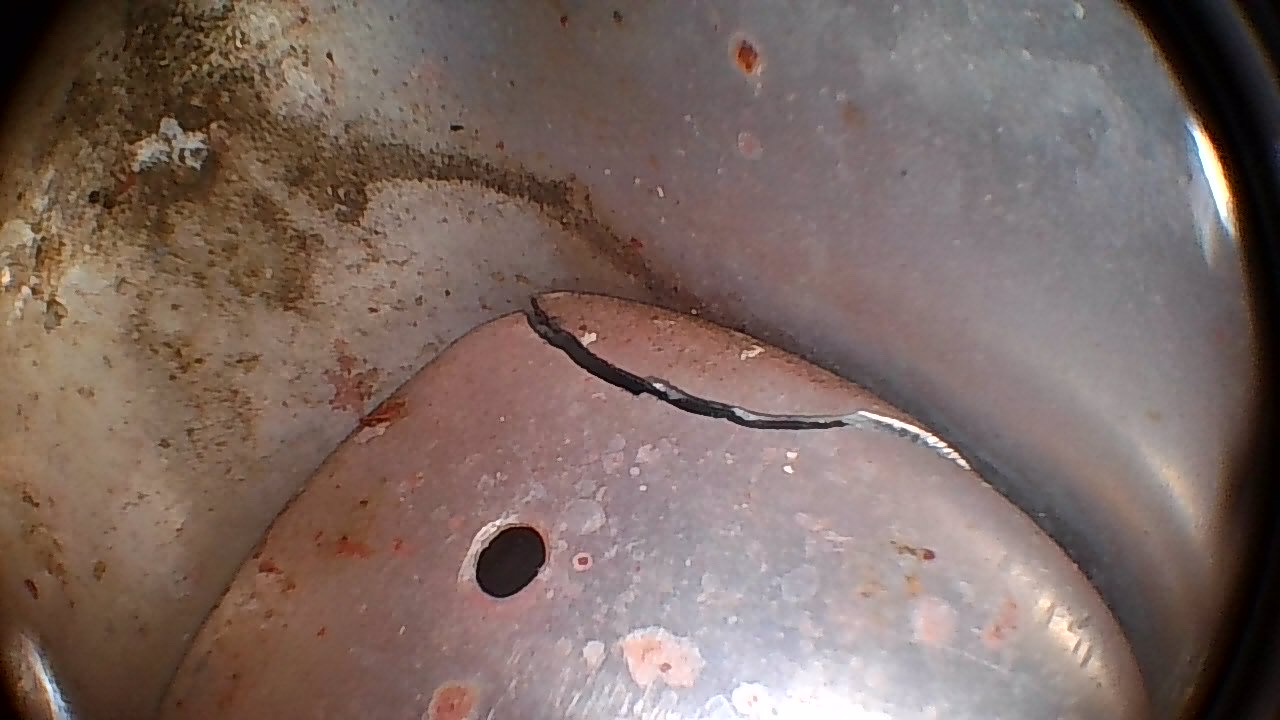
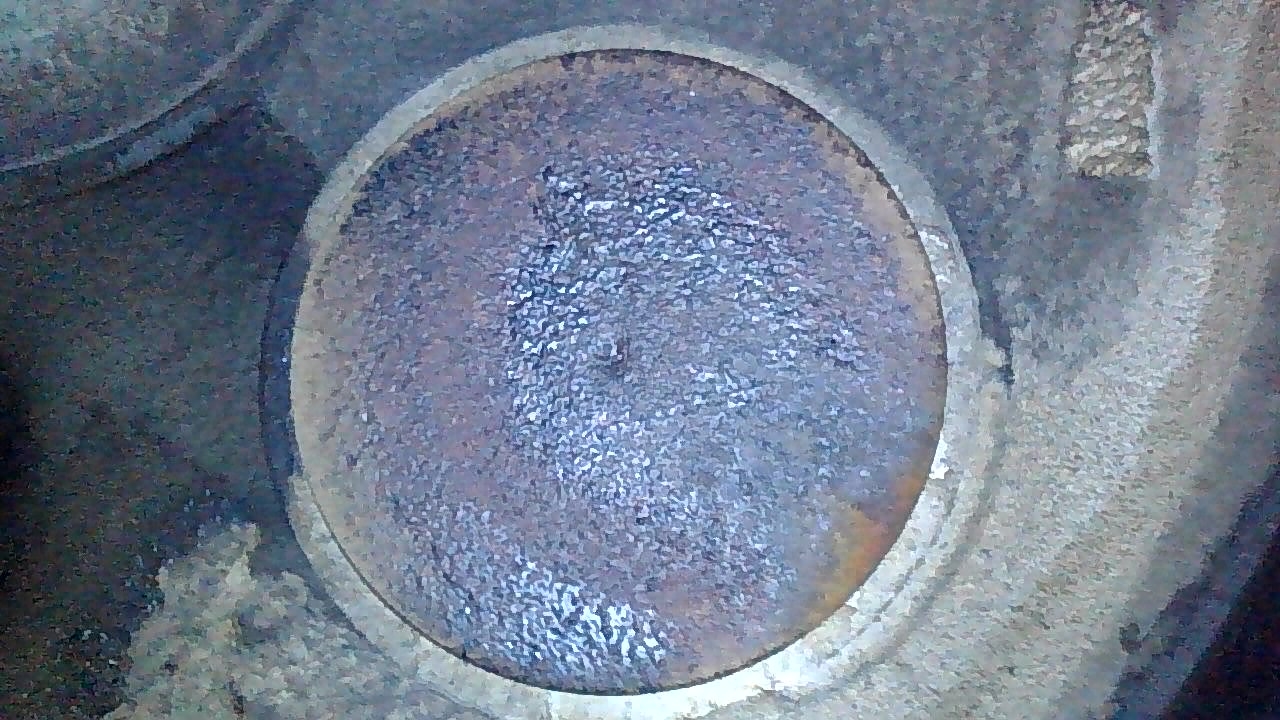
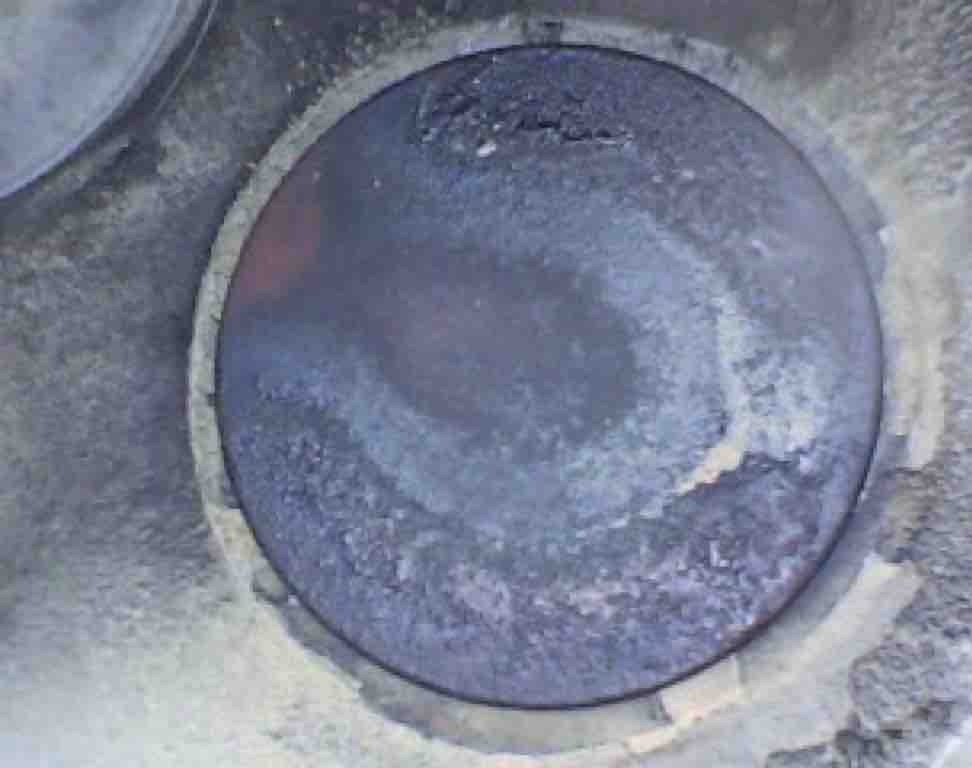
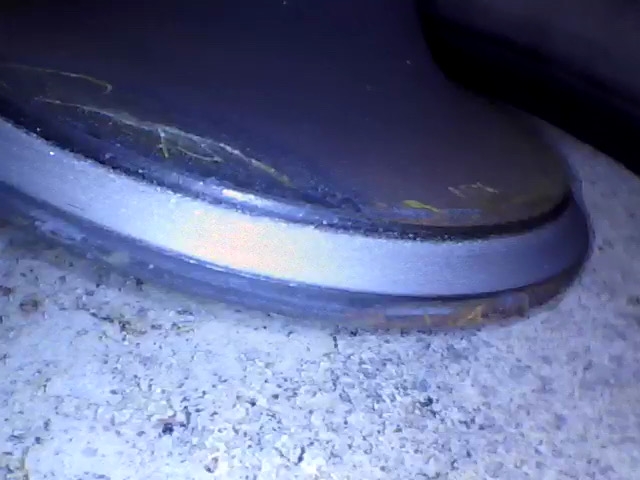
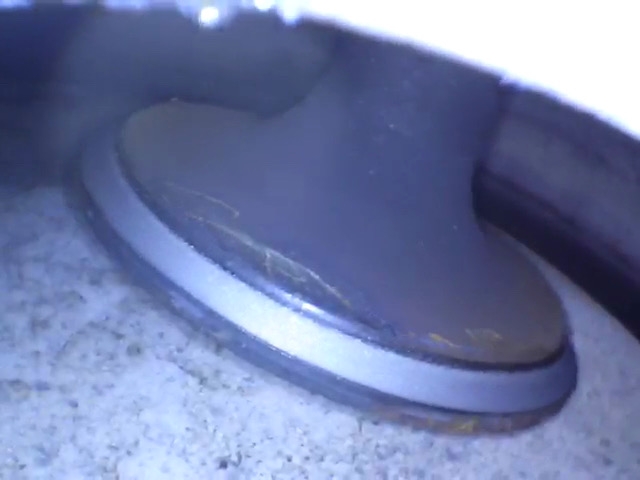
What we can’t see from this angle is the fact that the brake disc has broken in two pieces!
Check it out:
Here’s the story:
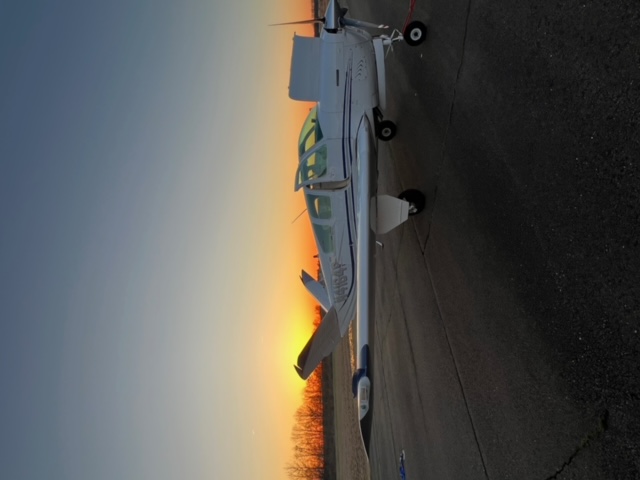
The pilot landed the Piper Cherokee, and after a successful landing, something gave way on the left brake, and it became ineffective. Now we know why.
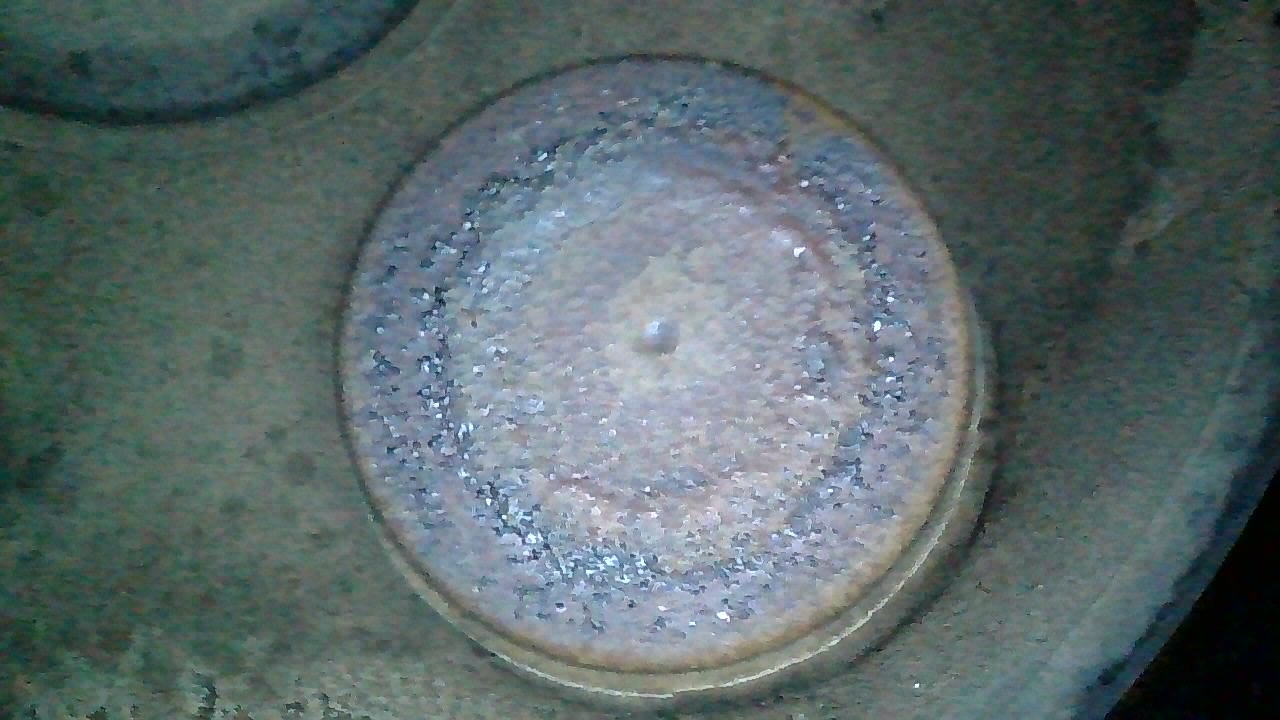
It’s definitely time for new brake discs, and this airplane will soon get new APS164-02000 Blacksteel brake discs that are corrosion resistant.
It will also be a good time to replace the worn tire on this wheel.
After some research, I discovered a retread Goodyear Flight Special II (like the airplane currently has on it,) is about half the price of a new one, and can be purchased directly from Wilkerson Tire Company here in Virginia!
And when I called them, a real live knowledgable and helpful person answered the phone… it was truly a great customer service experience (it was Mckaellen Wilkerson, a fourth generation member of the team there.)
I love supporting quality family businesses whenever possible, and Wilkerson appears to be one such business.
Here’s a link for their website if you want to check it out:
In this podcast episode, I also shared two emails I received recently.
One was from Troy, who had some very helpful and interesting things to say about the last episode about single engine RG Cessna airplanes. Thanks Troy, for the reminder that if one of these airplanes is not high enough and the gear is retracted, it can actually lift the airplane right off the jacks… yikes!
Be sure to listen to the audio to hear the rest of his email.
The second email I mentioned was from Fabien.
He and his family moved to the US awhile back and they fly a nice V35B Bonanza. He had a question about where to get his ruddervators stripped and repainted due to some corrosion that has been developing.
If you have any excellent recommendations for V-Tail Bonanza ruddervator paint work, you can contact Fabien directly at the following email:
fabien.turpaud{at}icloud{dot}com
Along with his paint question, he also shared some really great photos and gave permission to include them here:
The filiform corrosion on the ruddervators is not critical yet, but Fabien is being proactive about making a plan to remedy the issue as soon as reasonable.
Hopefully we can find a good solution for Fabien to get his ruddervators repainted with minimal down time so he can continue the adventures with his family!
Note: Scroll down to see who I unexpectedly met in Florida this past week!
Now for the Prebuy… it was some months ago, and I did a prebuy inspection on a nice airplane on behalf of the buyer.
I also became good friends with the owner / seller, for which I was grateful, because sometimes these can end up being sticky situations.
The owner / seller (who is a really great gentleman) seemed to think his airplane was nearly perfect, and there should be very little wrong with it.
And by all means, it was a very nice airplane indeed. So much so, that if I was buying it, I’d be thrilled!
Nevertheless, I found some things that needed attention.
Listen to the episode to hear about the things I noted, which I categorized into three parts:
Significant Items
Miscellaneous Observations
Items to consider during next annual inspection
I’m not going to list them all here, but I talked about them in the audio for this episode.
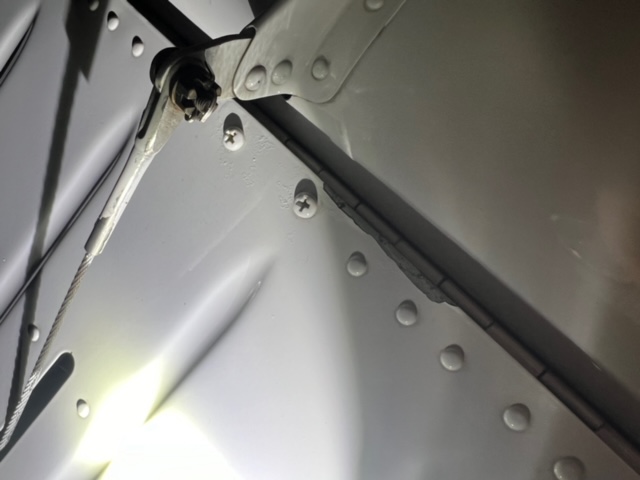
Here’s a photo of one item I found… the right flap forward rib had a large crack in the leading edge – a very common problem on Bonanzas. (The flap was sent out for repair, and reinstalled, as part of the selling process.)
This crack can be seen by looking outboard and forward inside the open inspection hole in the flap in the following photo:
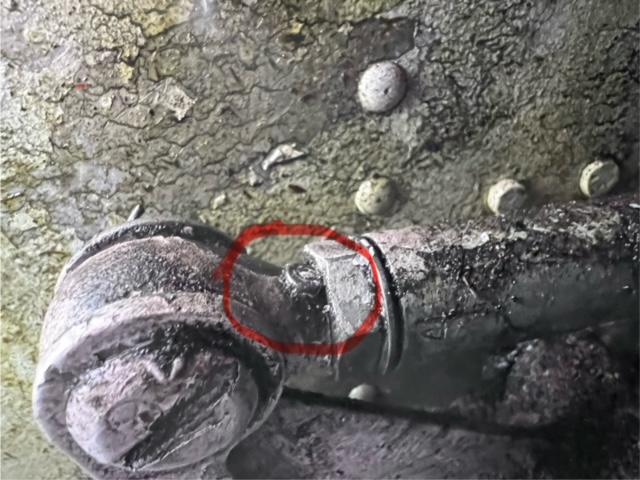
The following photo shows the forward nose gear rod end that was replaced, along with the nose gear down spring and some other hardware (note the small grease zerk in the side of the rod end… rod ends that are drilled for a grease zerk have been known to fail, and it’s wise to replace them with the solid type.)
Note: American Bonanza Society (ABS) recommends replacing all three rod ends for the Bonanza nose gear system every 2000 hours.
For me, the prebuy was a great experience, and I’m hopeful both the seller and the buyer feel the same way.
In my estimation, we took a really nice airplane, and made if even better… and that makes me happy!
How about you? Is your airplane perfect?
One way to see how perfect it is would be to get some other eyes on it from time to time… take it somewhere different every few years for the annual inspection.
Then, when it comes time to sell it, perhaps it will be just a little closer to perfect!
Now for my huge surprise in Florida this past week… I met a very fine gentleman at the Orlando Executive Airport, and even got a photo with him:
This is Mr. Bob Showalter, of the Showalter Flying Service in Orlando, which the family sold back in 2015.
I was grateful to meet such a fine gentleman that day, and to learn more about him and his family, and how they have contributed in such a huge and impacting way to the world of aviation.
So many people have asked me over the years if I was related to the Showalters who have the FBO in Orlando, and my answer will now be, “Not that I’m aware of, but if I was related to them, I’d be proud!”
If you’re interested in some fascinating history of Bob’s family and Showalter Flying Service, here’s a link with all kinds of interesting information, as well as a large assortment of really fun photos from years ago.
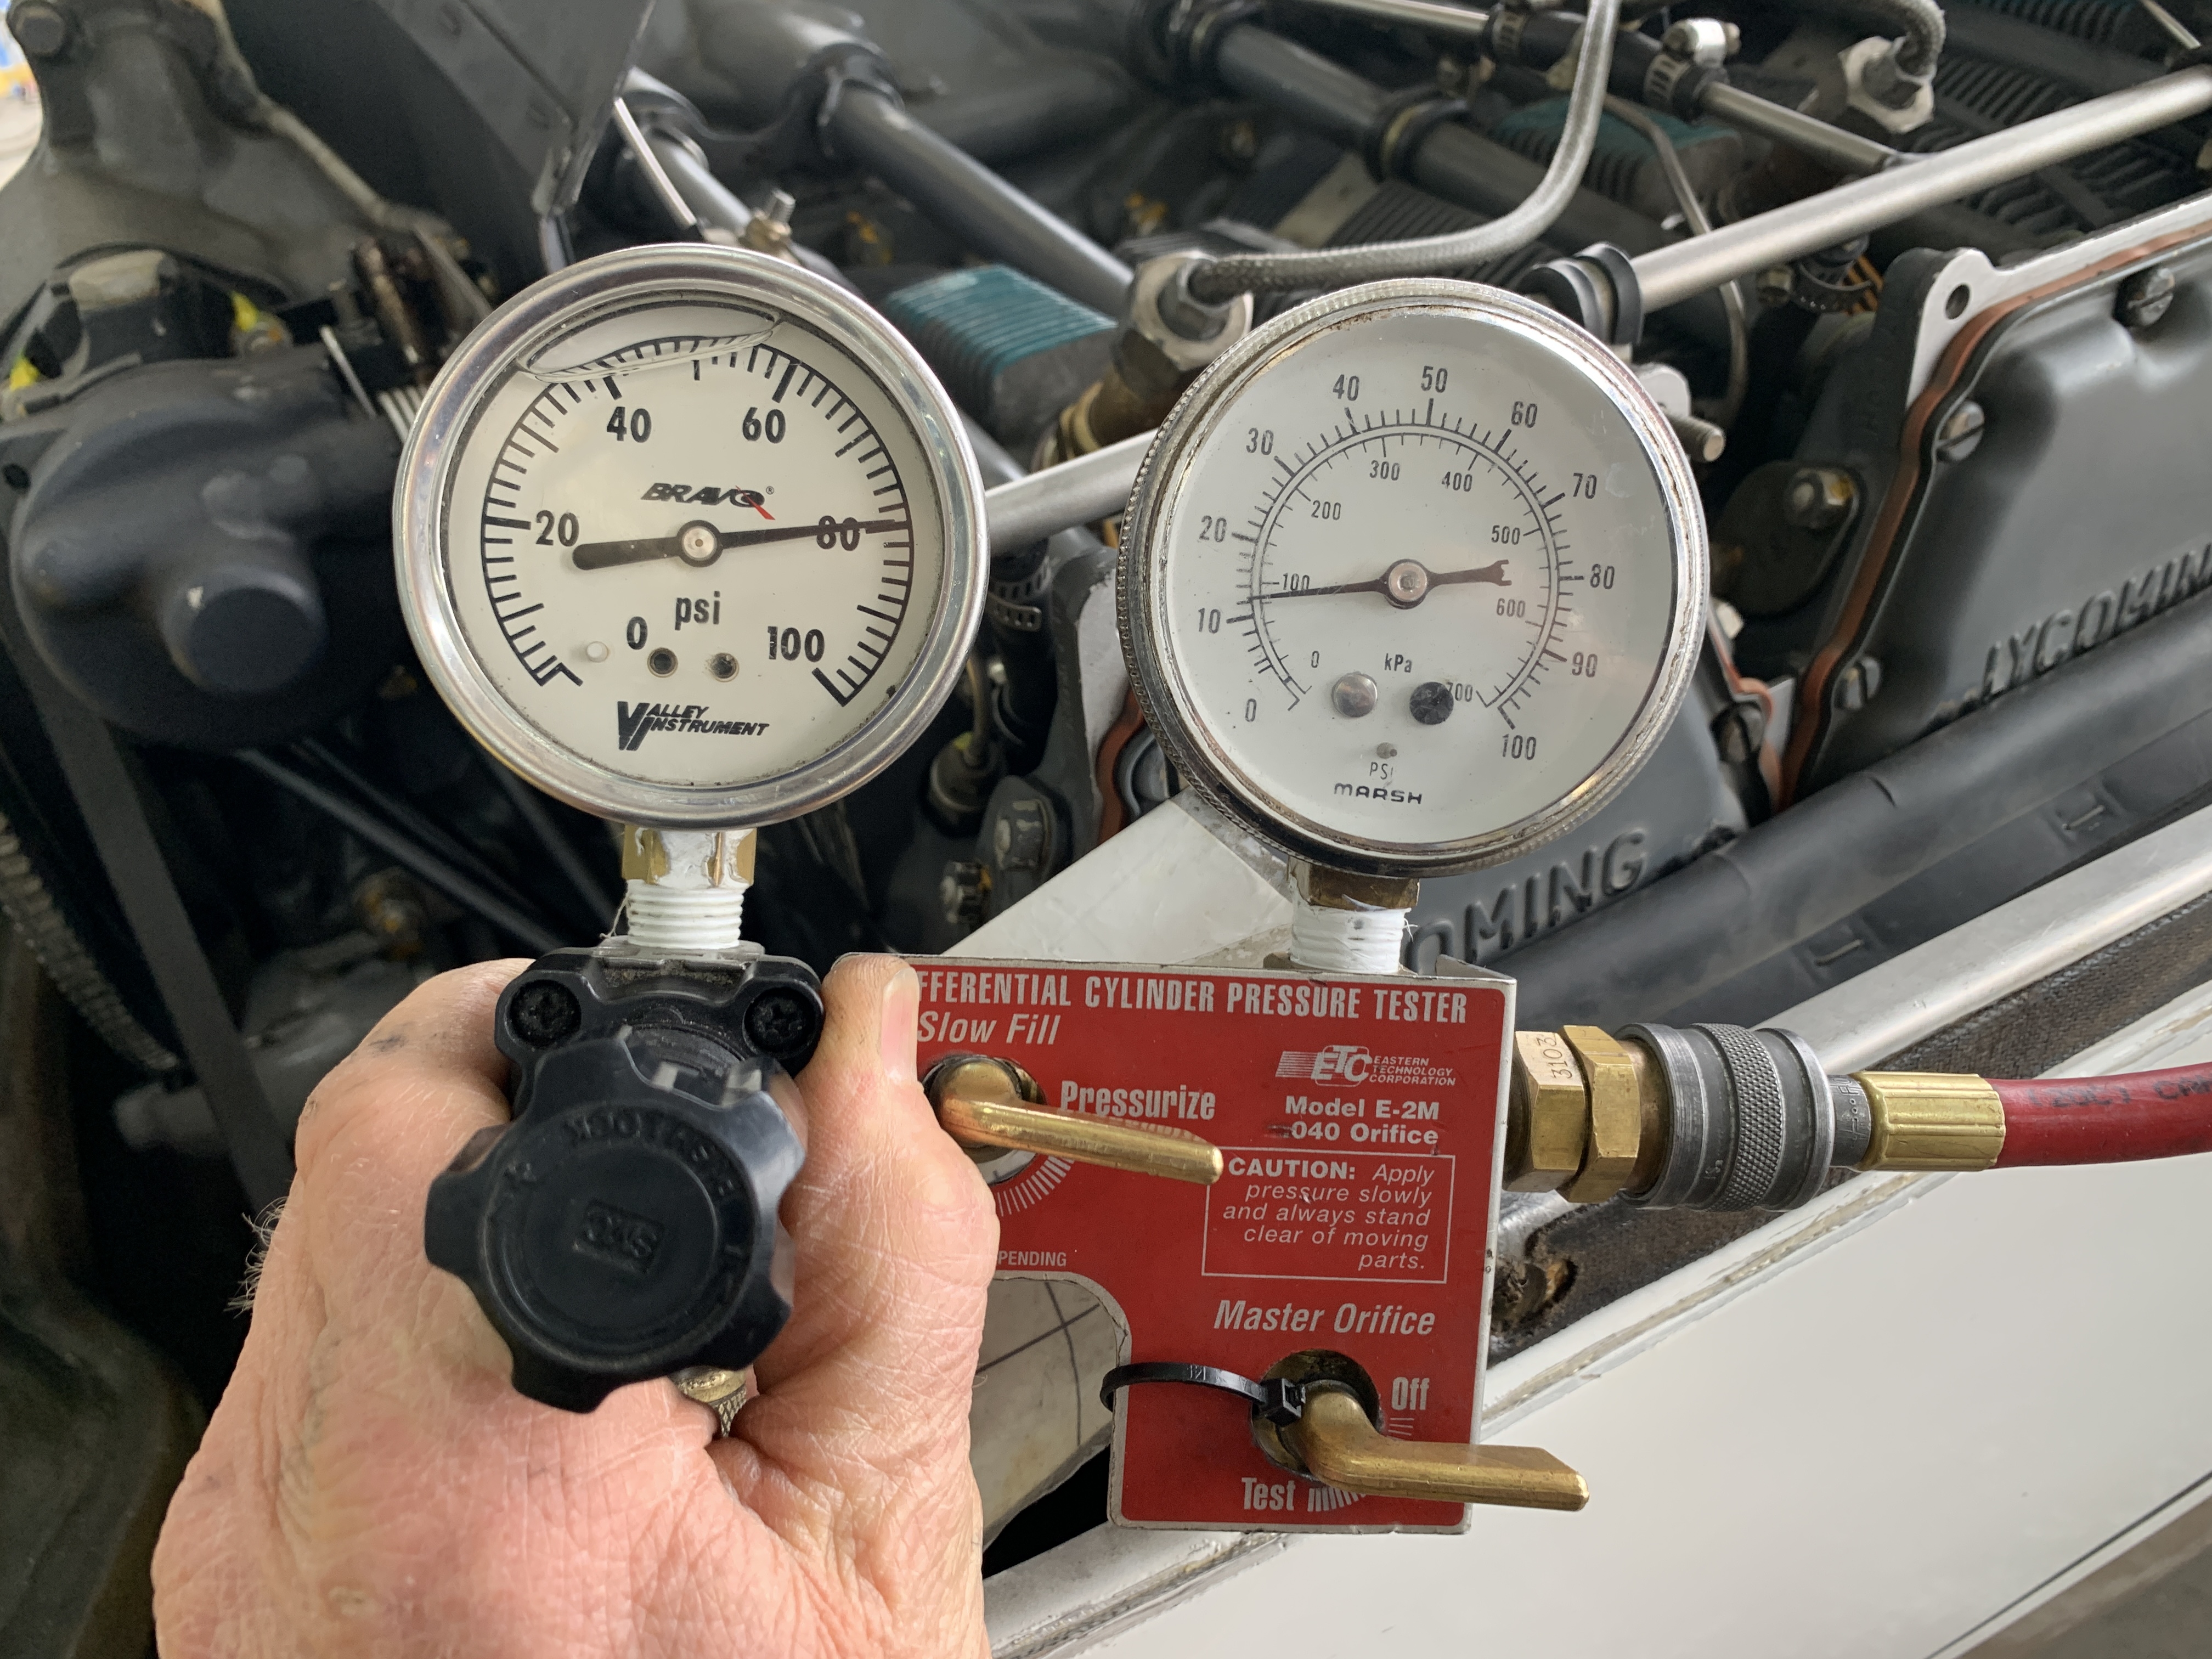
I inspected another A36 Bonanza recently, and one of the cylinder compressions was too low… lower than the minimum prescribed by Continental using the master orifice tool.
I had two options:
Option One: Remove the cylinder for repair or replacement.
Option Two: Make the exhaust valve seal better and improve the compression result in hopes of saving the cylinder from premature amputation.
I chose Option Two.
It was at least worth a try…
… and the result was stunning!
After lapping the valve in place and installing a new rotocoil, I ran the engine again and rechecked the compression.
It was 75/80!
The lowest cylinder on the engine was now the highest cylinder.
I also lapped the exhaust valve in cylinder #2, and that one improved from 49/80 to 63/80.
This was what happened recently in a Piper Seneca… and in this episode, we discuss why the alternator quit… it was something I totally was not expecting.
After verifying the field connections (power and ground) were good, and the brushes were nearly perfect, I removed the alternator.
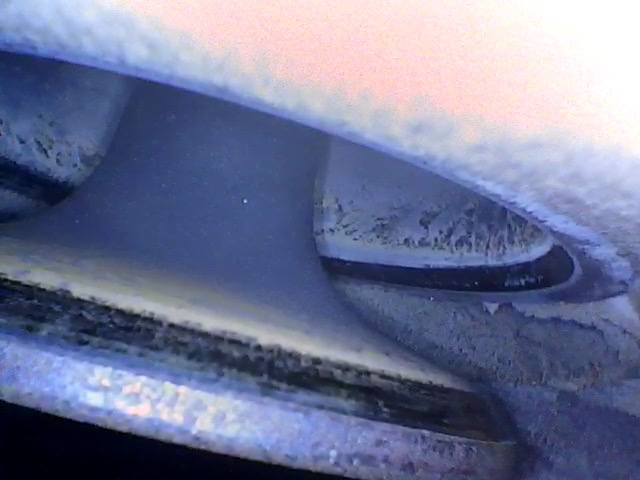
And here is what I found… watch this video:
It was two things, really. First, the nut holding the drive coupling onto the alternator shaft was loose. And second, the drive gear was turning independently of the alternator shaft… not good! The drive coupling is like a clutch that is designed to slip at a preset high torque value in case the alternator seizes.
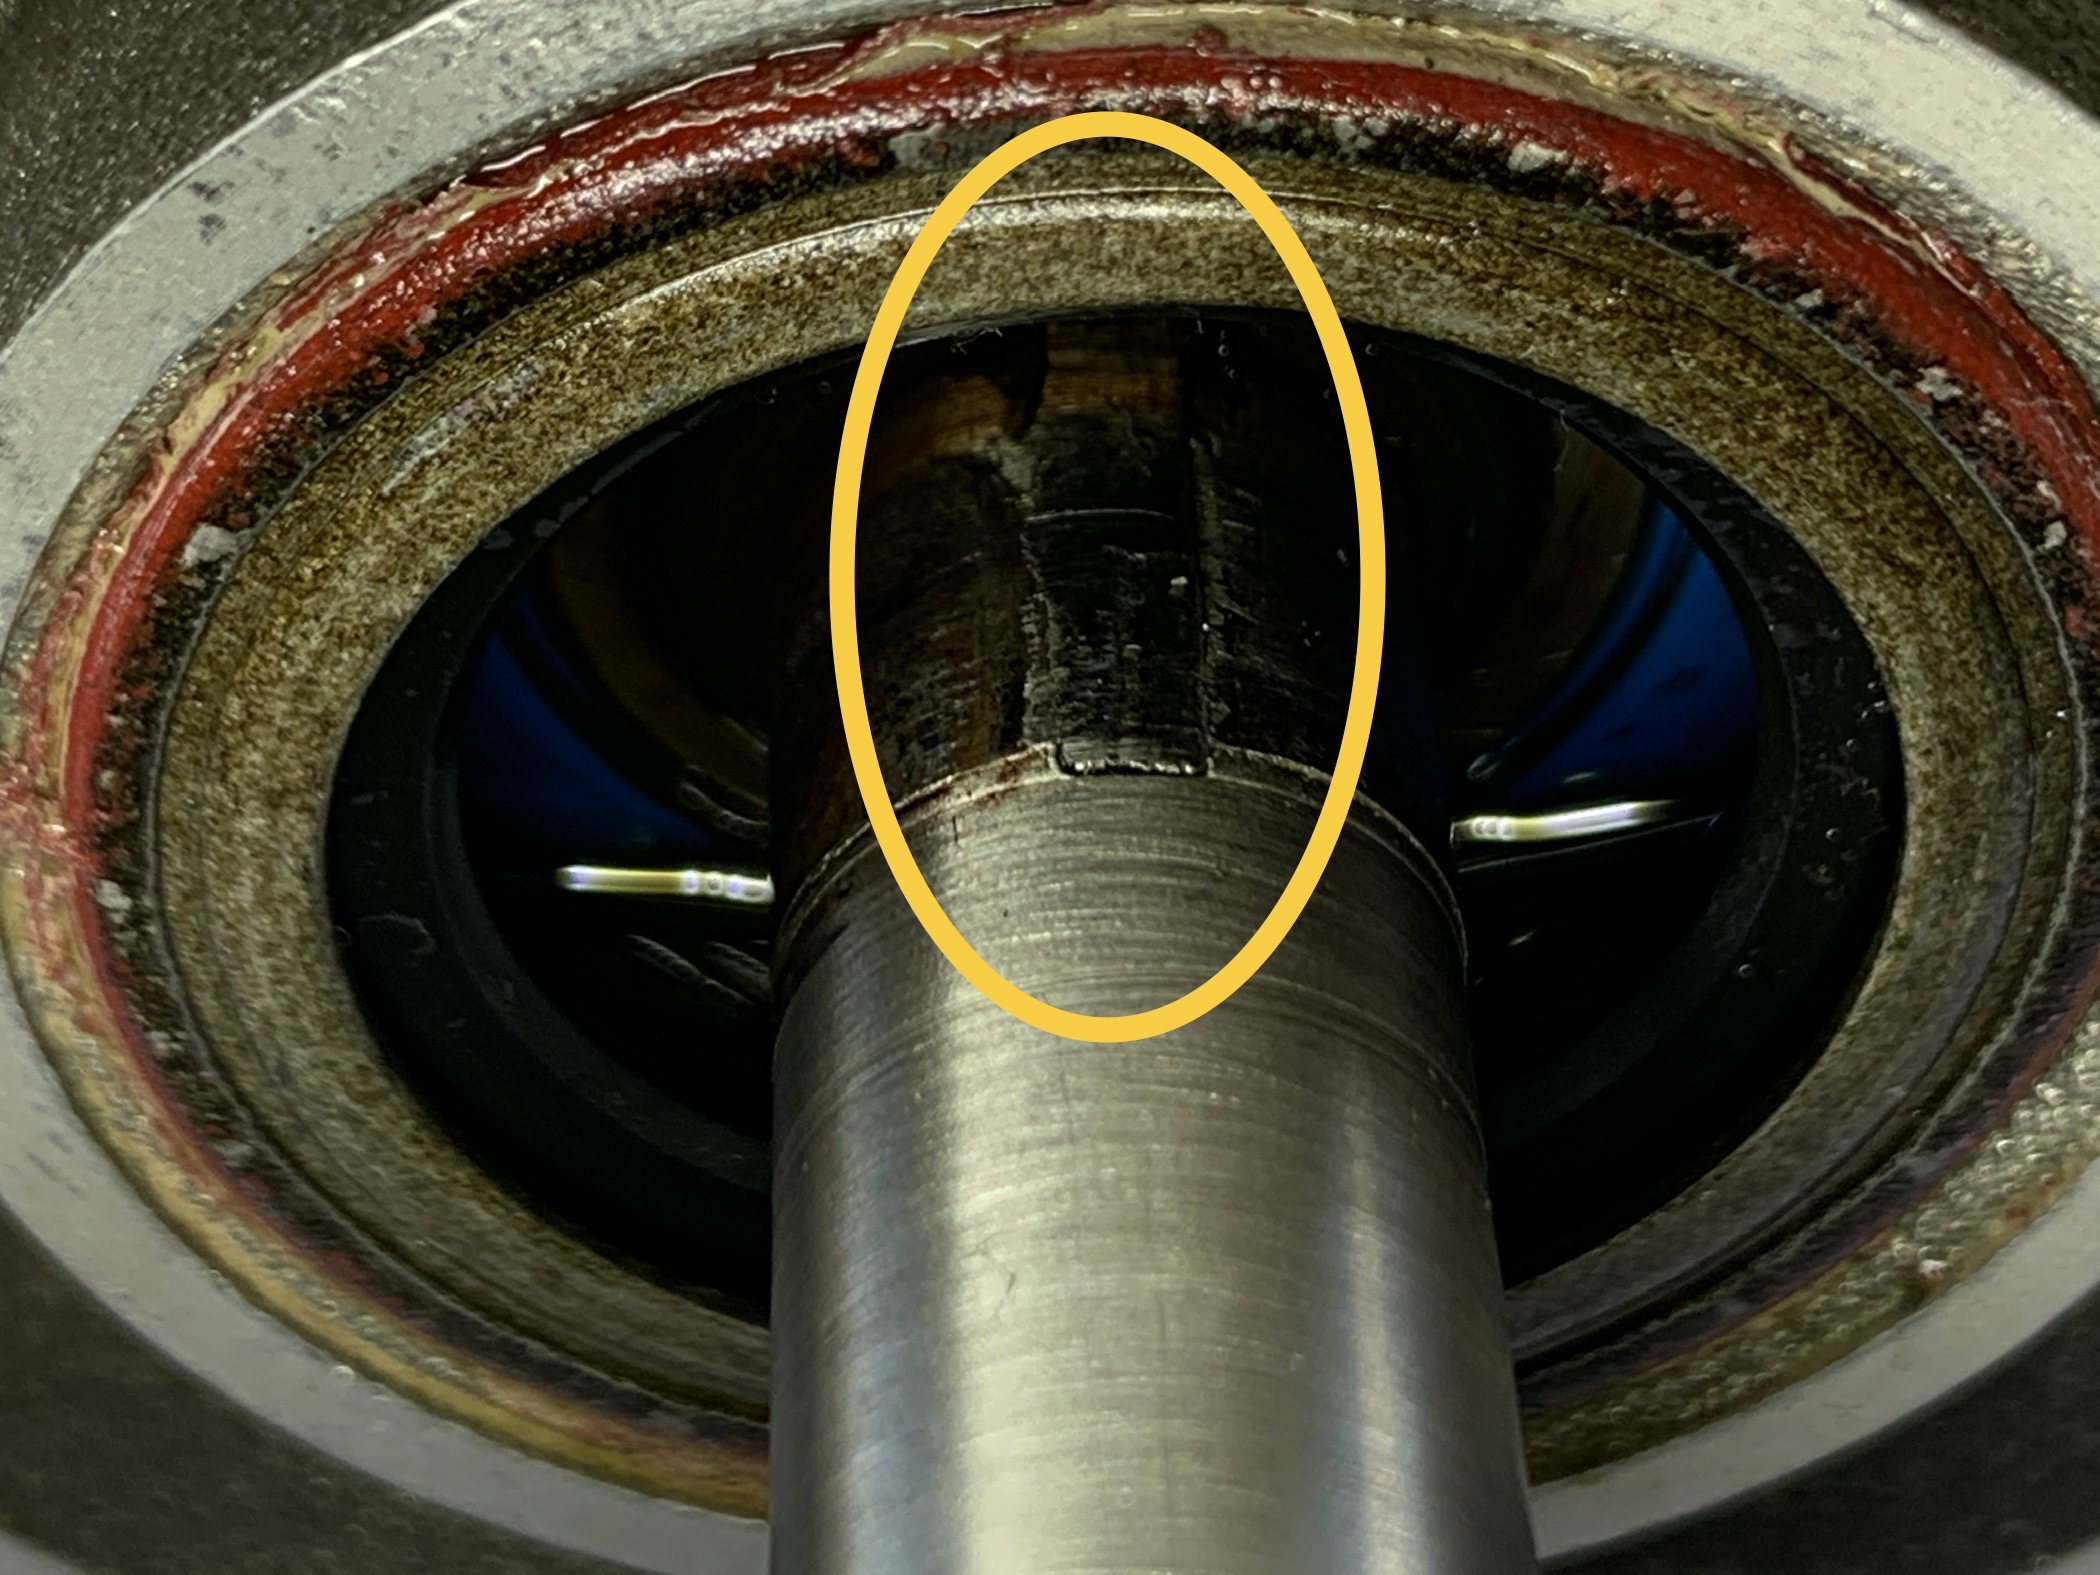
I had to look closely to really see what had happened… and I discovered the woodruff key that holds the drive coupling securely to the alternator shaft, had completely sheared off, and the remaining portion of the woodruff key was barely visible in the alternator shaft after I removed the drive coupling… check it out:
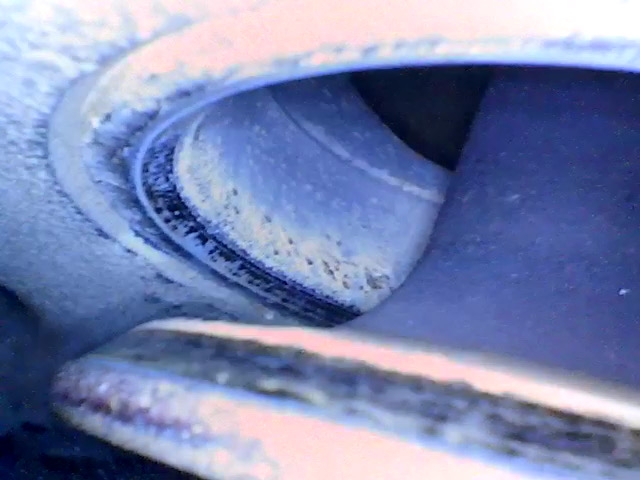
And, after the woodruff key sheared off, the drive coupling and gear kept turning while the alternator was not turning, and it wore the alternator shaft right down to the shiny surface you see here.
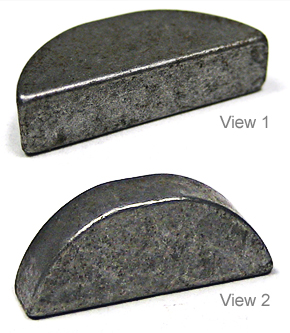
In case you’re not familiar with a woodruff key, here’s what they look like new, and you can buy them at Aircraft Spruce and other places:
The rounded part goes down into a slot in the alternator drive shaft, and the straight part sticks out of the shaft and engages with the drive coupling as you slide the drive coupling down onto the alternator shaft.
Continental has very specific instructions for installing the drive coupling onto the alternator, along with a specific torque value, and very specific instructions for installing the cotter pin.
In this case, we ordered an overhauled alternator (because the shaft was worn and the remaining woodruff key was stuck in the worn shaft,) an overhauled drive coupling (because the slot for the woodruff key was worn,) and a new special nut for the drive coupling (because the old one was worn due to spinning against the gear/drive coupling.)
So, why did this happen? I’m not sure, but I’m guessing the nut was not torqued properly way back when it was installed at engine overhaul about 400 hours ago.
And my next question is, “What about the left engine alternator?” And did the same person install that one? Perhaps we should remove and inspect that one as well.
Here’s another question I’ve been pondering that relates to the title of this episode: “Why did the alternator fail when he put the gear up?”
And here’s my guess: The drive coupling and woodruff key had been wearing over a long period of time, and was barely hanging on, and finally when it was very weak, at the moment the landing gear pump was activated, it caused a momentary surge of amperage draw, just enough to put an increased load on the alternator, and the small bit of remaining woodruff key sheared off completely and the drive gear was free-wheeling at that point, with the alternator shaft remaining still, making it impossible to produce any more electrical power output.
That’s my theory.
And you may wonder, how did the whole thing turn out?
While I would have liked to finish the repair, I was not able to be in the shop the next day, so another A&P installed everything, and the owner took off for a big trip to the South the next day.
If the alternator had to fail, it happened at the perfect time. It was just after a good long 1 hour plus flight to break in a freshly installed repaired cylinder on the left engine, but before the owner blasted off for a long trip in the airplane… amazing.
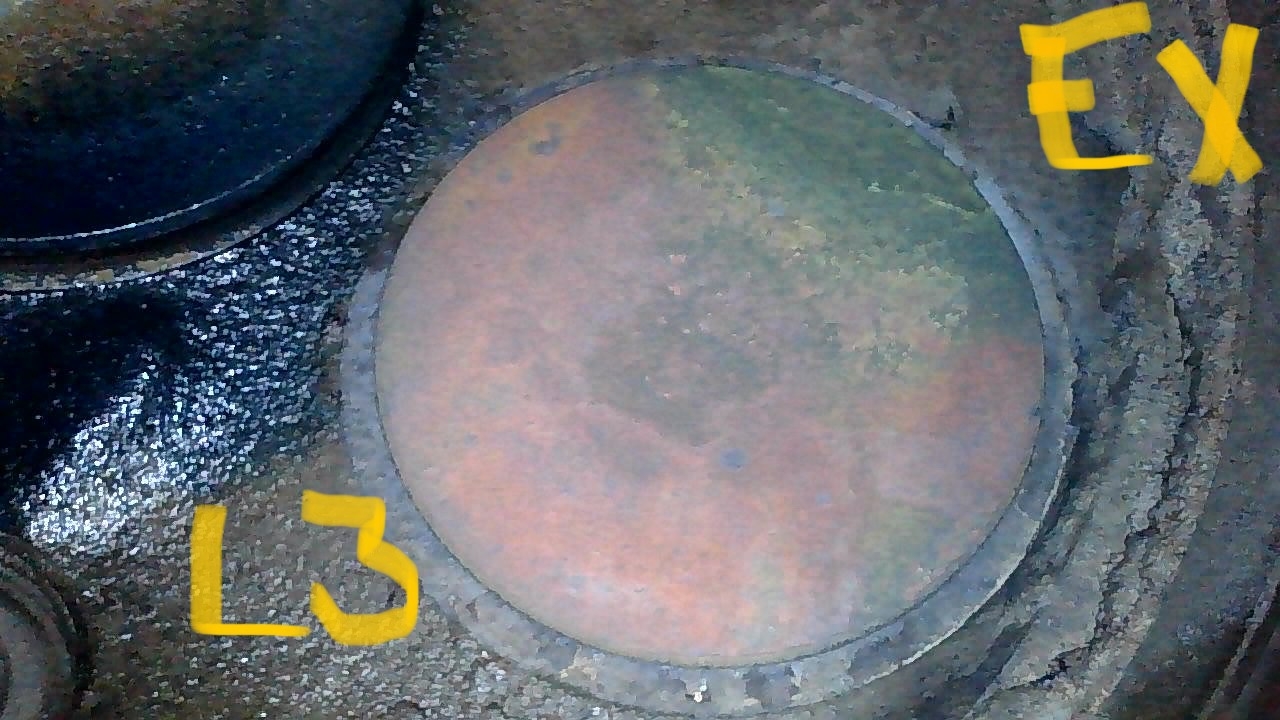
And that’s another story we covered in this episode… the left engine #3 cylinder had to be changed due to a burning exhaust valve. Check it out:
The compression in this cylinder was 11/80, and then we found the burning exhaust valve with the borescope. This photo was taken after removing the cylinder.
If this valve had been found earlier, perhaps it could have been saved by lapping and installing a new rotocoil, but since it was too far gone with a green edge due to severe burning and wear on the seating area, it had to be removed.
One more interesting thing about this whole scenario is the owner has had some concerning oil analysis reports from both engines recently, and he’s been trying to get to the bottom of it. Hopefully, after repairing the left engine cylinder #3, including a new exhaust valve and valve guide, and no longer having a woodruff key coming apart in the right engine, the oil analysis reports will be much better moving forward… we’ll see.
Here are a few other items we talked about in this episode:
The turbo Cessna 182 RG that’s ready to fly again after a big annual inspection and cam / lifter change in the engine.
A prebuy on a really nice Mooney M20C.
My good friend Dave Ovad and some fuel system work and landing gear work we did on his nice A36 Bonanza. And just to document this, here’s the P/N for the little thin special washers that go on either side of the middle rod end for the nose gear system, at the idler arm connection at the aft end of the nose gear well: 100951CR016YF If you have a Bonanza and you’re going to replace the 3 nose gear rod ends, go ahead and order a couple of these inexpensive washers, because sometimes, they are missing!
Another turbo-normalized Bonanza I’m currently doing an annual inspection on.
Well that’s all for this time… thanks for joining me!
The post “197 – When He Put the Gear Up the Right Alternator Quit” appeared first at AirplaneOwnerMaintenance.com
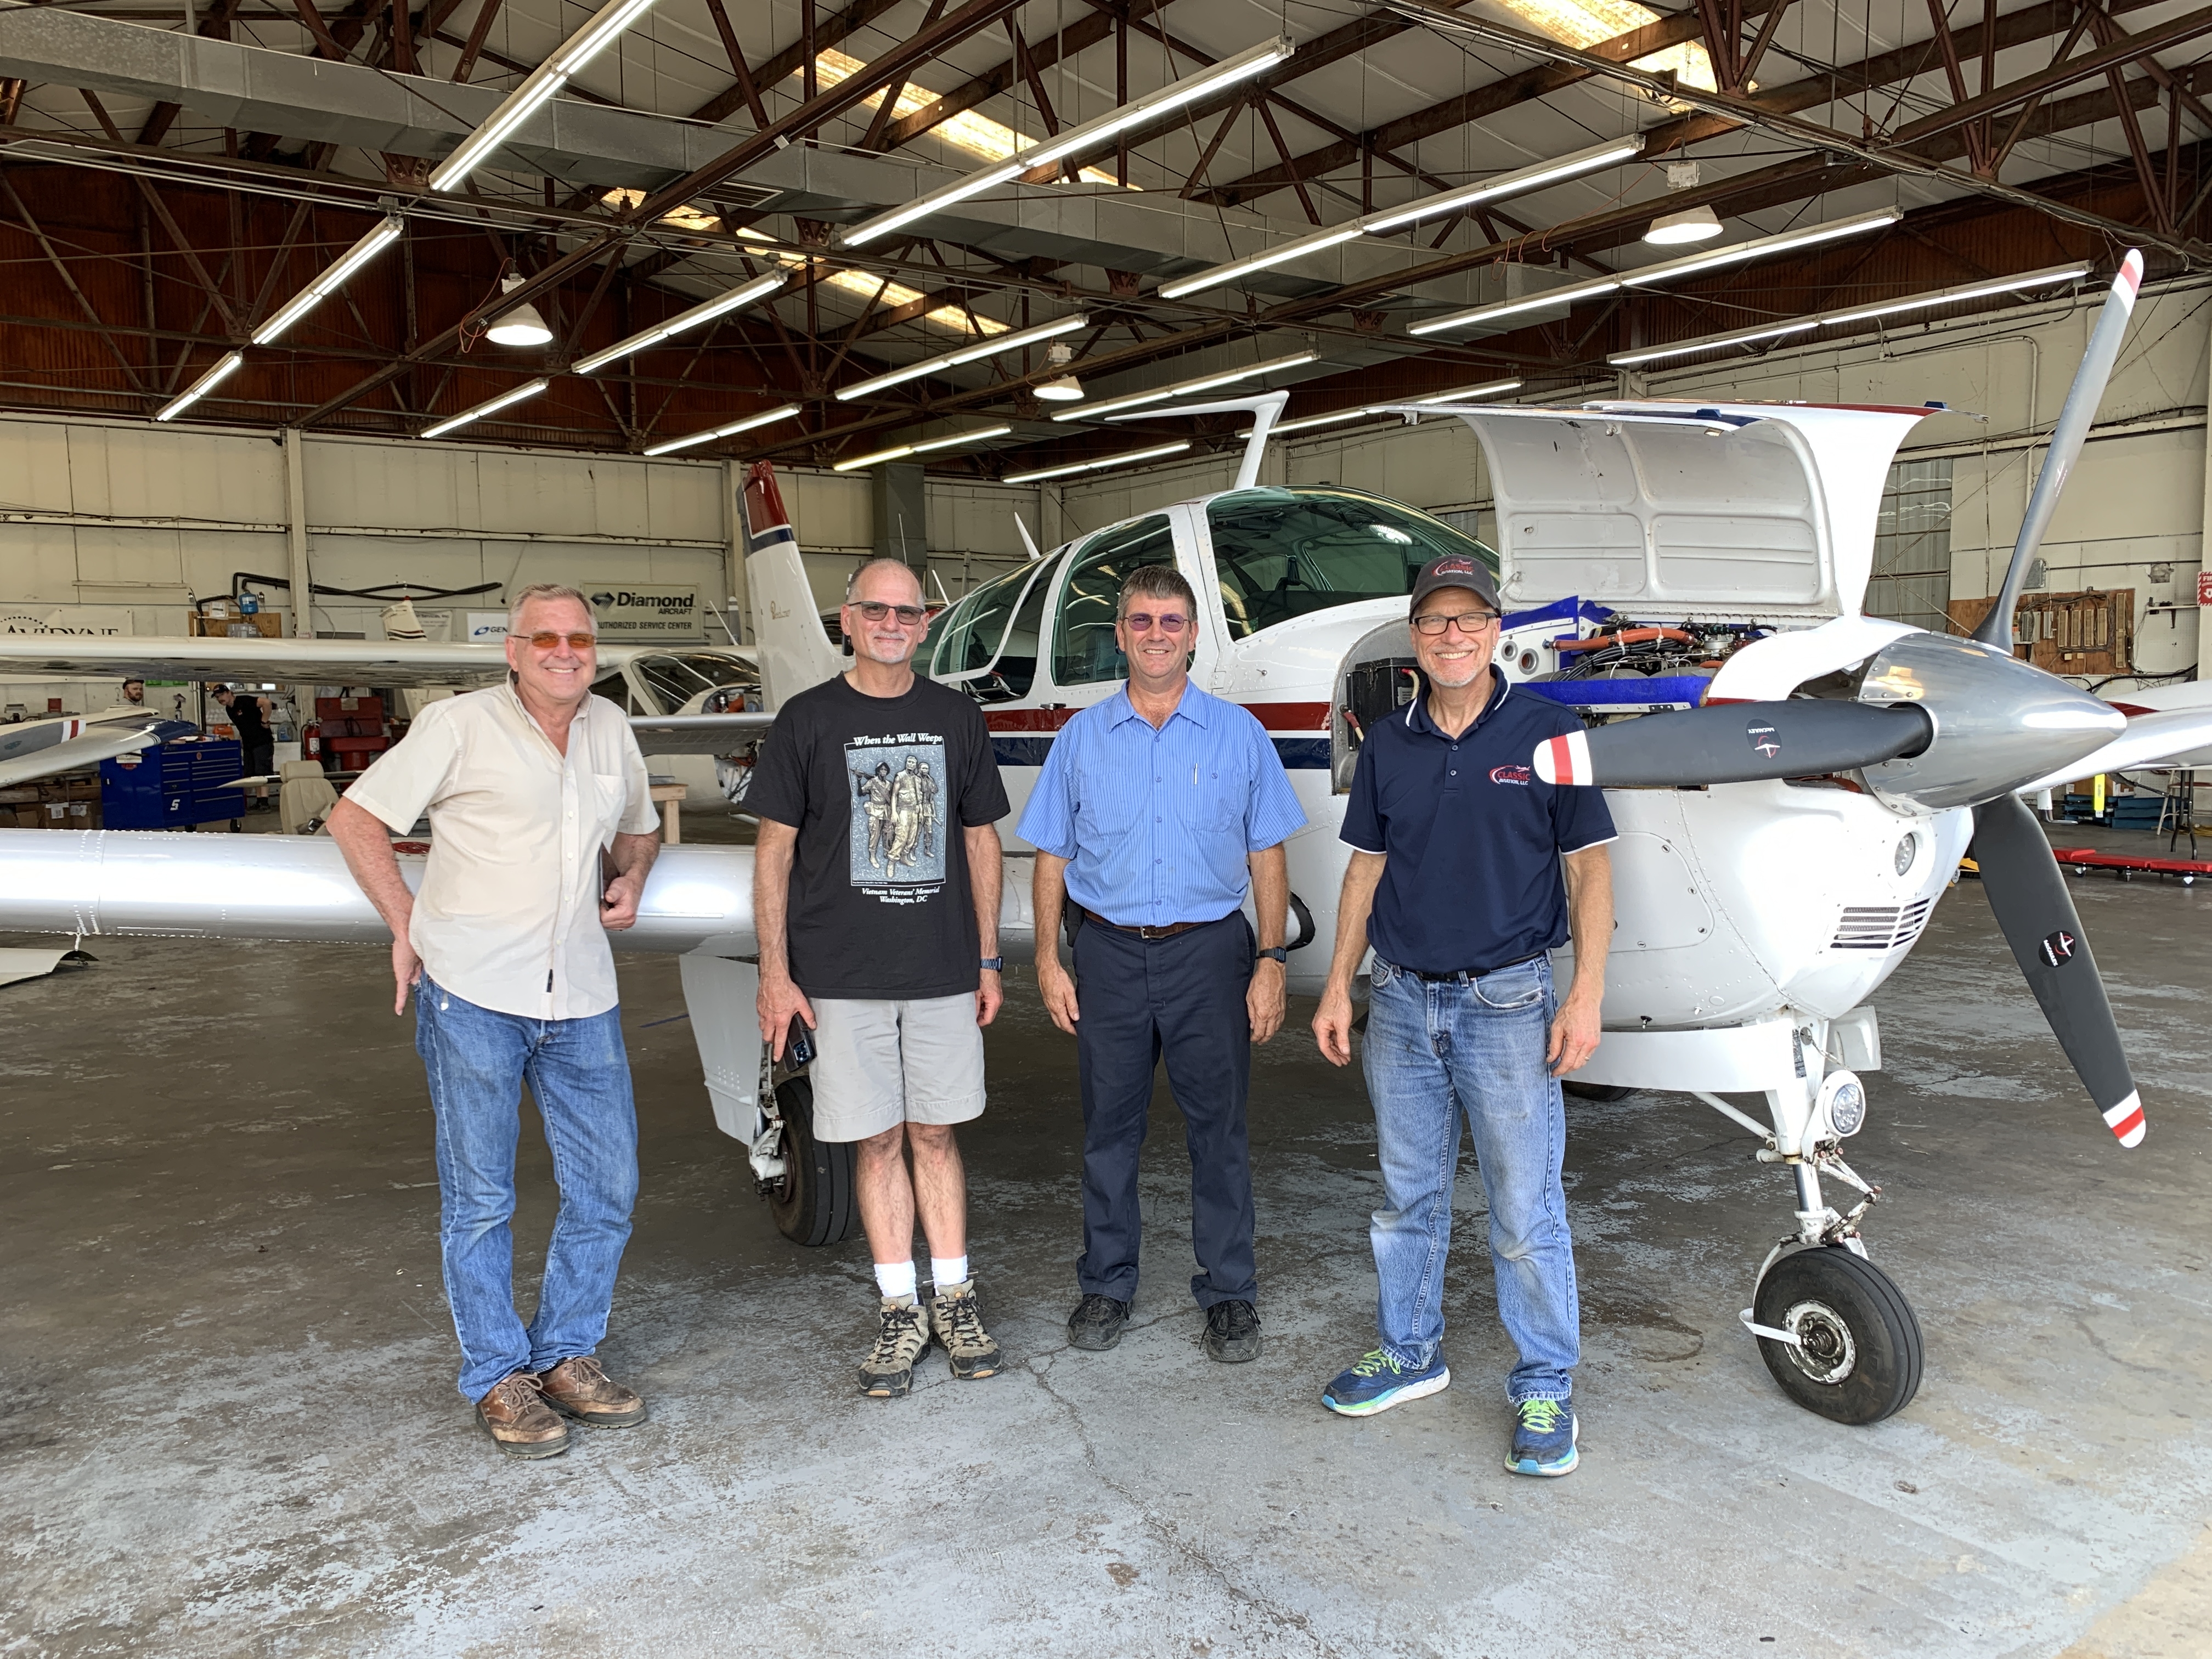
From left: Arthur, Dave, Mervin, Dean (I got to work with these guys last Monday at Classic Aviation., when Dave had me lap the exhaust valves in cylinders 3 and 5.)
Scroll down for more info about this valve lapping adventure.
Diamond DA40 annual inspection – here are some squawks we discuss in this episode:
Electroair ignition leads.
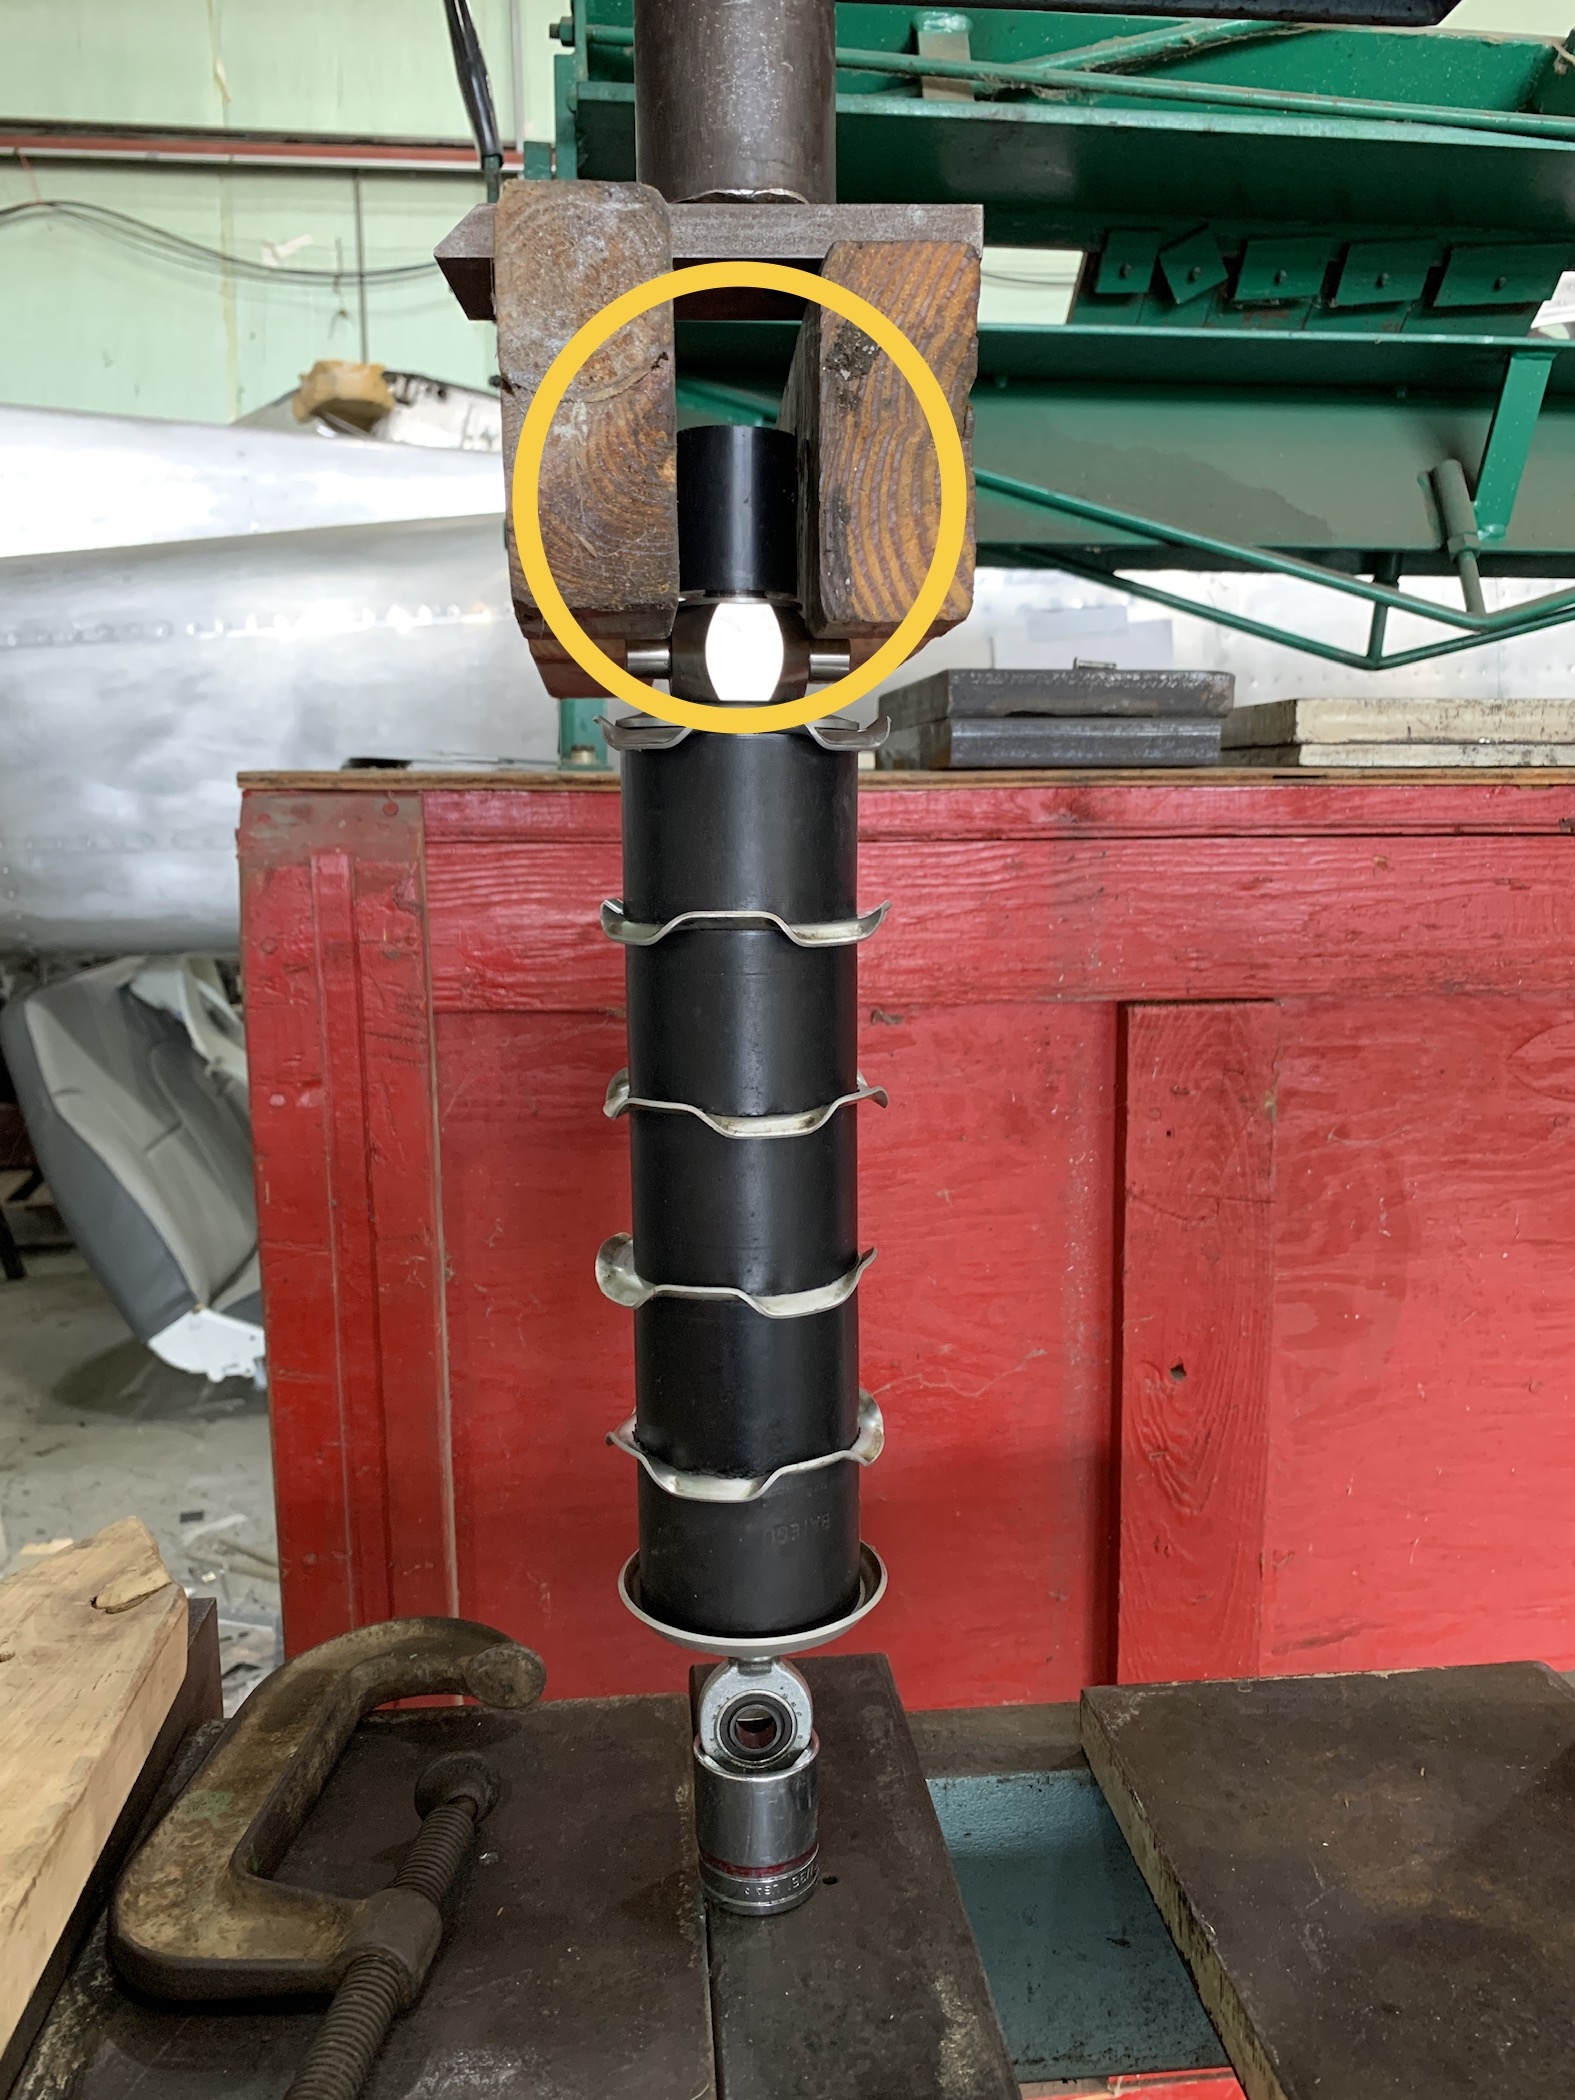
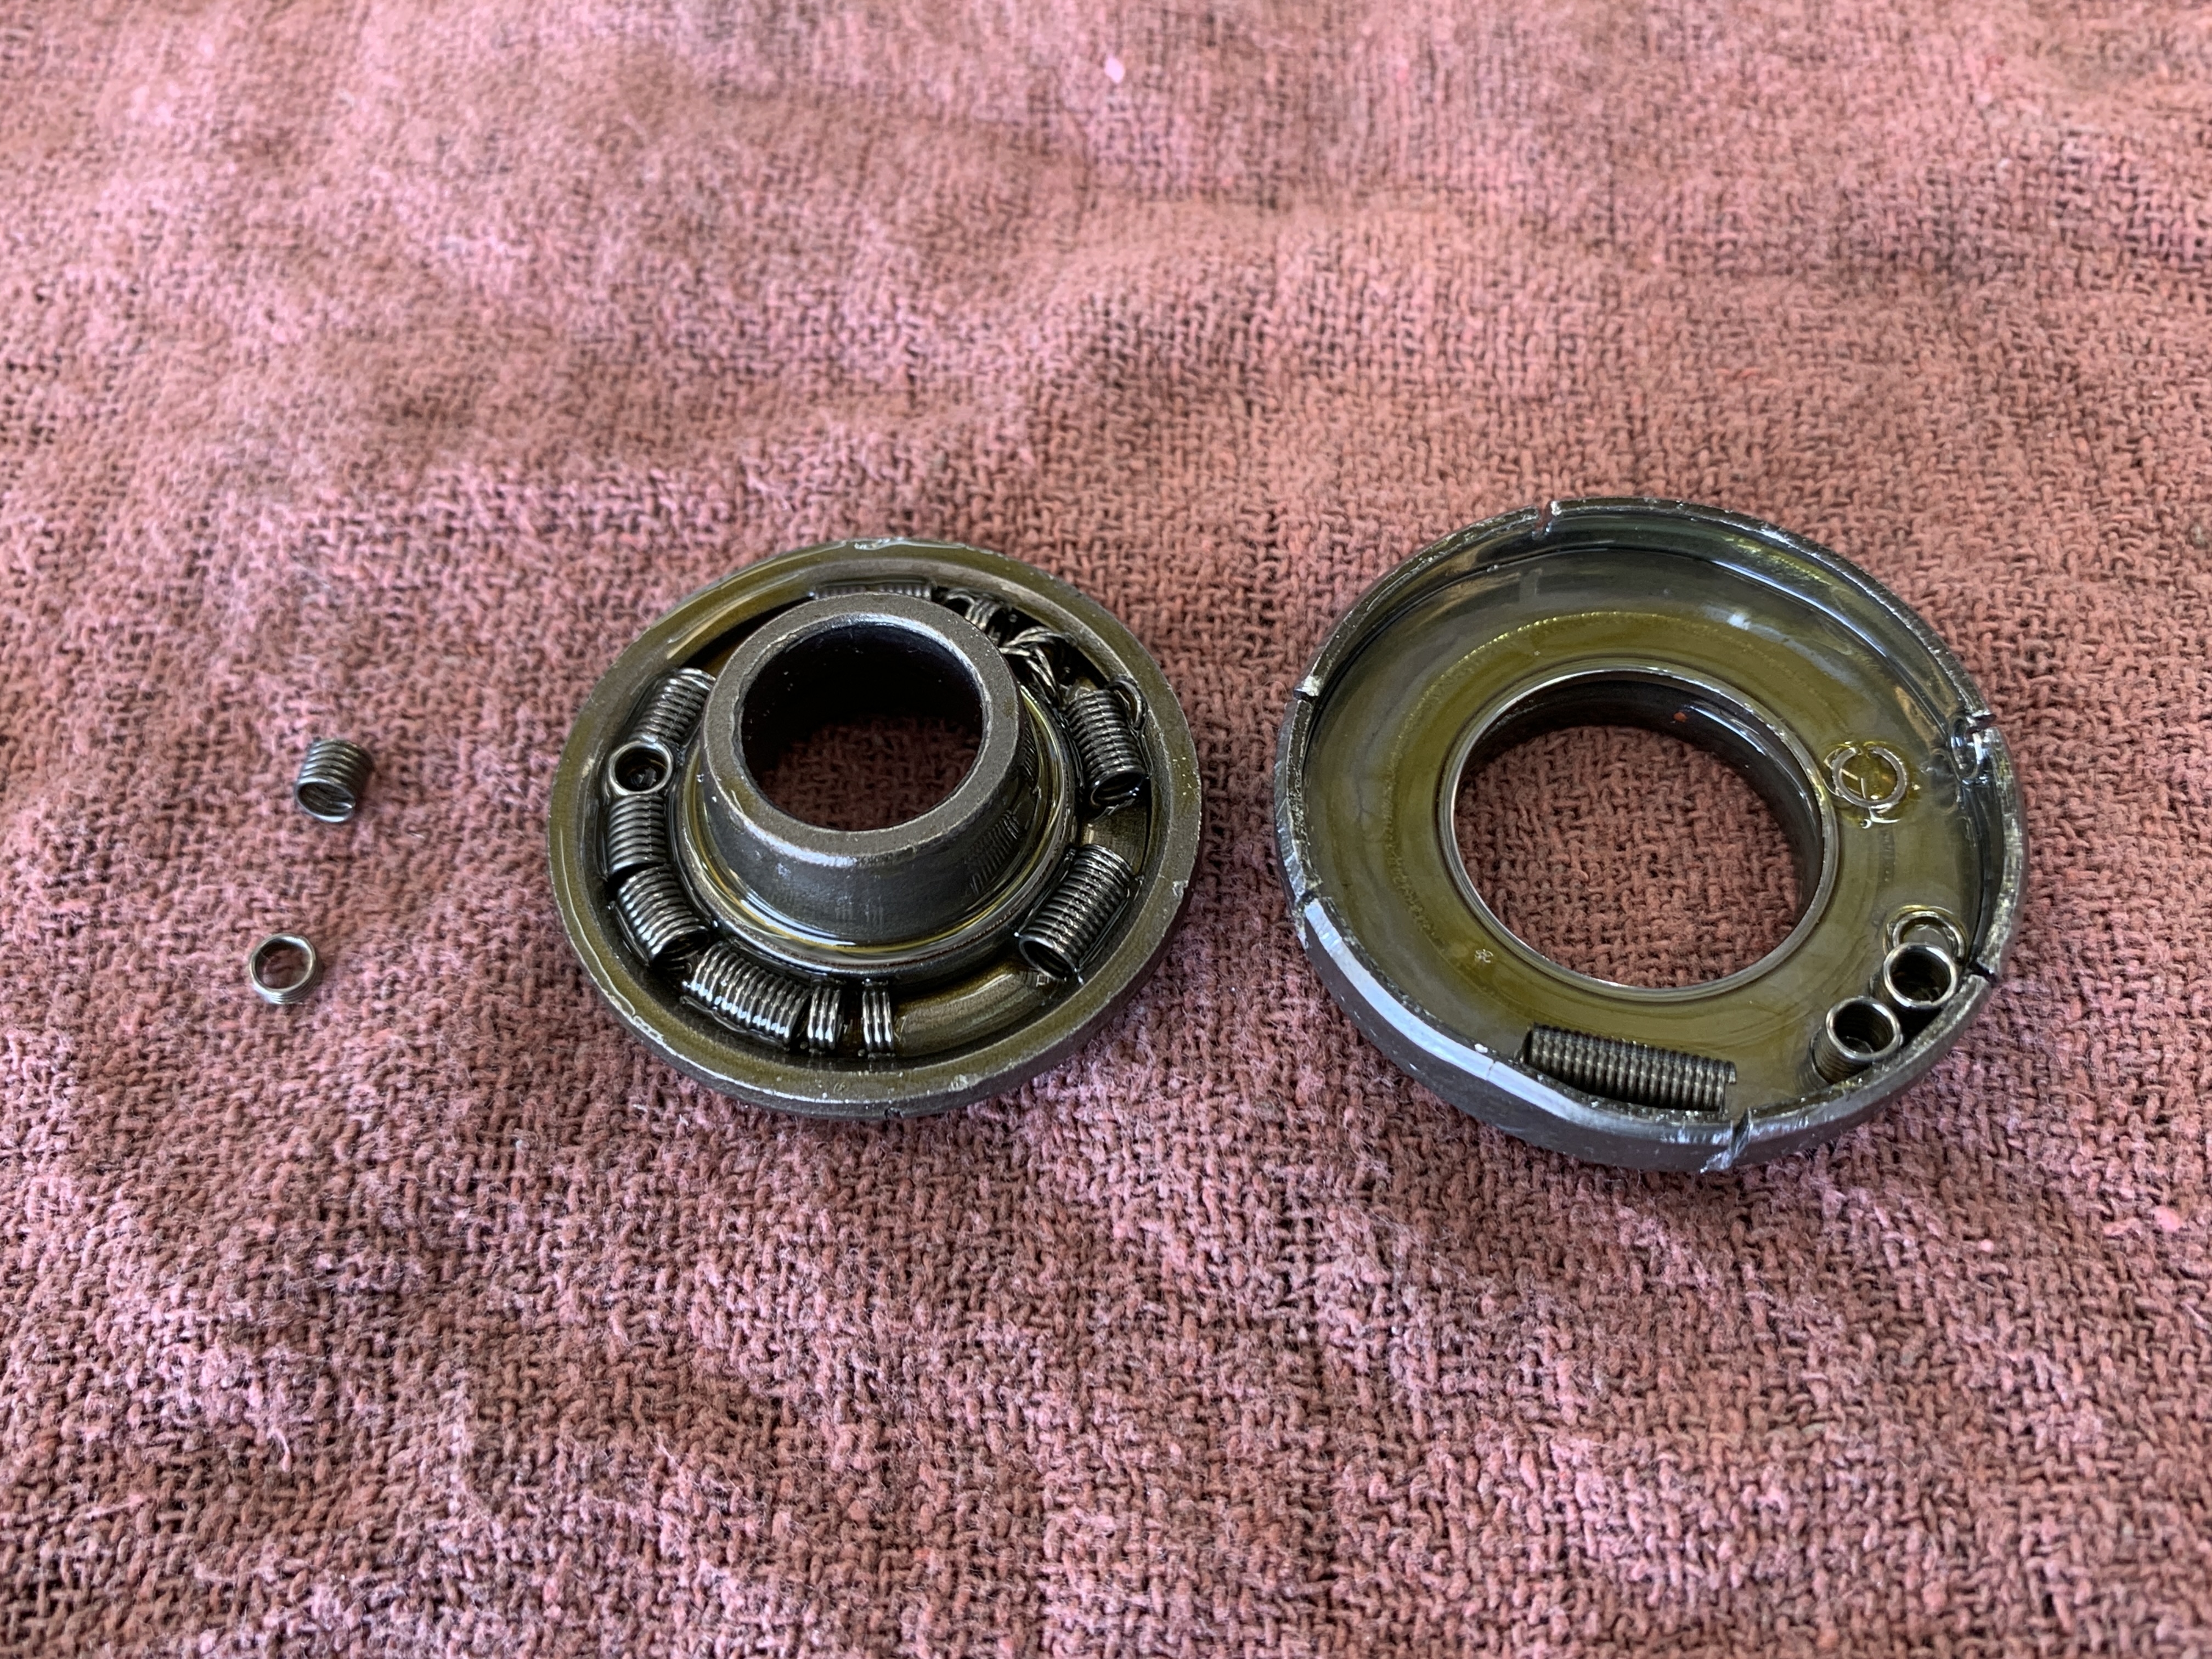
Nose gear issues, including a missing elastomer element:
This is the elastomer pack for the nose gear. The small elastomer element in the yellow circle is the one that we replaced since the old one had split and fallen out of position. The hydraulic press was very helpful in compressing the stack to get the nut started. The end in the yellow circle goes on the bottom end when installed on the airplane, and the rod end bearing at the bottom of the photo is actually the top of the stack, and attaches to the engine mount at the firewall.
AmSafe seatbelts
RG24-15M aircraft battery
Alternator 500 hour brush inspection
Alternator aux. wire terminal loose
Aft door warning light inop.
Prop governor nuts under-torqued
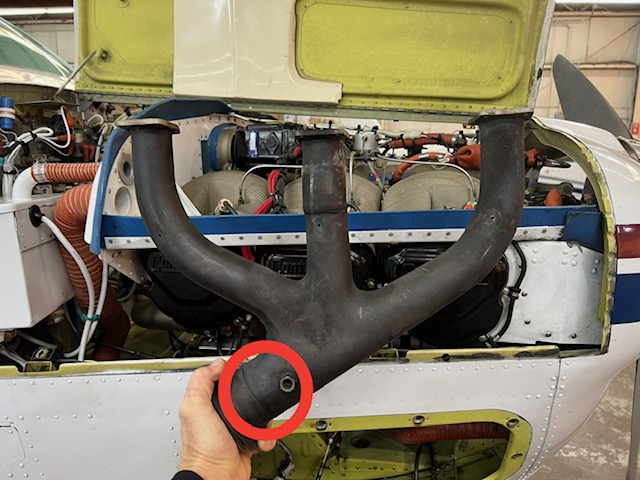
Bolt dangling from the induction airbox
Oil leak caused by the engine driven fuel pump:
Engine baffling issues
Loose brake caliper bolts
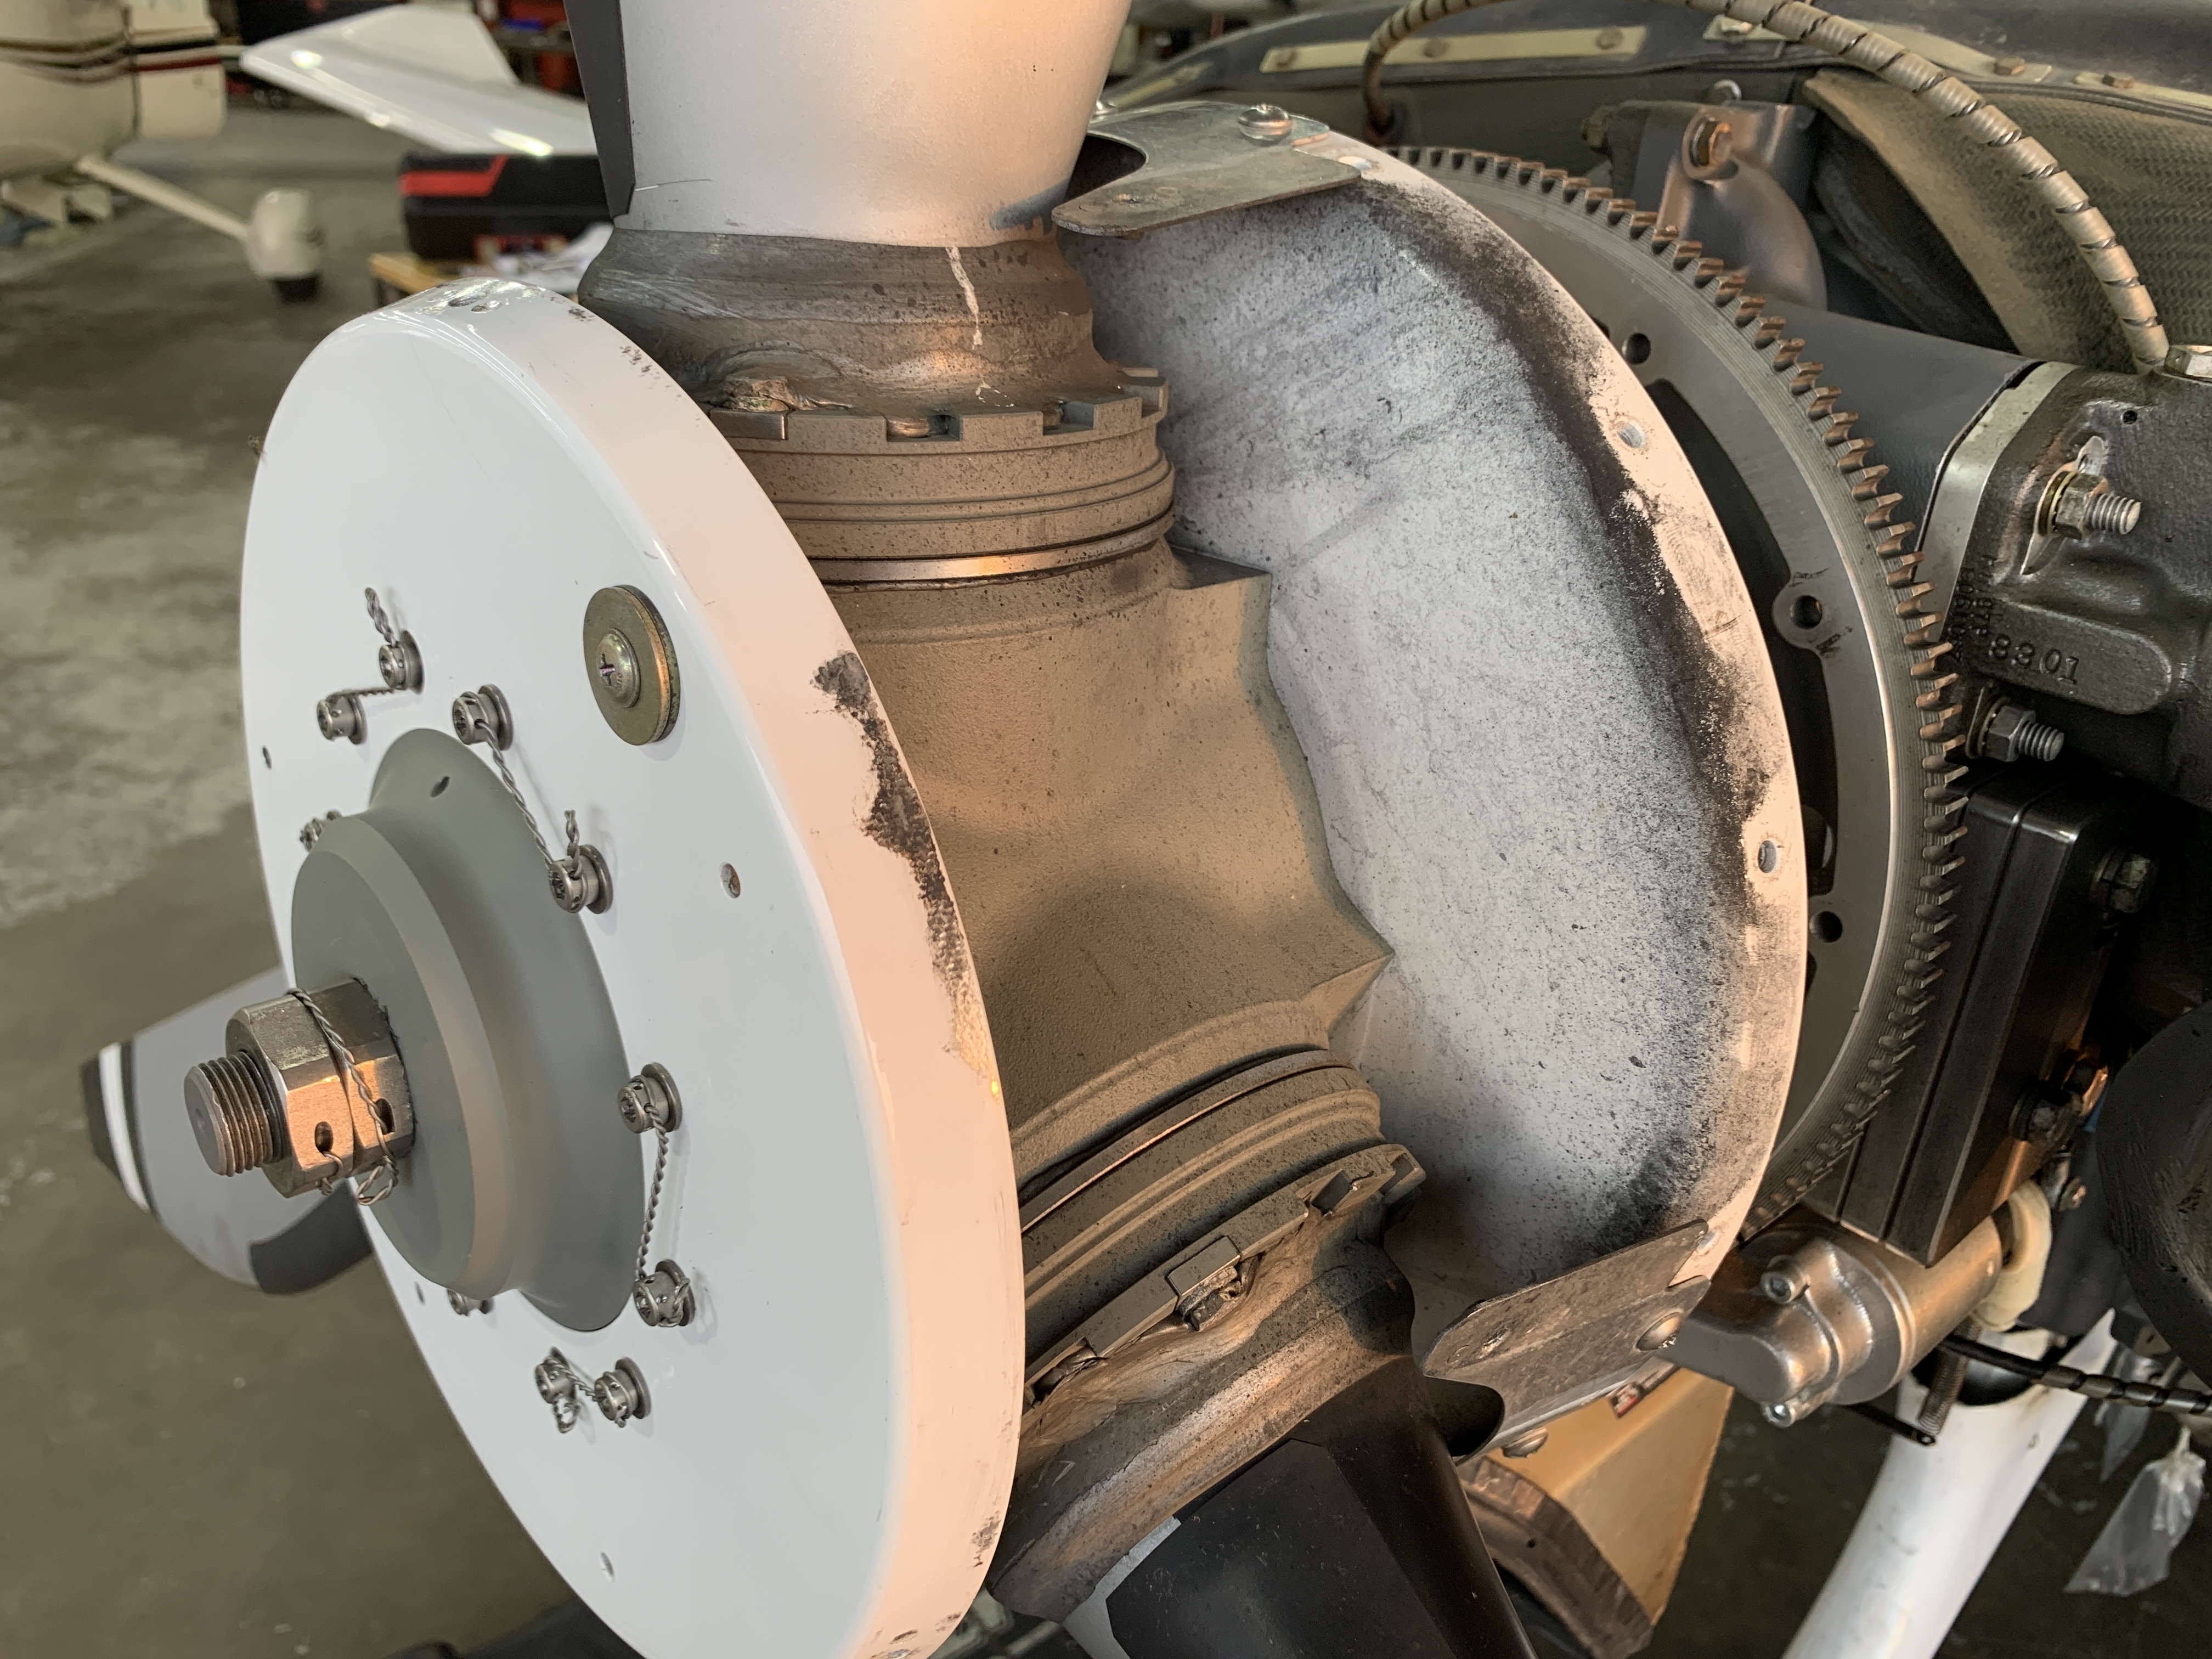
Aluminum dust on prop spinner bulkheads:
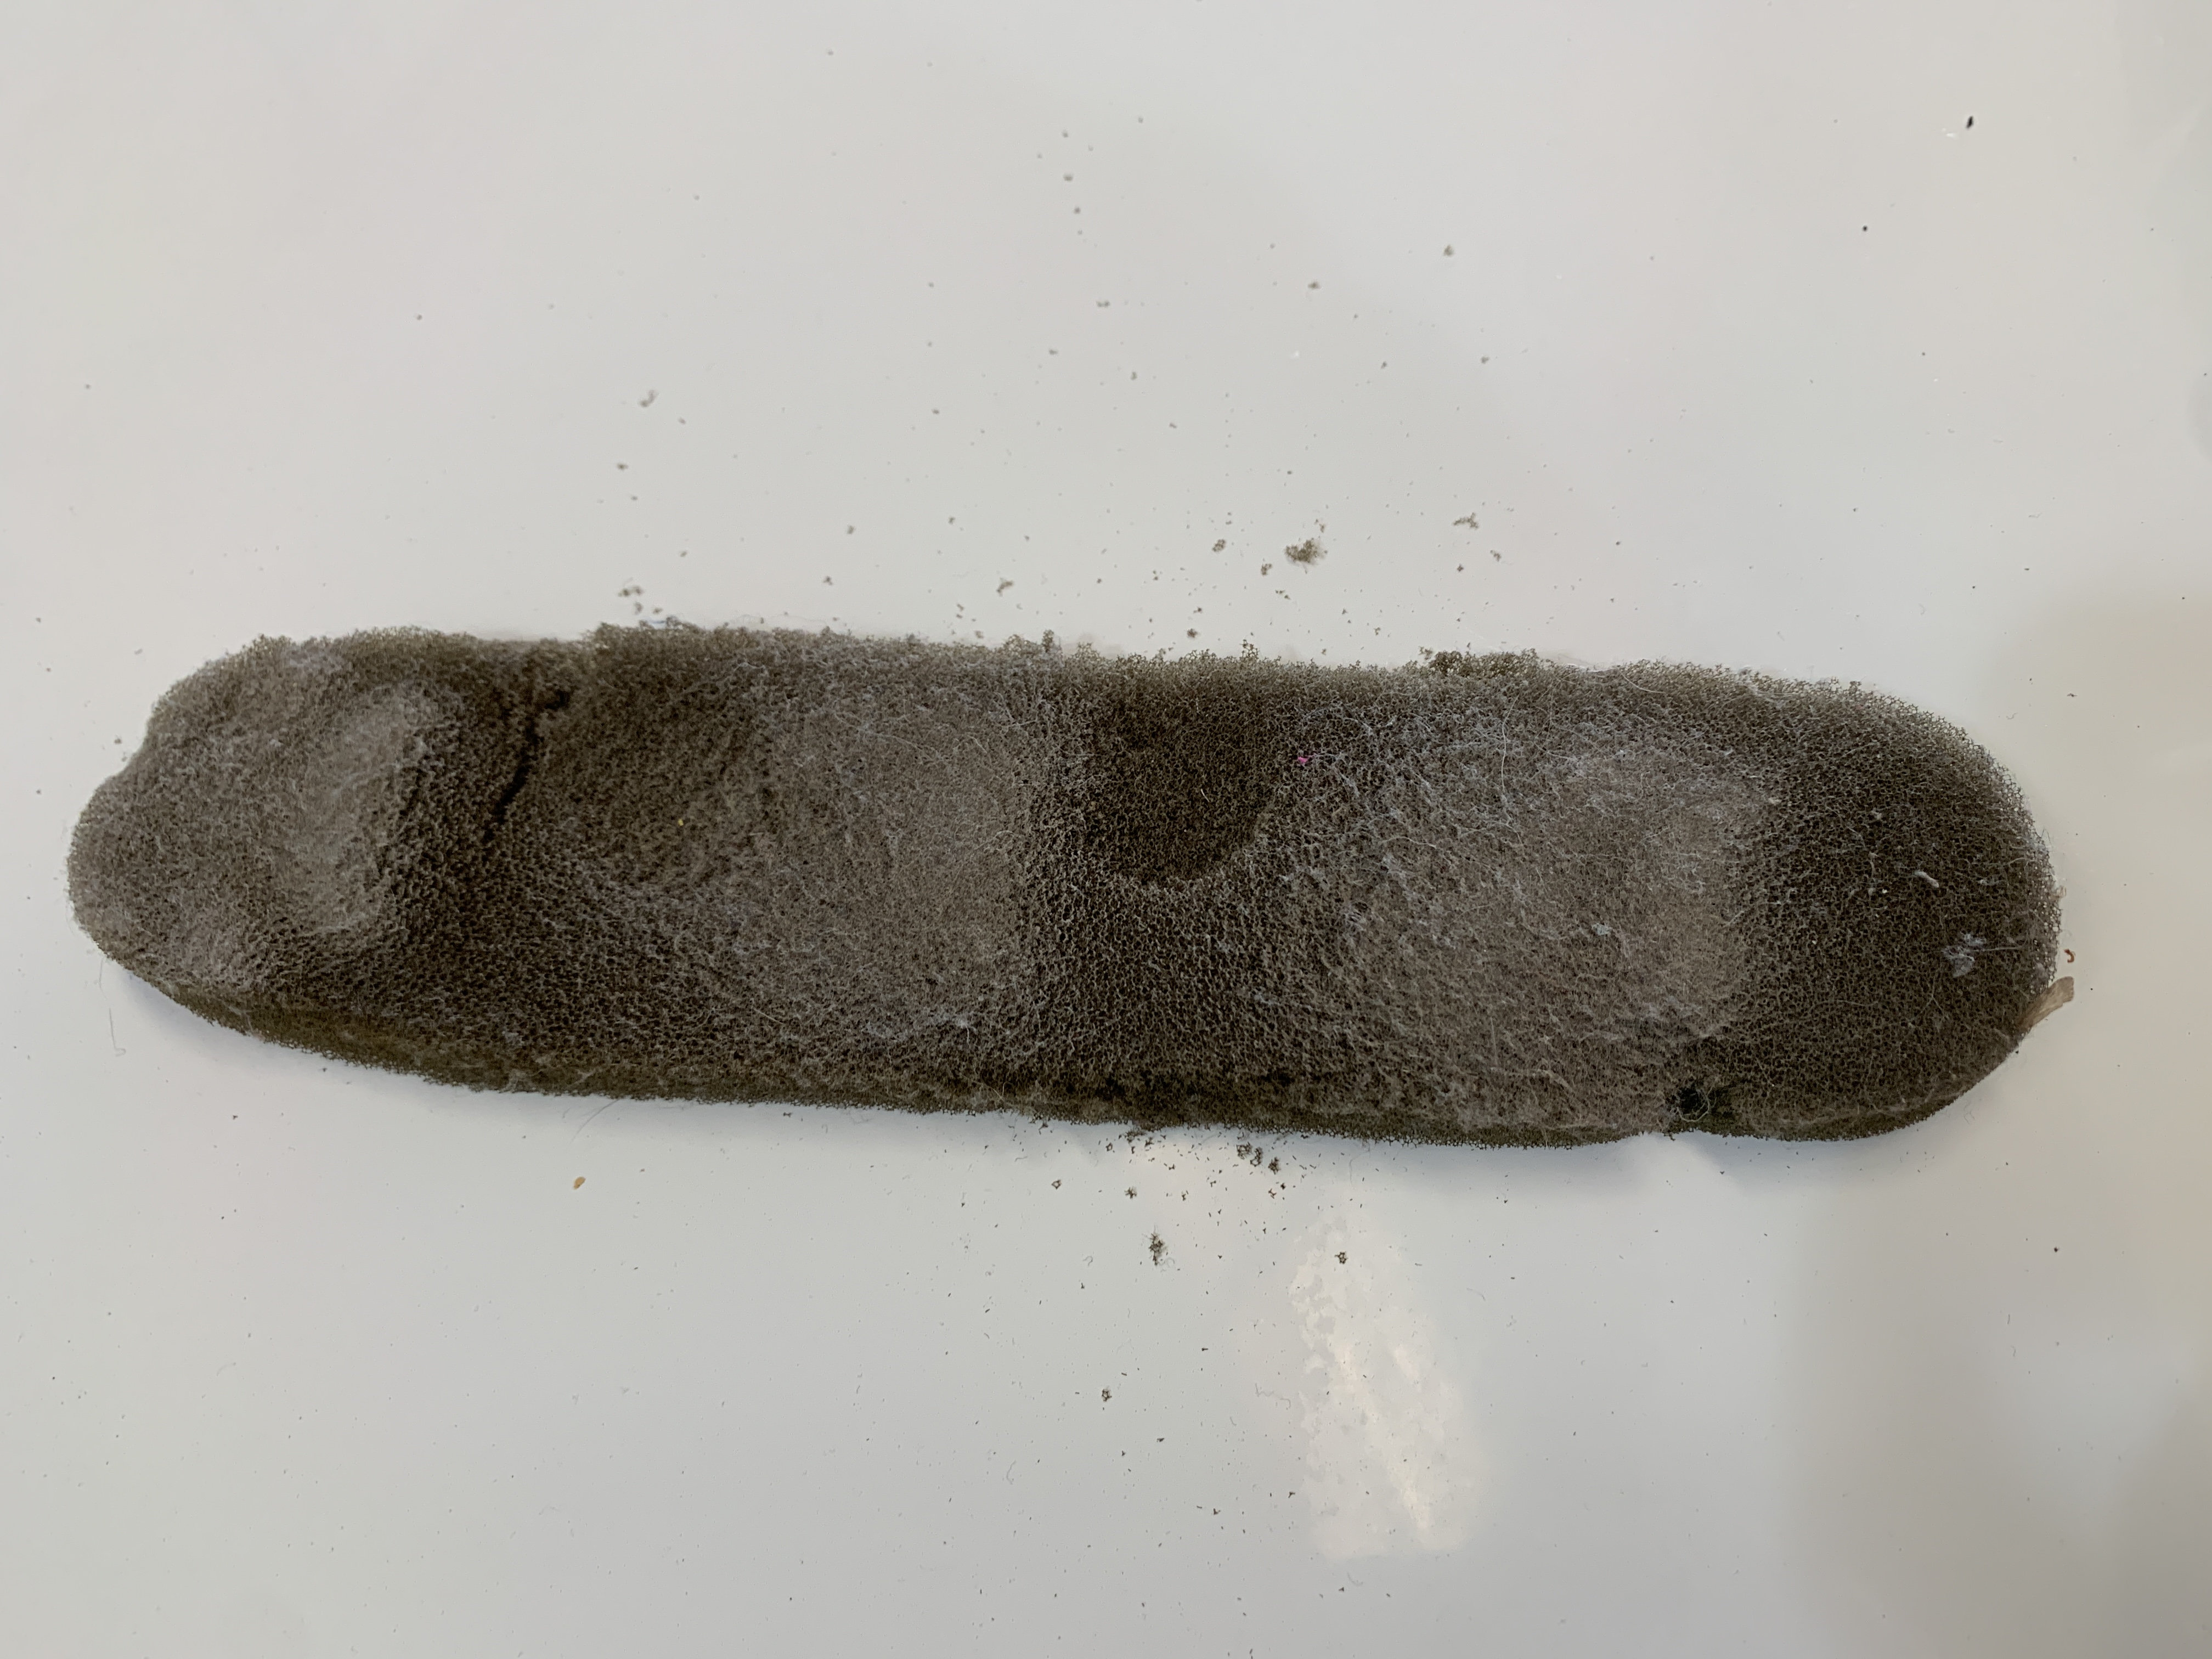
Aft avionics fan inlet filter badly deteriorated and filthy:
Rudder cable tension low
Wiring and baffle rod under right side of engine
Now back to the valve lapping project with the Bonanza – here are the exhaust valves from cylinder 3 and cylinder 5… #3 compression improved from 60/80 to 62/80, and #5 compression improved from 55/80 to 69/80. The real test will be when we see the results after another 25, 50, and 100 hours of operation.
The #3 exhaust valve definitely has some irregularities; hopefully it will return to a normal appearance in several hours of operation after lapping and installing a new rotocoil.The #5 exhaust valve looks quite healthy overall, with a very small questionable area at about the 1 o’clock position. We also lapped this one and installed a new rotocoil as a proactive measure.
By the way, these photos were taken with my new Vividia VA-400 borescope… I was very impressed with the photo resolution compared with my older borescope from a couple years ago.
There are various options, and if you want to display the images on your iPhone or iPad, I recommend the VA-400 WiFi Bundle #1: VA-400 and W01 wifi box (Model: VA-400W1)
When you purchase from Oasis Scientific and use the code “Dean” you will receive a 10% discount, and you’ll be supporting the podcast at the same time.
It was a great experience meeting Dave Ovad and working on his F33A Bonanza along with Mervin and Arthur.
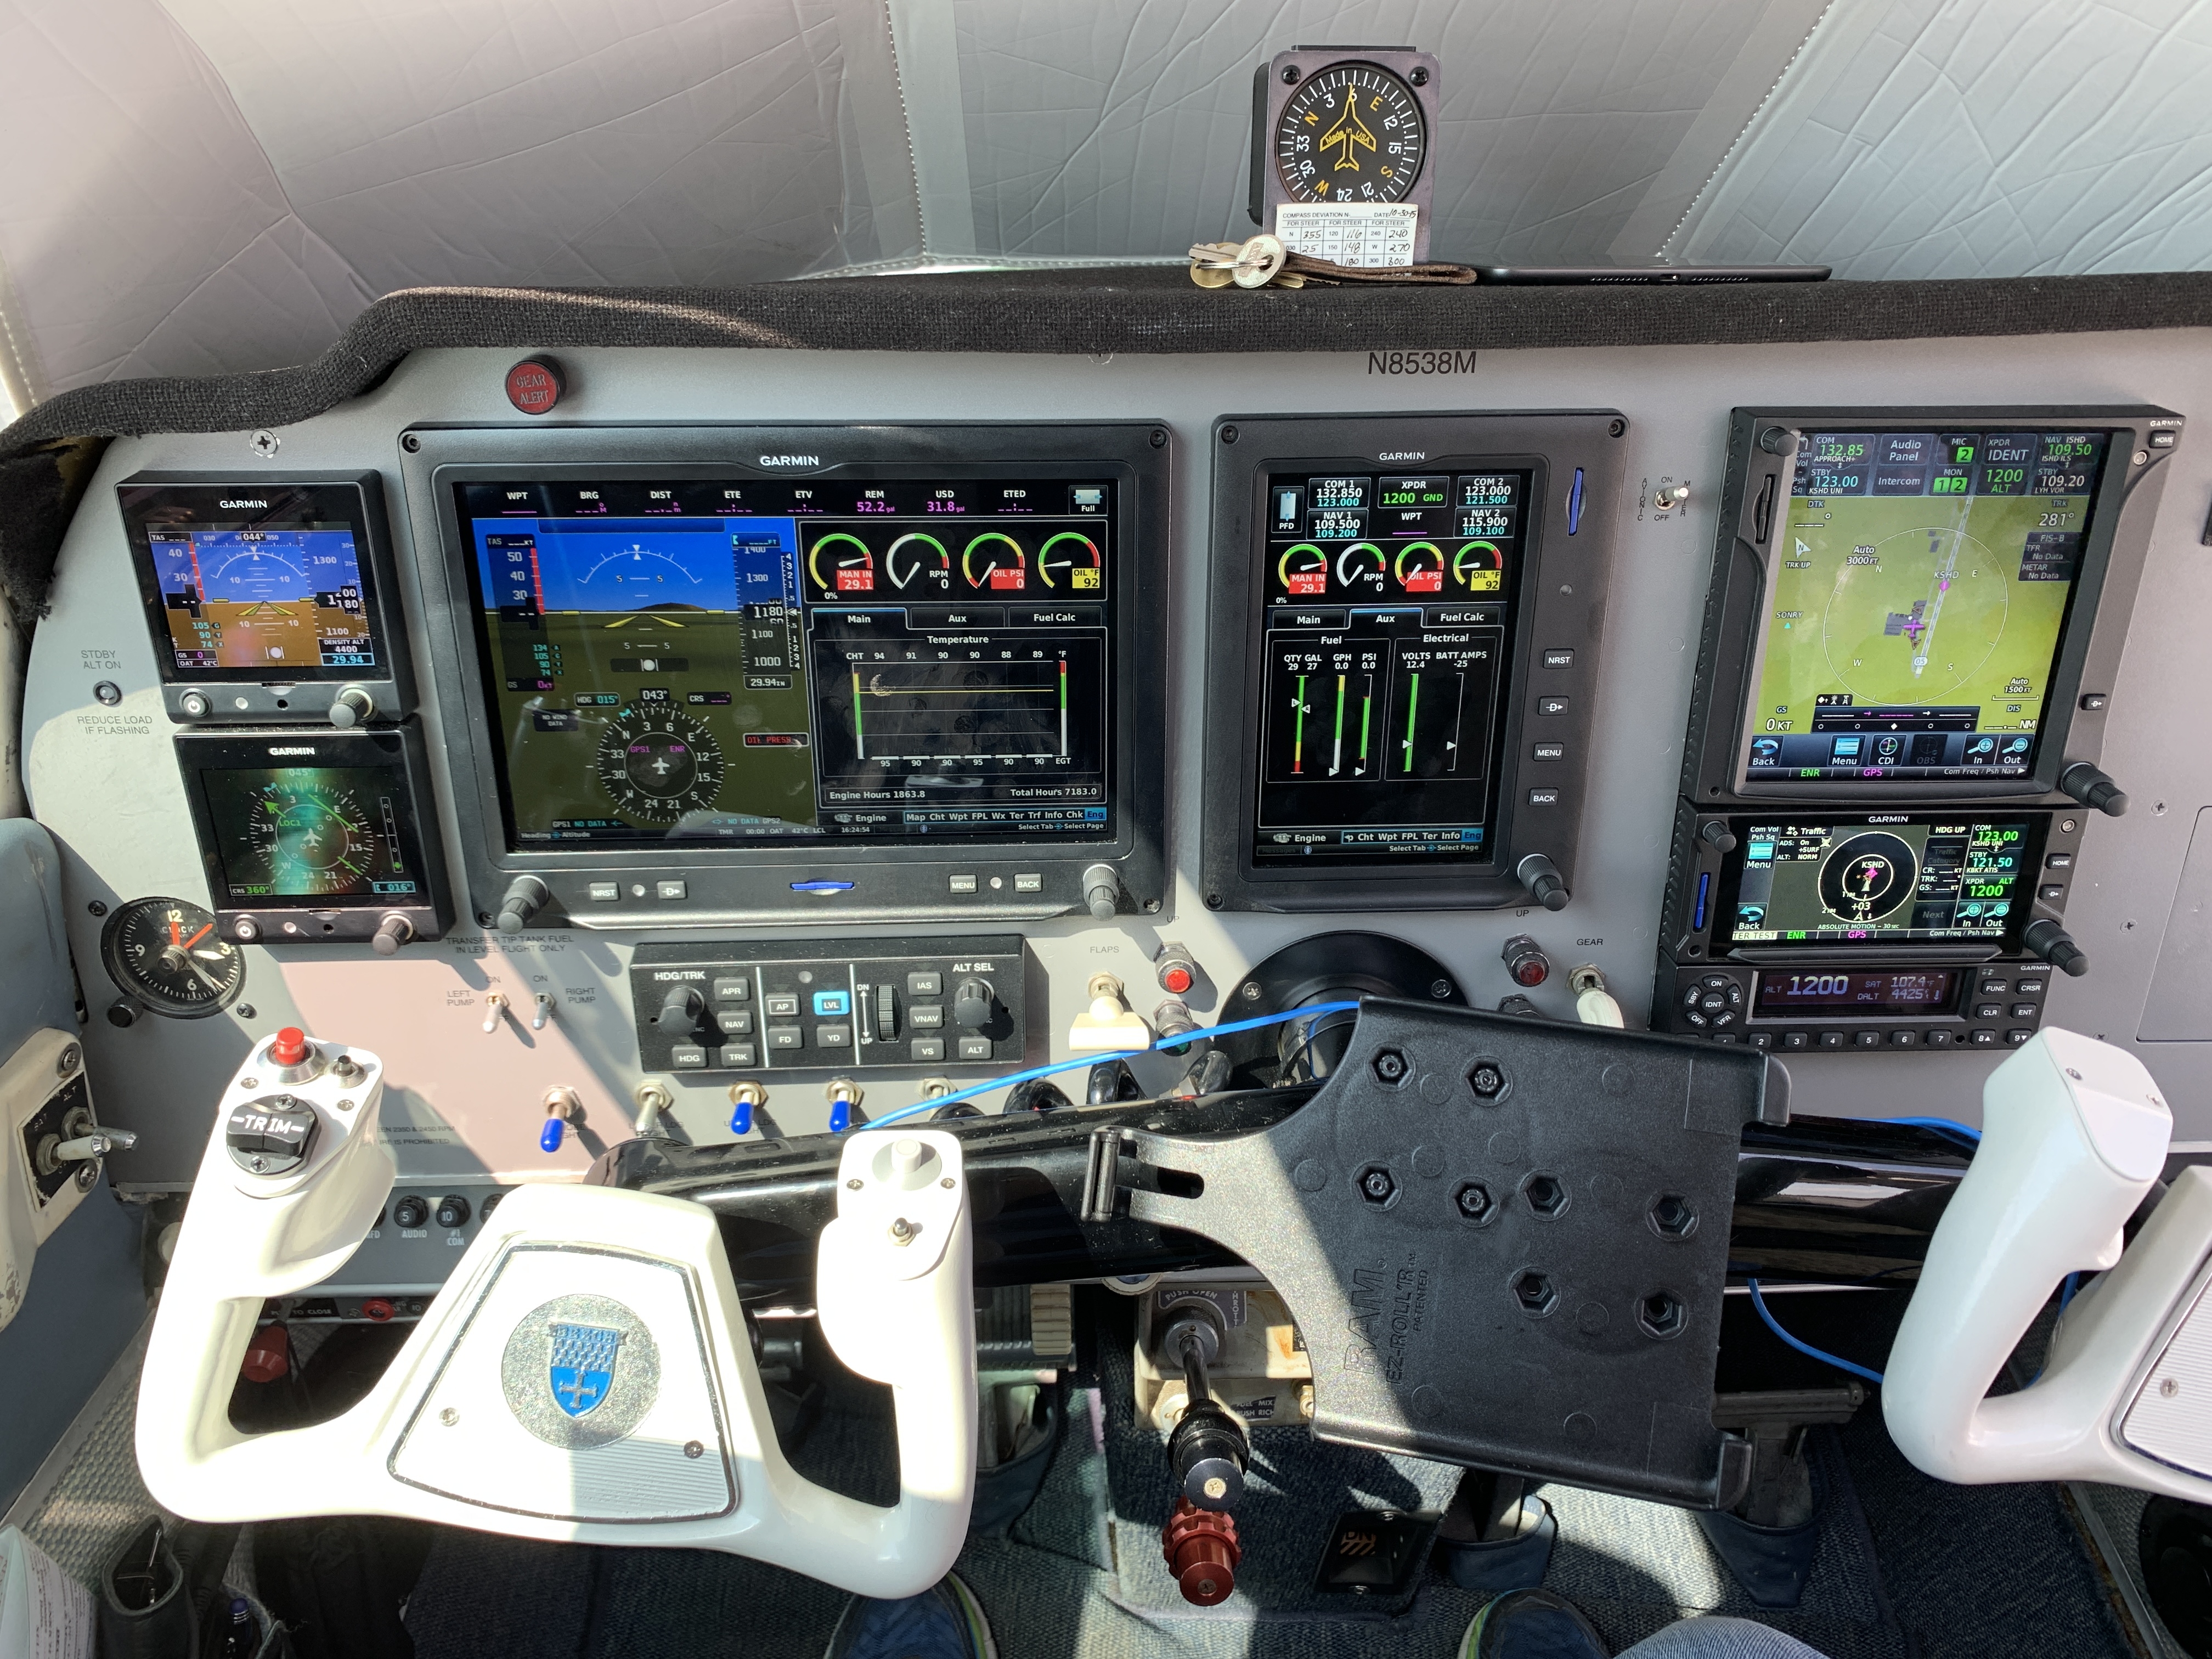
It was also a pleasure to see Arthur’s P35 Bonanza that day:
Arthur has a really nice panel in his airplane as well… check it out:
I received an email recently from Spence, the owner of an S35 Bonanza with a Turbo-Normalized IO-520 engine. He included a picture of his #2 cylinder exhaust valve. Here’s what it looked like:
At first glance, my reaction was something like, “Oooh, that’s ugly!”
The most concerning area is the spot at the 10 o’clock position. There’s also a little concerning area at the 2:30 position as well, but not as much as the 10 o’clock position. The normal deposits seen on the top and bottom edges of the valve have been burned away over at the 10 o’clock position. The small red spot is concerning, but not as concerning as if it was green. As it says in the excellent exhaust valve poster “Anatomy of a Valve Failure,” produced by AOPA, “Green means stop!” This is because the color green has been seen on valve edges that are imminently in danger of a piece breaking off.
For sure, Spence’s borescope photo is a classic visual presentation of a burning exhaust valve. Perhaps you’re wondering, “What does “burning” mean?” And that’s a great question. It means there’s an area that is not sealing well between the edge of the valve and the valve seat when the valve is closed. This condition allows very hot exhaust gases to rush through a small gap between the valve and seat at just the wrong time when those gases are the hottest, and over time if left uncorrected, the edge of the valve can suffer extreme heat damage and finally be in danger of a piece of the valve breaking off.
Not something you want to risk while you’re flying along in your Turbo-Normalized Bonanza! (Or any airplane for that matter.) But an airplane with a turbocharger is especially vulnerable because even a small piece of an exhaust valve would be enough to completely trash the turbocharger.
The next question might be, “How would you know if an exhaust valve was burning?” This is also a great question. You might see a drop in compression, but the best way by far to find a burning exhaust valve is with a borescope. With some training in what to look for, a burning exhaust valve is very noticeable, as in the photo above.
Spence did a great thing when he found this burning valve. Finding it was one thing, but deciding what to do about it was the next big question. In his email, Spence asked, “Do you believe this is a candidate for lapping in place and is it something you would be able to do for me?”
Spence was very interested in a less-invasive way to remedy his burning exhaust valve, especially since he has had other cylinders fail this way over the years, and this particular cylinder had only 368 hours on it (he actually paid a reputable engine shop to take the new Superior cylinder, check the exhaust valve tolerances, and perform a 3-angle cut before installing the cylinder.) He was understandably weary of changing cylinders.
I agreed to give the lapping procedure a try, with a couple conditions. One, we would not want the exhaust valve guide to be significantly worn. And two, the edge of the valve and valve seat must be in reasonably good condition.
On the agreed upon morning, Spence showed up at Classic Aviation at KSHD, and we got to work. We got things opened up and before removing the valve springs, we did a cold compression check and could not get more than 30/80 psi, with significant leakage past the exhaust valve. A healthy cylinder should be a lot more than 30/80, even with a cold compression check.
We got some borescope photos of the valve edge and seat, and aside from the normal spotty appearance, things looked quite good.
After removing the valve springs, our second condition was also met, in that the valve guide did not have a substantial amount of wear. I checked this by wiggling the valve stem up and down and side to side, in various positions.
Now it was time to perform the lapping procedure. “Lapping an exhaust valve” involves removing the rocker cover, exhaust rocker arm, and valve springs. This allows you to carefully push the valve into the cylinder far enough to see the edge down through the top spark plug hole. In this position, you can carefully apply valve grinding compound on the seating area of the valve, rotating the valve as needed to lightly coat the full 360 degrees of seating area. At this point, pull the valve back against the seat and rotate it back and forth using whatever method you decide, in order to restore a good smooth seal between the valve and the seat. I use a wood dowel rod chucked in a cordless drill, with a piece of thick vinyl tubing clamped between the dowel rod and the valve stem, which acts as a shock absorber and works very well. It may take several rounds of applying the compound and lapping the valve, and rinsing it off with solvent in between times, letting it run out the bottom spark plug hole onto a shop towel.
It’s important to rinse the valve edge off each time in order to examine the progress. My biggest regret from this particular lapping job, is that I did not take incremental photos along the way. It was by far the best result I’ve ever seen. After the first round of lapping, there was a nice smooth even band most of the way around the valve, with a distinct darker uneven area for about 30 or 40 degrees of rotation… corresponding to the burning side of the valve. After the second round, the bad area was noticeably smaller, and after the third round, even smaller still. We did a fourth round of applying the coarse grit compound for good measure (the bad area was pretty much completely gone at this point,) and finished it off with one round of lapping with fine grit compound.
The result was nothing short of spectacular:
This is about as perfect of an exhaust valve edge as you could hope for! Needless to say we were thrilled.
We washed the cylinder out with some Av Gas in a squeeze bottle, blew it out with compressed air, and repeated that process a second time. Then we sprayed some LPS-2 in the cylinder for some lubrication so the cylinder walls would not be dry for starting.
We put everything back together and installed a new rotocoil assembly P/N SA629117-1 on the exhaust valve, and a new rocker cover gasket.
Spence did a short ground run so we could check for leaks, and then he did a test flight to check engine operation and get it hot so we could do another compression test.
While Spence was out flying, I cut the old rotocoil apart, and was SHOCKED at what I found: (I had heard of this happening, but had never seen it myself.)
The spring inside the rotocoil should be one long continuous spring. This one was in many pieces, clearly making this part non-functional. The rotocoil serves a very important purpose. It causes a small and incremental rotation of the valve every time the rocker arm presses against the valve stem, and helps to maintain a good seal between the valve and valve seat. When an exhaust valve stops rotating, there is a much greater possibility for a hot spot to develop. It’s important to stop a hot spot as soon as possible. If not, cylinder removal may be inevitable.
We are very hopeful this cylinder has been rescued from premature removal. Not only did the lapping process restore an excellent seating area on the valve, but the compression came up dramatically as well… after the test flight, we got an amazing 70/80!
Thank you Spence, for the opportunity to work with you on your cylinder! Of all the valve lapping projects I’ve done, this one is a favorite for sure.
The result was absolutely amazing, and I have a few takeaways as I think about the whole valve lapping process:
Even low-time cylinders can develop exhaust valve problems.
ALWAYS do a borescope inspection along with every compression test (preferably with every oil change.)
Take action immediately when you notice a burning exhaust valve (lapping is often a good solution if caught early.)
ALWAYS install a new rotocoil assembly when lapping a Continental exhaust valve, to help ensure the valve will rotate properly and consistently.
If you do remove a cylinder for repair, be sure a new rotocoil is installed as part of the repair process (sometimes they are reused unless you specify otherwise.)
If you’d like to see or hear more info on this topic, be sure to check out episode 109 of the Airplane Owner Maintenance Podcast. It’s called “Exhaust Valve Problems – Could Lapping Be A Good Option?” Apparently airplane owners want to learn about this topic… episode 109 is the 4th highest downloaded episode of all time, do date.
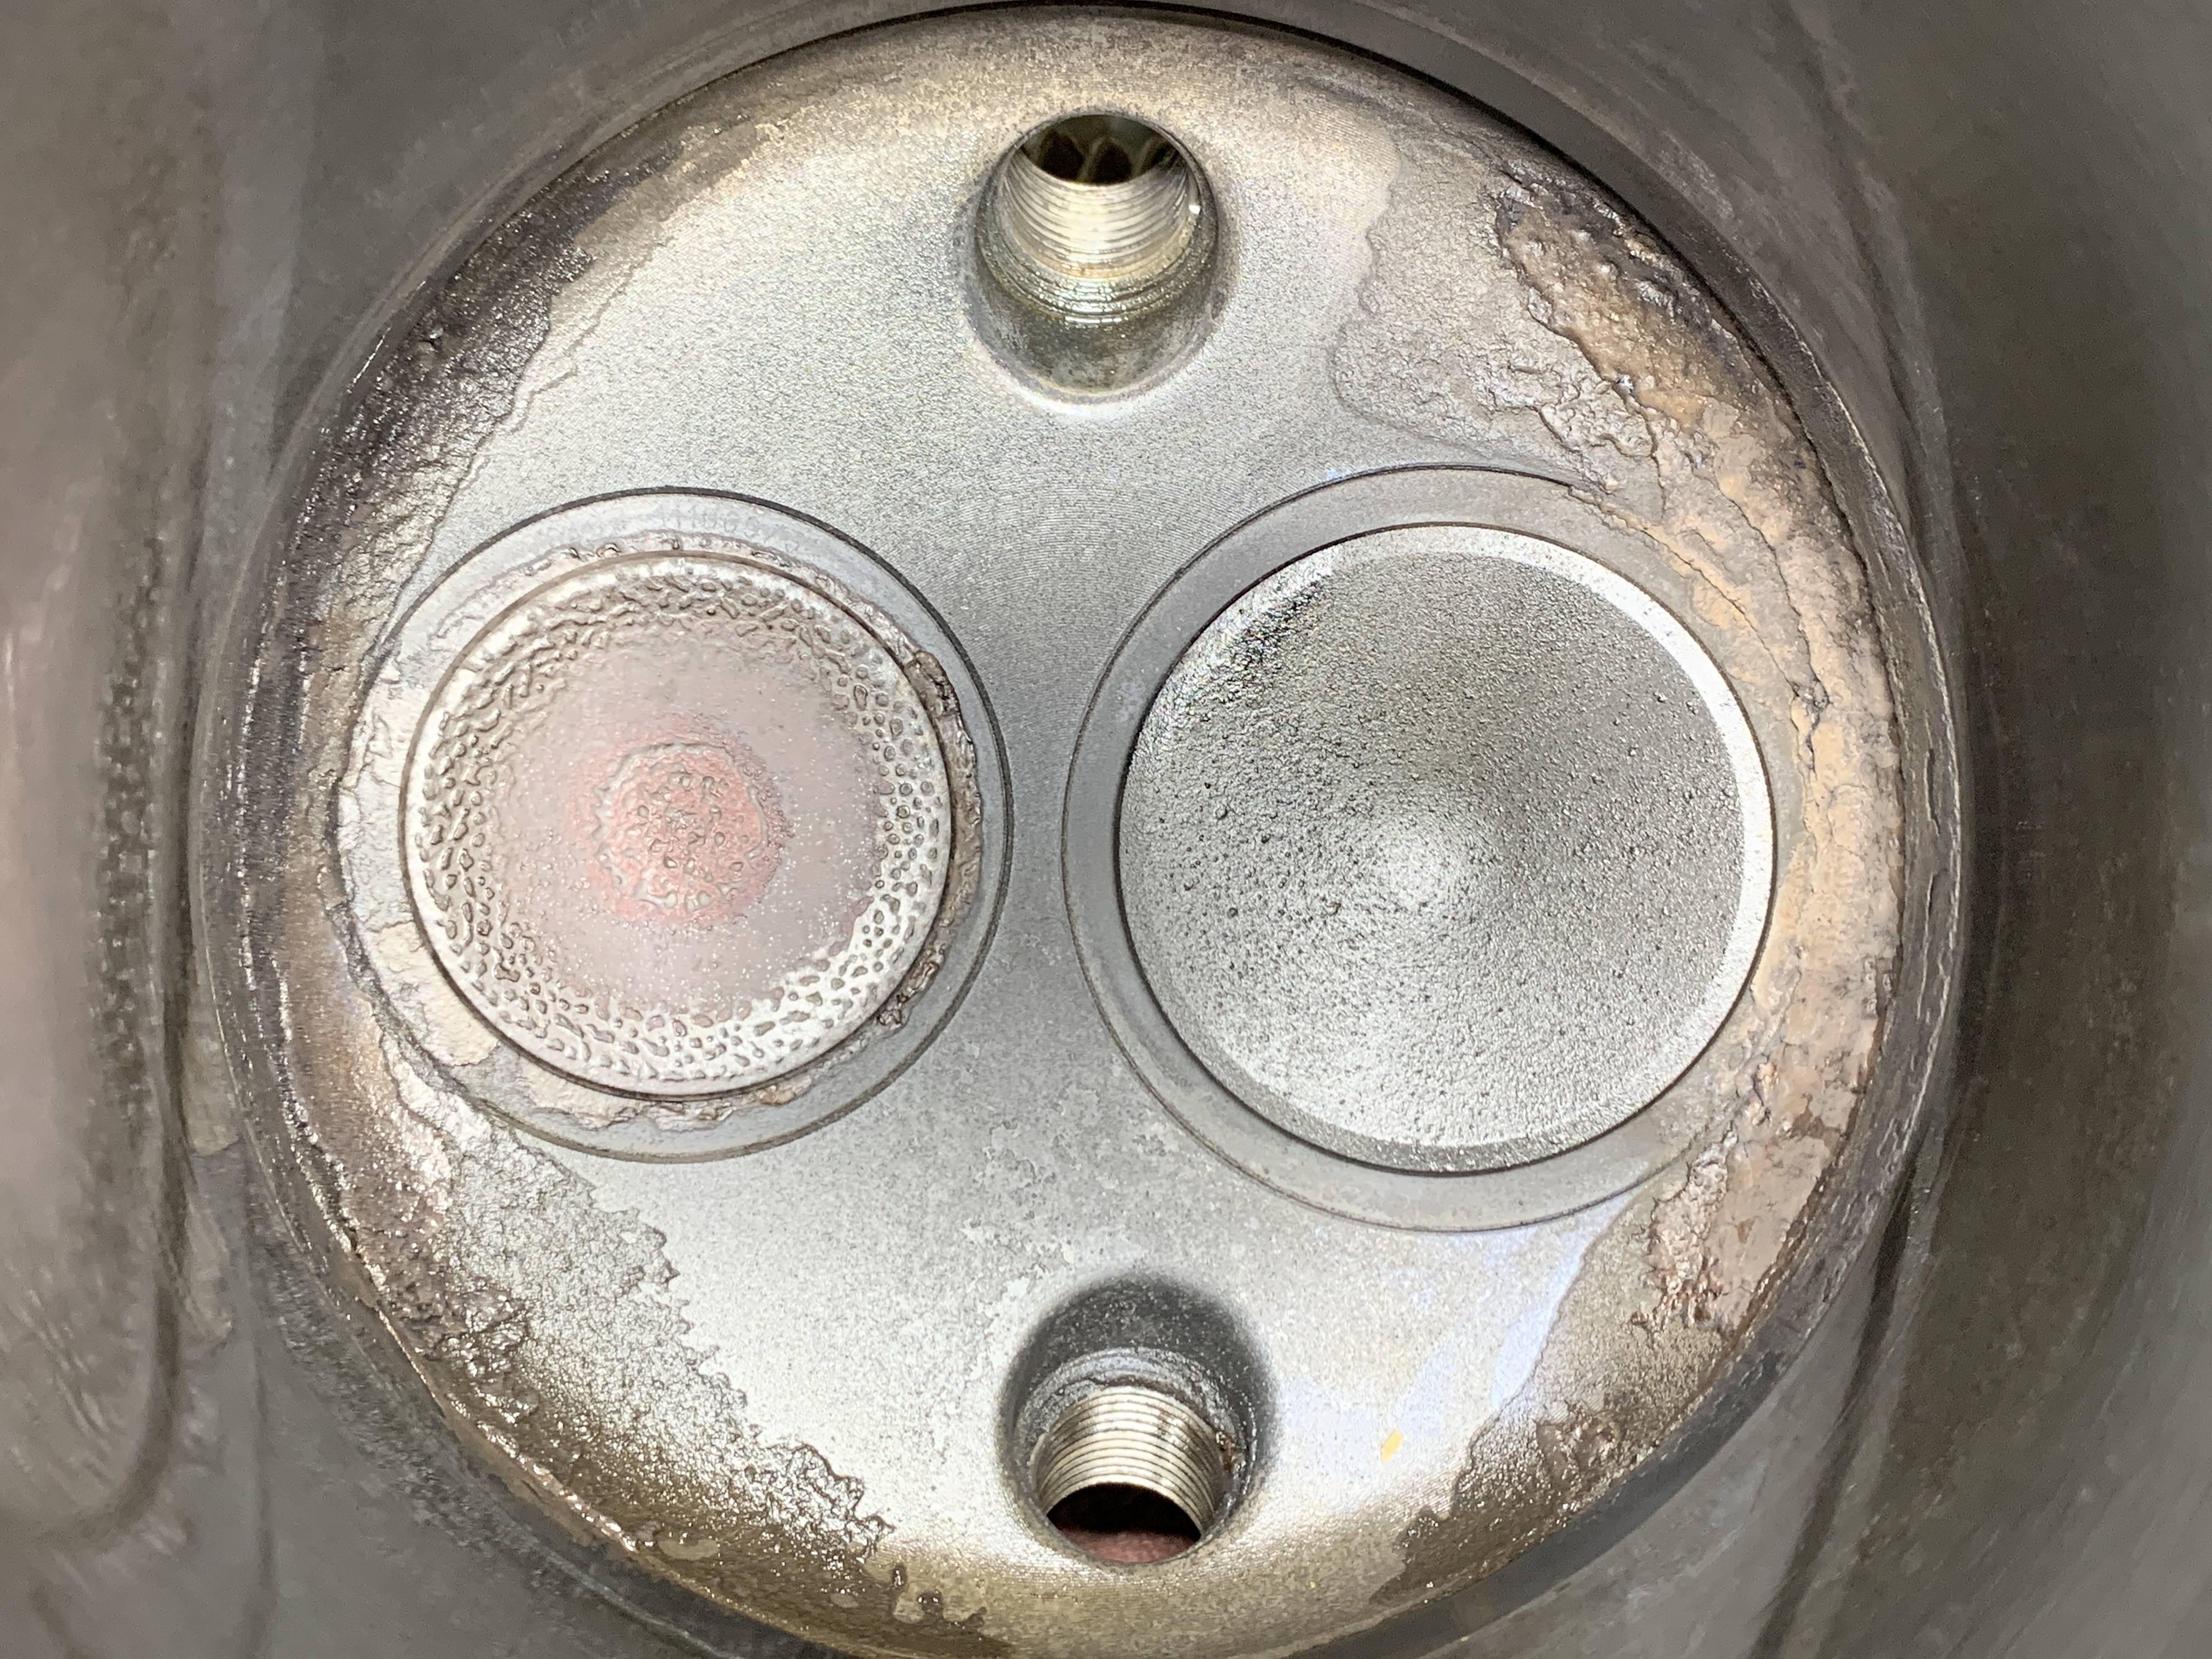
12/80! That’s a terrible compression test result. And unlike some cylinders, this one did not show any obvious reasons for the low compression… take a look at the valves after the cylinder was removed:
Unless I’m missing something, I don’t see anything that would explain such a low compression number. The cylinder has been shipped to Tim Barnes at Skyline Cylinders for repair, so I’m hoping he will be able to give me more information about it. You can listen to the audio for more thoughts about this whole experience, and maybe I’ll give an update on it in a future episode.
I also mentioned in this episode my latest project in the shop at Classic Aviation – an annual inspection on a nice E33A Bonanza:
It’s a great airplane, with a great owner – now that’s a good combination!
The post “172 – A Perplexing Low Cylinder Compression on a Piper Saratoga” appeared first at AirplaneOwnerMaintenance.com
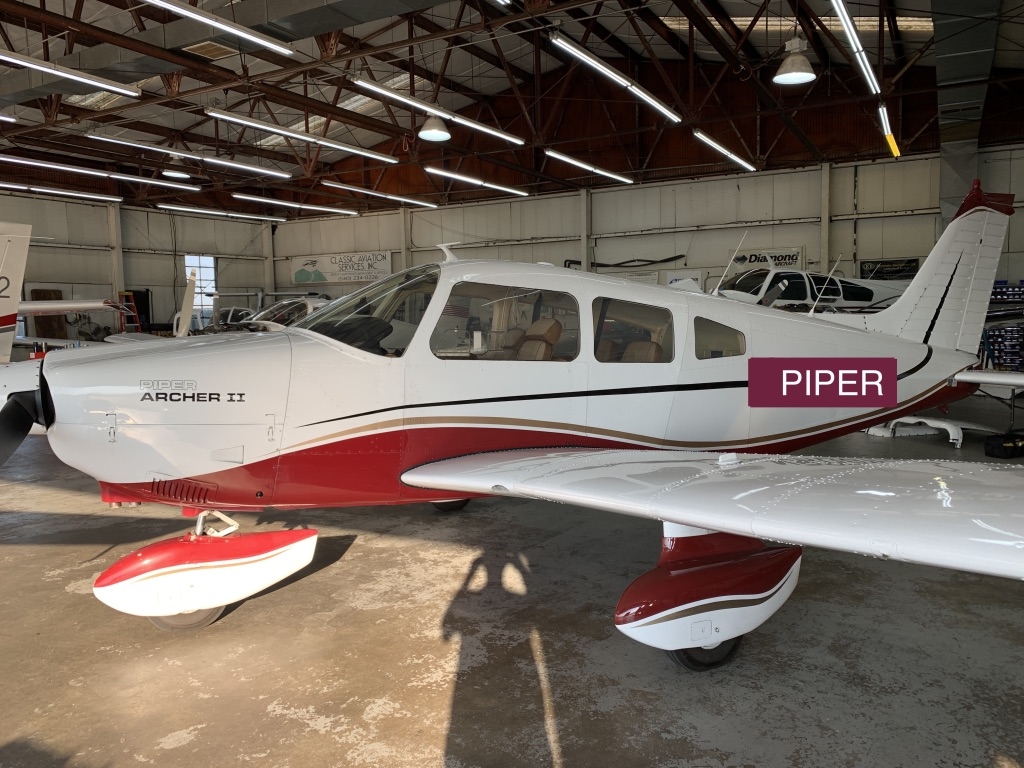
A good friend from another airport recently bought this Piper Archer, and I’ve had the opportunity to do a little maintenance on it and take a look around.
This is one of three airplanes I’ve had an opportunity to look at recently… all three were in annual inspection, but I noticed a few things that could use some attention. We’ll save the Archer for last.
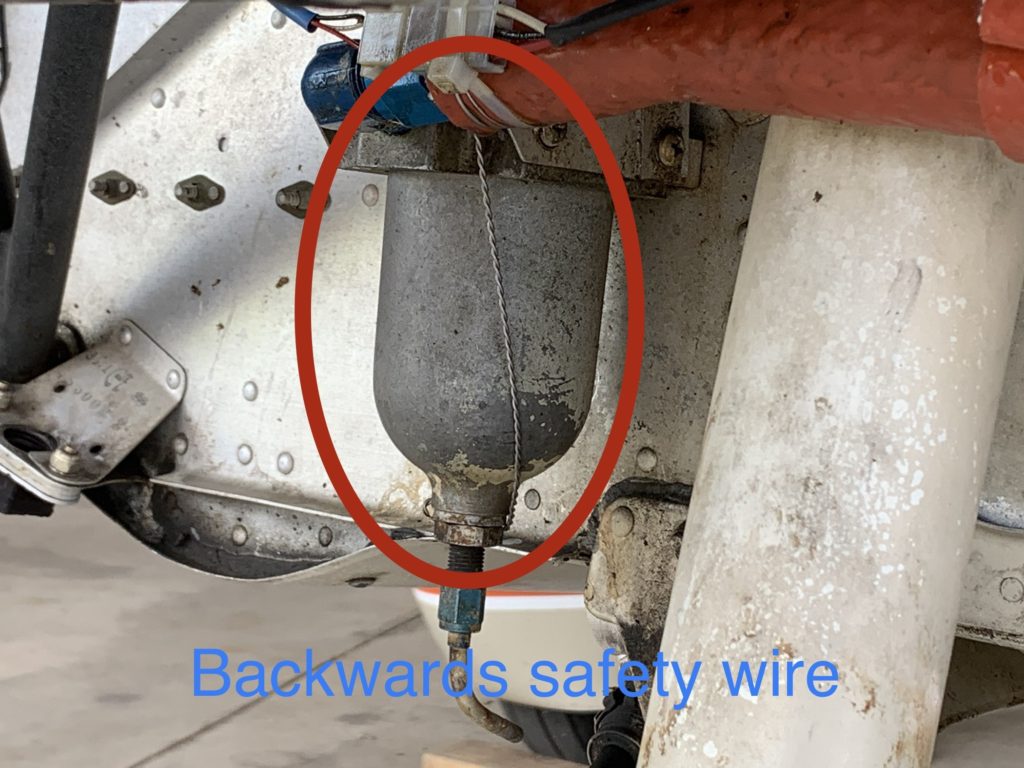
First, a Cessna 172:
I noticed the fuel strainer (gascolator) was safety wired backwards!
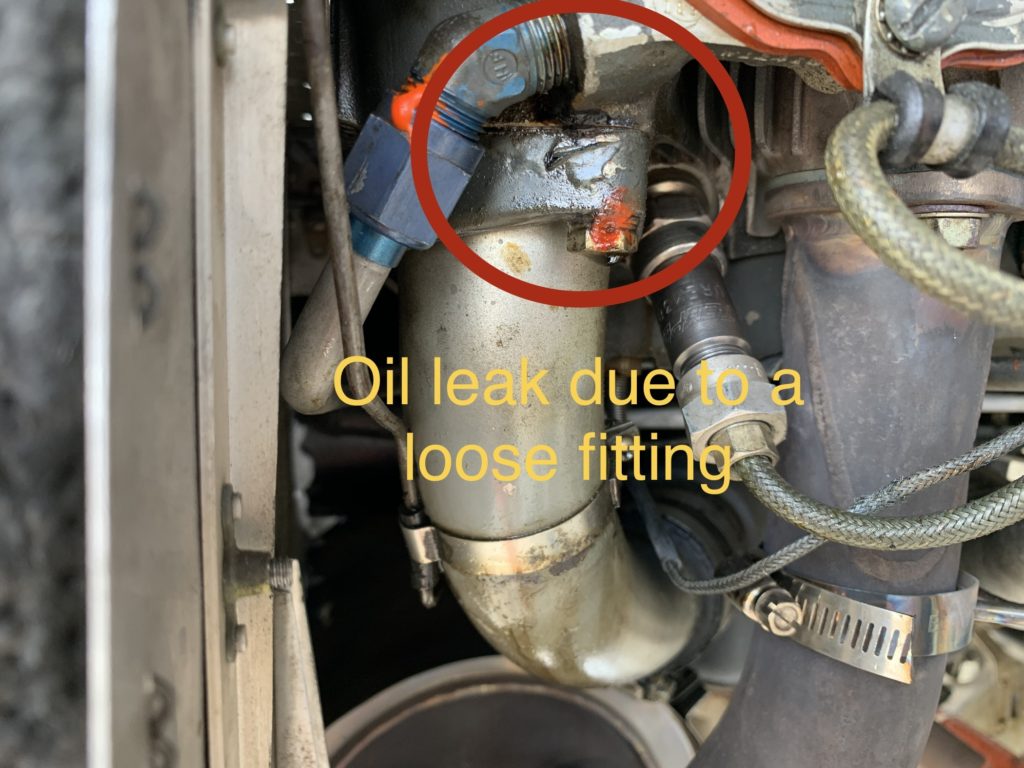
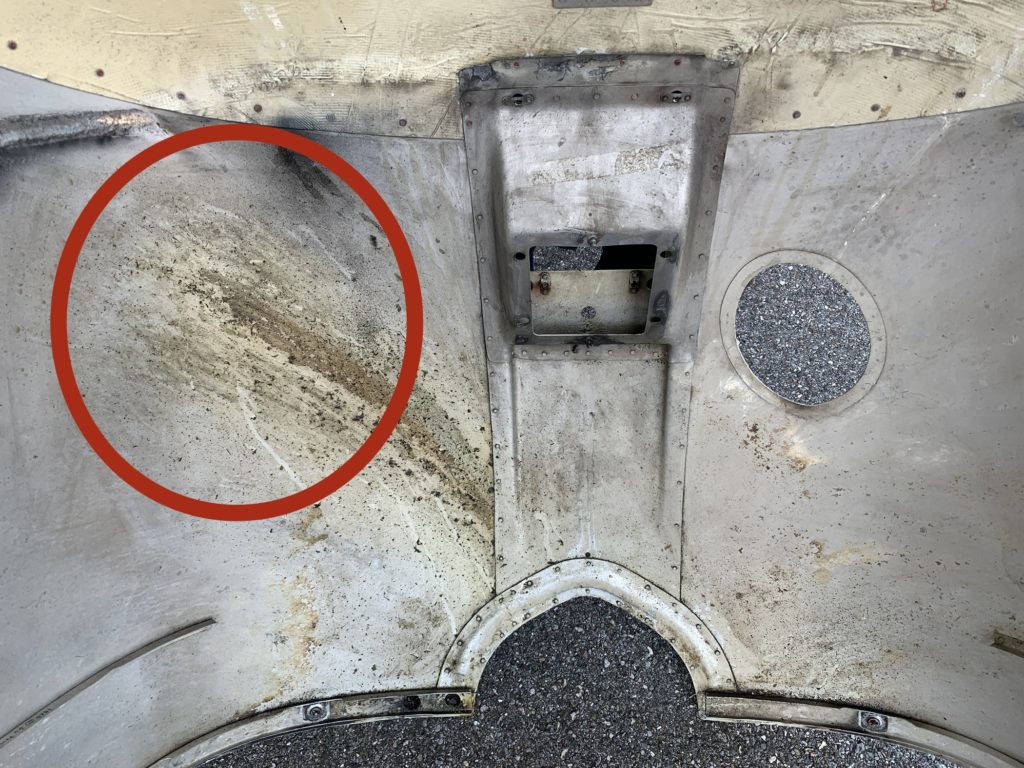
The same Cessna 172 also had a small oil leak… I later discovered the rocker box oil return fitting was loose and needed to be resealed:
The bottom cowling was telling a story about that oil leak… it’s always a good idea to look for oil in the bottom cowling and then try to determine where it’s coming from:
Second, a Beech Bonanza:
No pictures for this one, but here are a few things I found on this one:
No copper safety wire on the emergency exit window pins.
No safety wire on the fillister head screws in one of the ruddervator hinge brackets.
One loose ruddervator hinge bolt.
One worn ruddervator thrust bearing.
Listen to the audio for more details on this one.
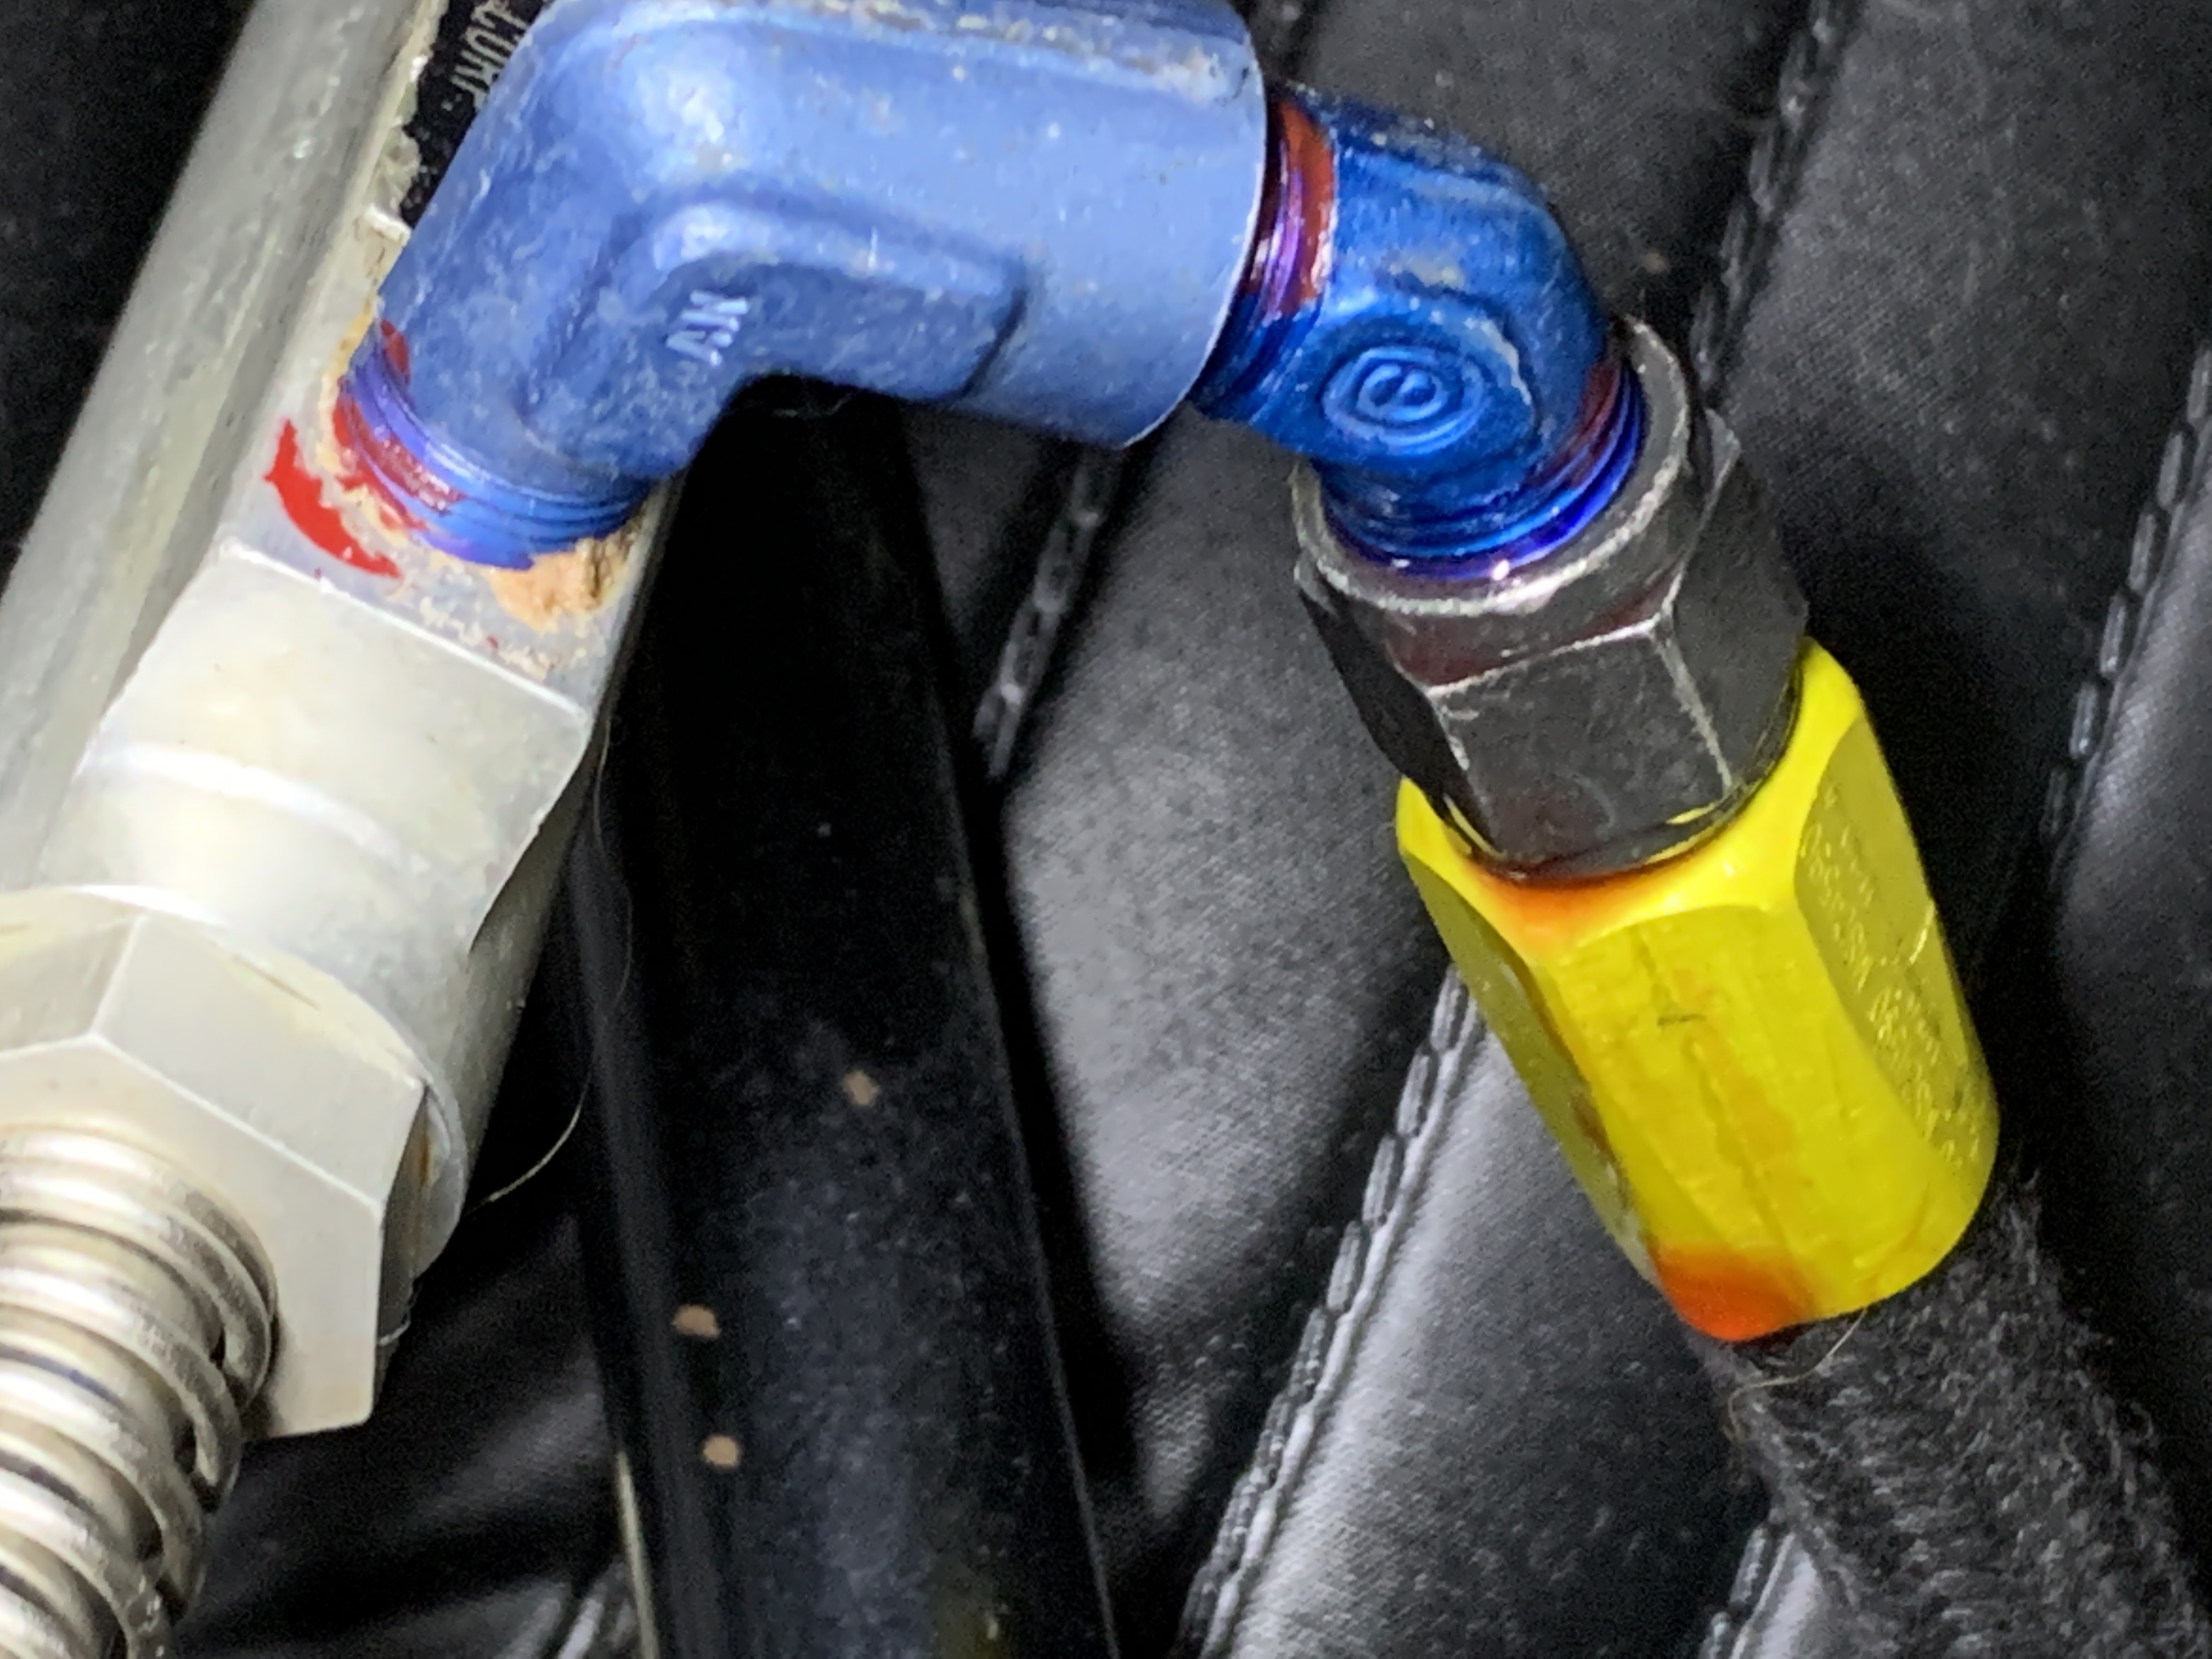
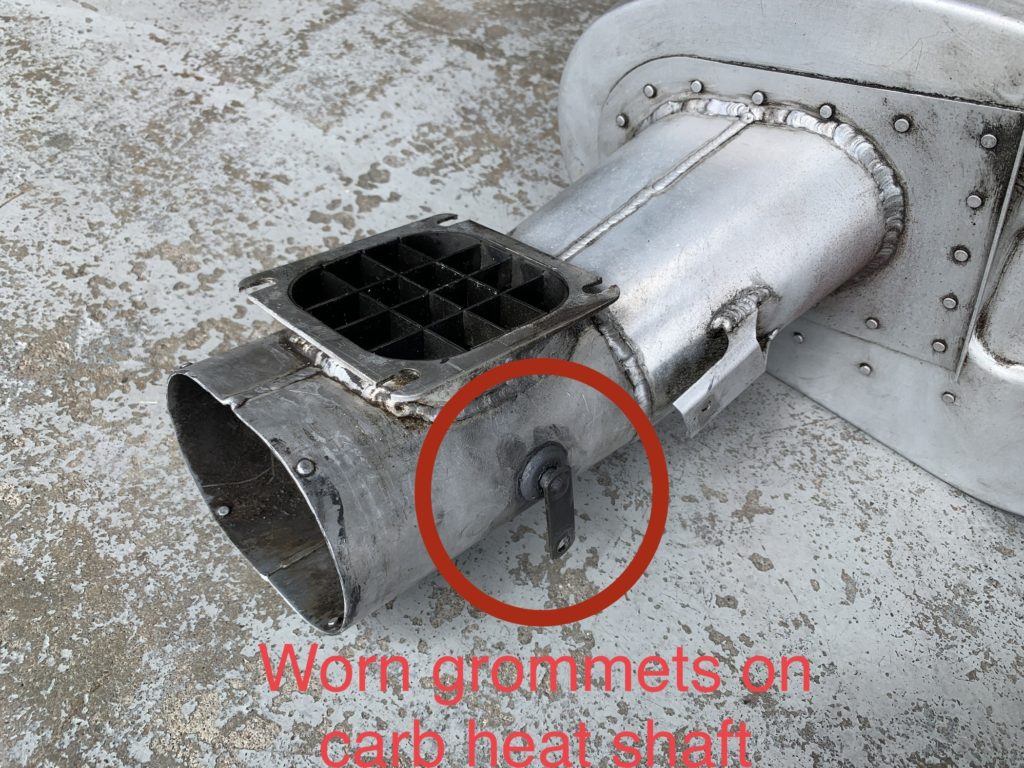
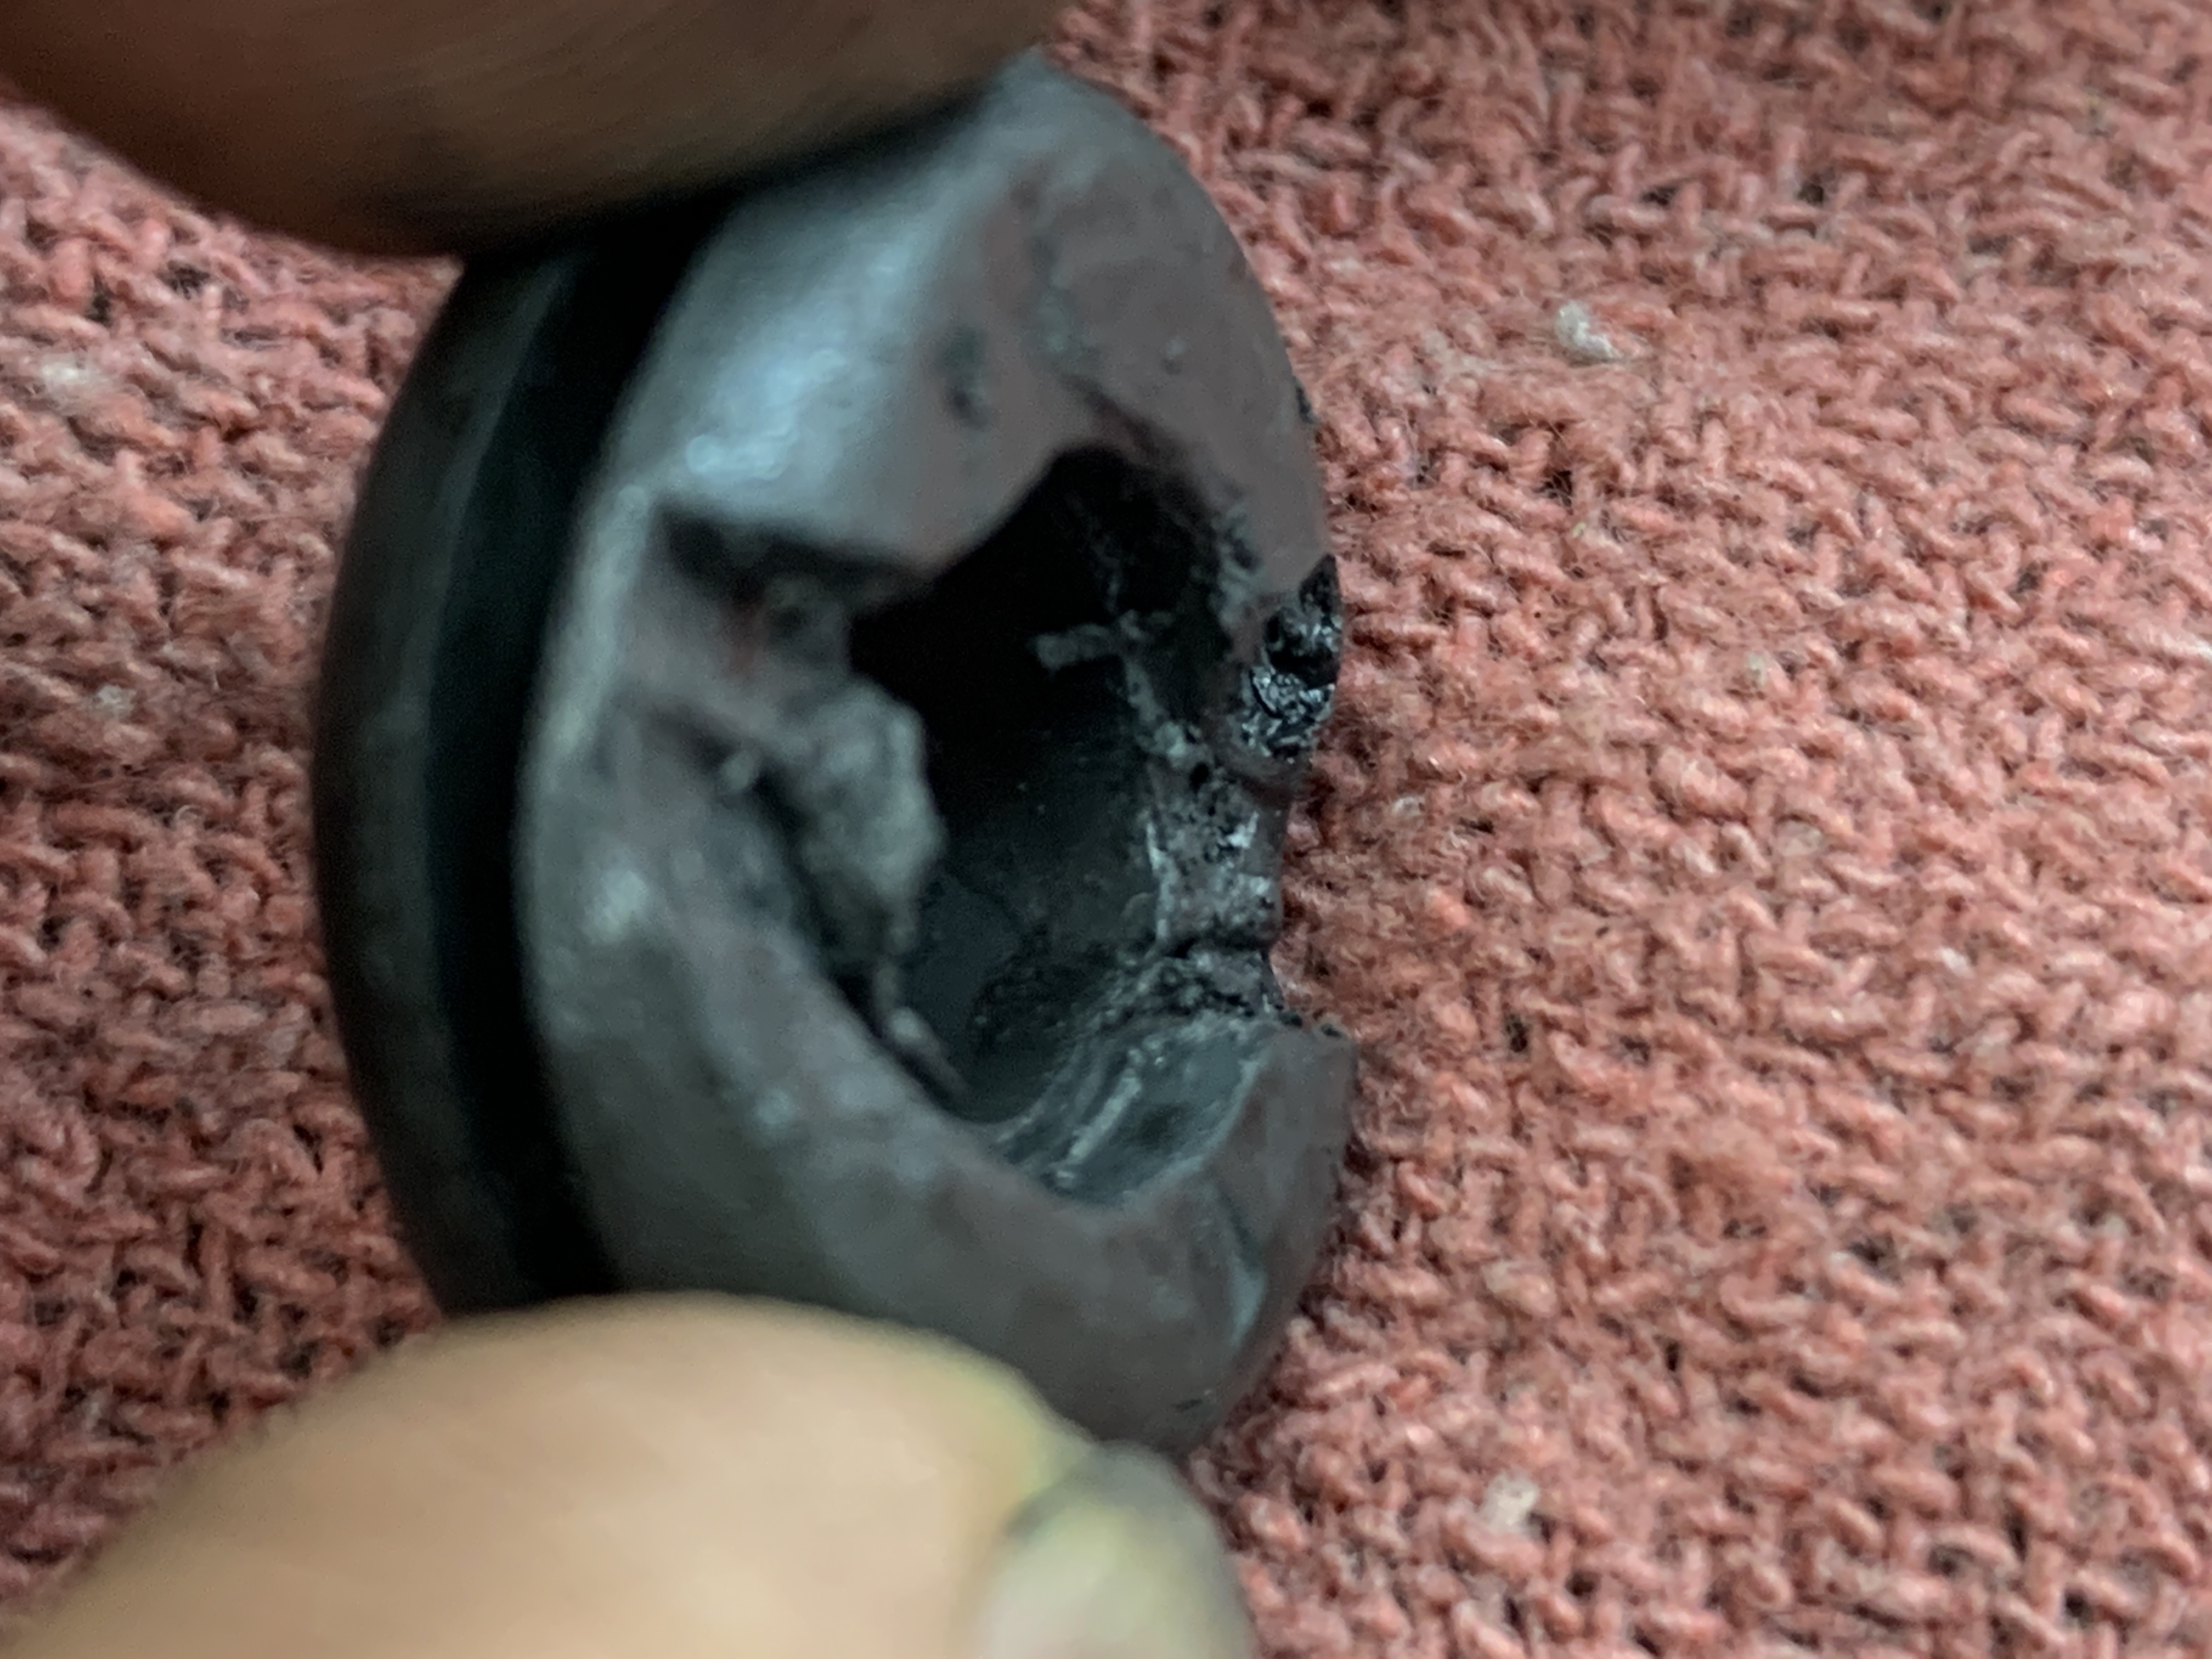
And third, a Piper Archer:
One of the brake hoses was leaking – the nut was only finger tight!
The cabin door hinge pins were worn and the door was hitting the frame when closing. New pins and some shim washers fixed the problem.
The carb heat door shaft grommets were worn:
The left cowling pin bushing bracket was loose:
And finally, the fuel primer nozzle was really dry and stiff:
I always love to discover things on airplanes that need attention.
What about you? Could you benefit from having me look at your airplane? Send me an email to explore the options. dean{at}airplaneownermaintenance{dot}com
Or, go ahead and set up a Facetime consulting call and we can look at your airplane together and discuss any issues you might have:
Schedule a FaceTime call with me in 2 simple steps
Go to my calendar and pick a time spot that’s good for you.
On the scheduled day, I’ll call you and we can discuss and examine your airplane concerns. (Many prefer FaceTime for this.)
Other resources mentioned in this episode:
PilotWorkshop.com – This is a great place to help you stay sharp as a pilot… be sure to sign up to receive the “Tip of the week,” a short, 2 minute or less, valuable tip to make you a better pilot… and it’s free!
The post “154 – If I Looked at YOUR Airplane, What Would I Discover?” appeared first at AirplaneOwnerMaintenance.com
In today’s episode, I’m happy to introduce my good friend, Aram Basmadjian! Aram has a very interesting aviation journey, and it was fun talking with him for this episode.
Aram flew for Skywest Airlines for about 8 years, which was a great foundation for the flying he does today.
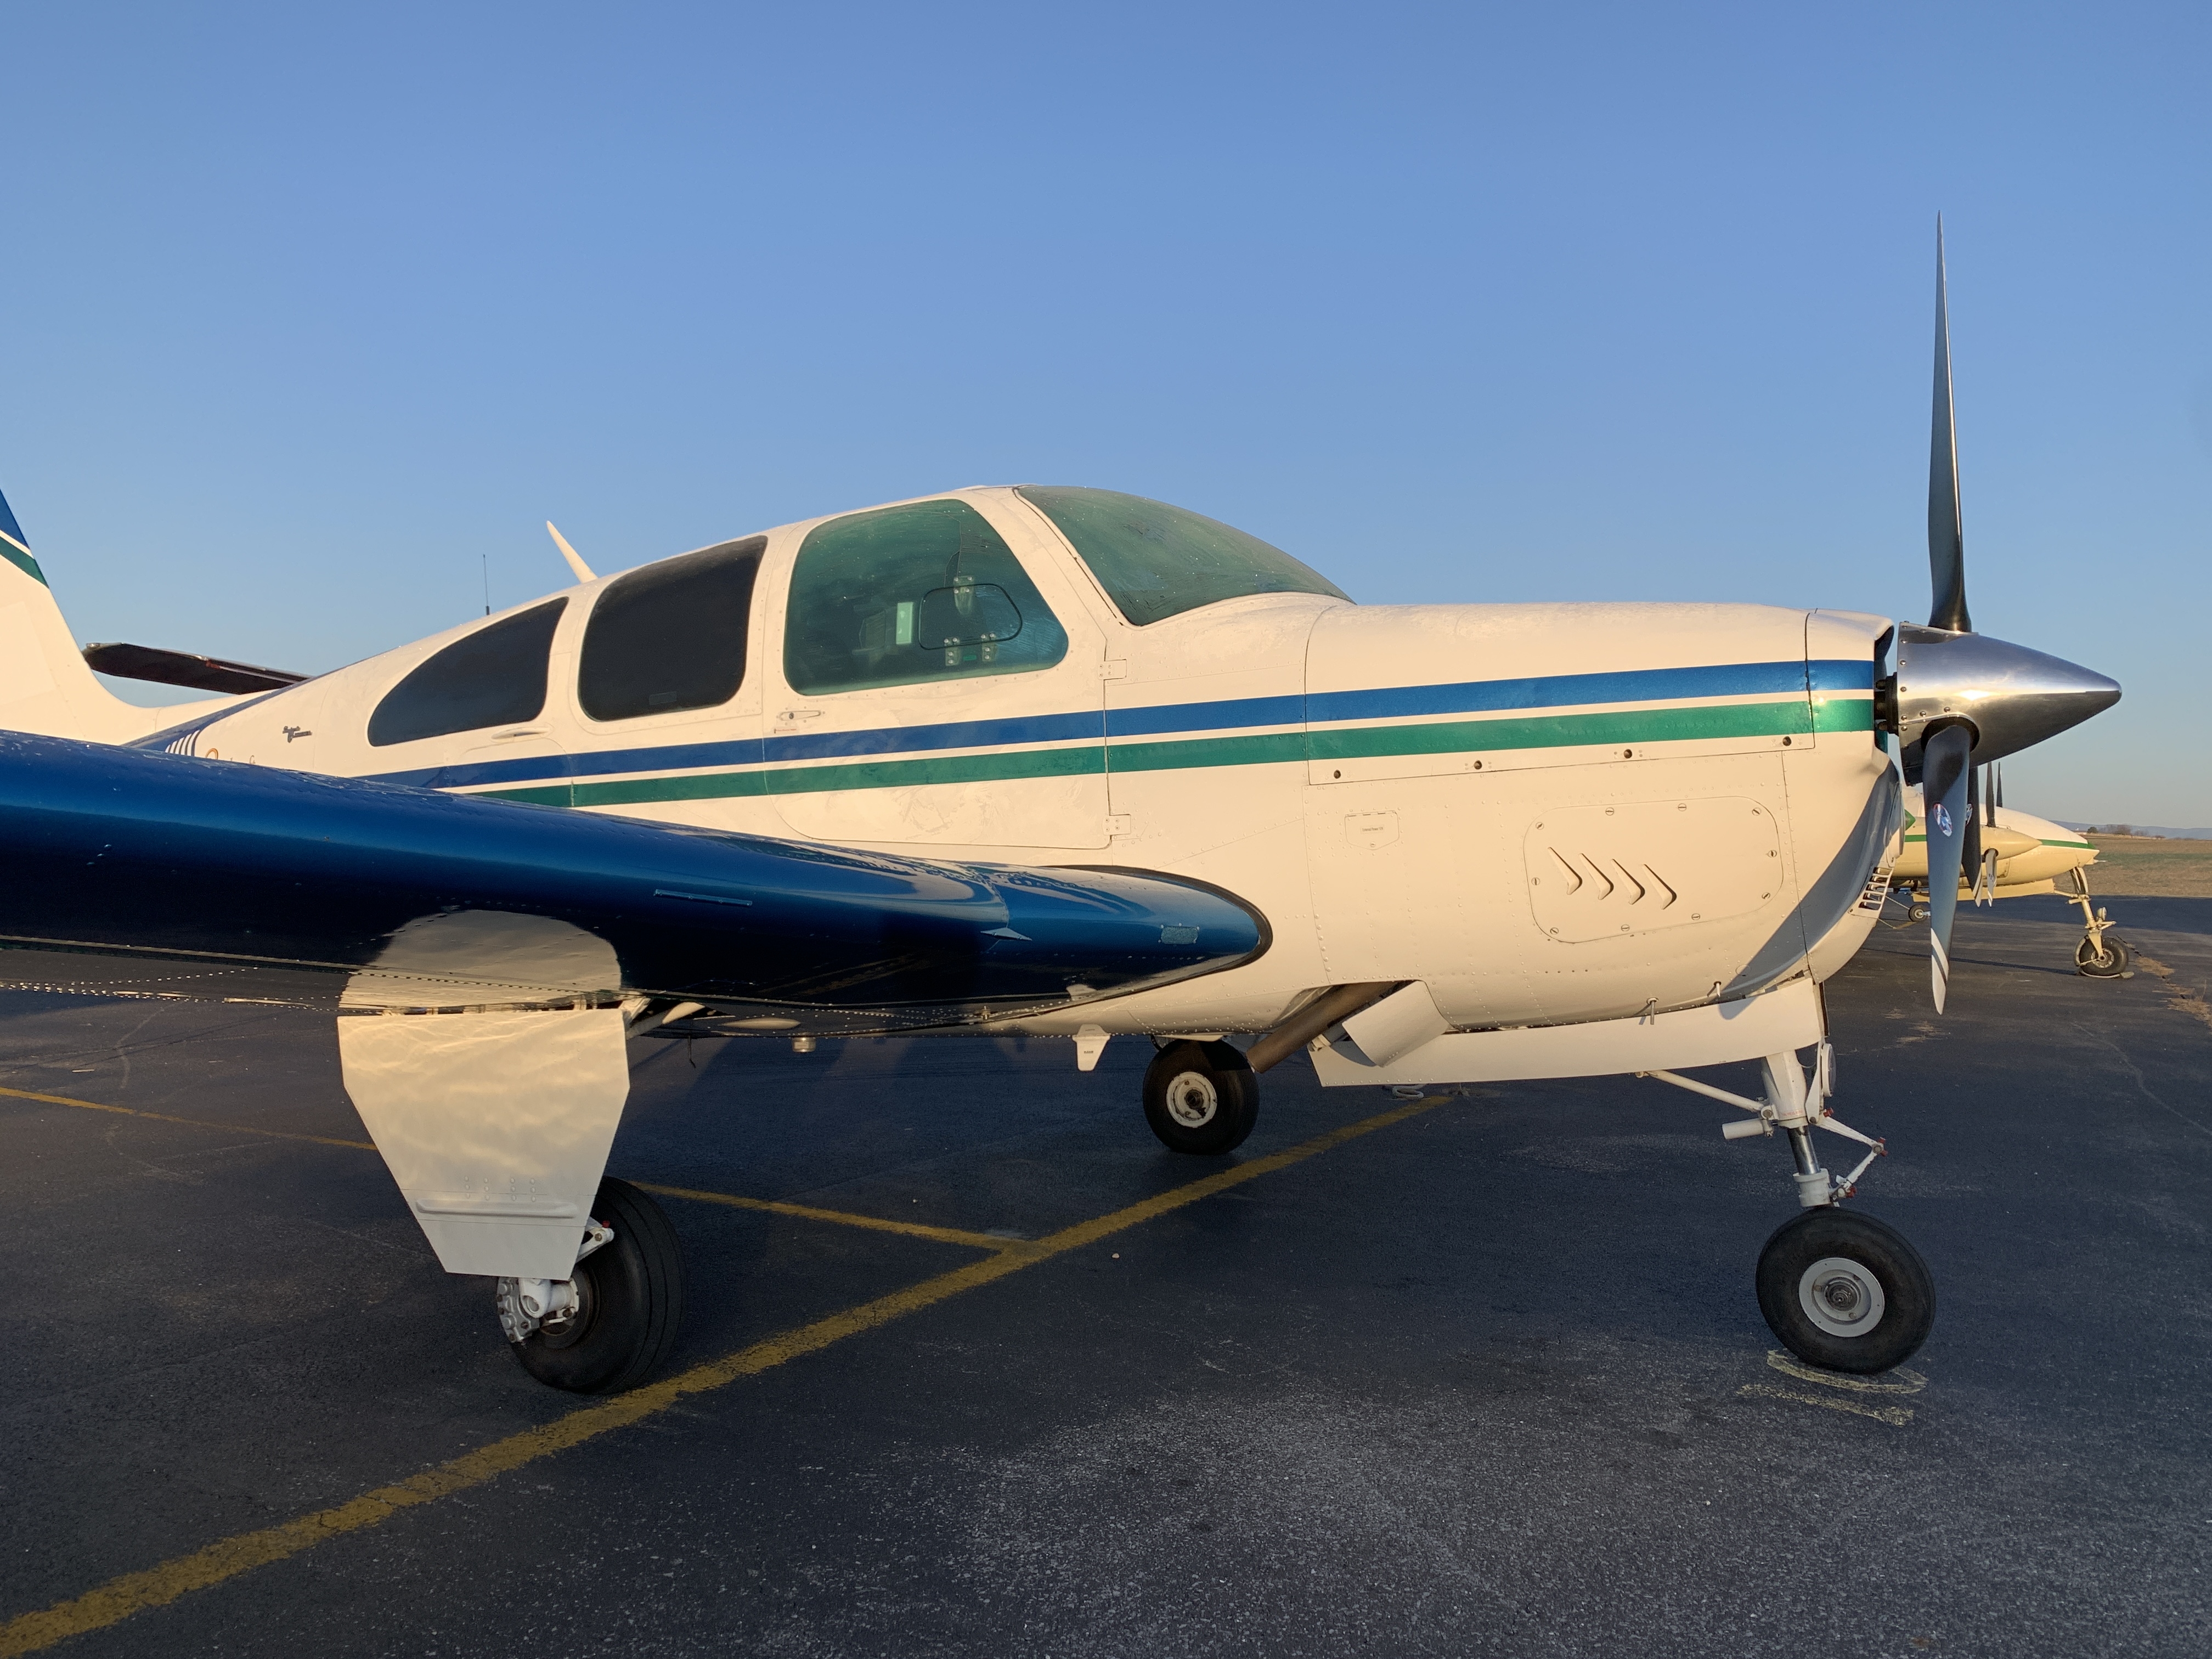
Aram enjoys going places with his wife and daughter in his 1962 P35 Bonanza.
He’s also the chief flight instructor at a local college, which allows him to use his skill and passion for teaching pilots effective procedures for instrument flying.
And one of these days, I’m hoping to make a trip to Pennsylvania to have Aram work me over in the flight simulator!
Aram is also a phenomenal organist, and is Vice President of Sales at Allen Organ Company in Macungie, Pennsylvania. According to the website, “Aram Basmadjian is one of the most accomplished organ virtuosos in America.” Wow, well done Aram!
I heard years ago that musicians many times make really good pilots, and I think that’s certainly true in Aram’s case.
So back to the Bonanza, Aram shared some really great tips and thoughts in this episode, and here are a few highlights:
Be involved in the maintenance of your airplane!
Plane Logix is one good solution for digitizing your maintenance records.
When digitizing your maintenance records, transcribe them yourself because you will learn so much valuable information.
Good quality maintenance is expensive… be prepared for it.
And finally, Aram shared something really interesting about his specific airplane… for the first 200 hours or so of his airplane’s life, Larry Ball’s name is in the records because he flew the airplane. Larry is well known for his time as the “Bonanza Program Manager,” and for his books, “Those Incomparable Bonanzas,” and “They Call Me Mr. Bonanza.”
Very interesting indeed. Everywhere Aram goes, he seems to attract a lot of interest in his Bonanza. It is indeed a great airplane.
Here are some links where you can learn more about Aram along with his Bonanza and his aviation adventures:


Recent Comments